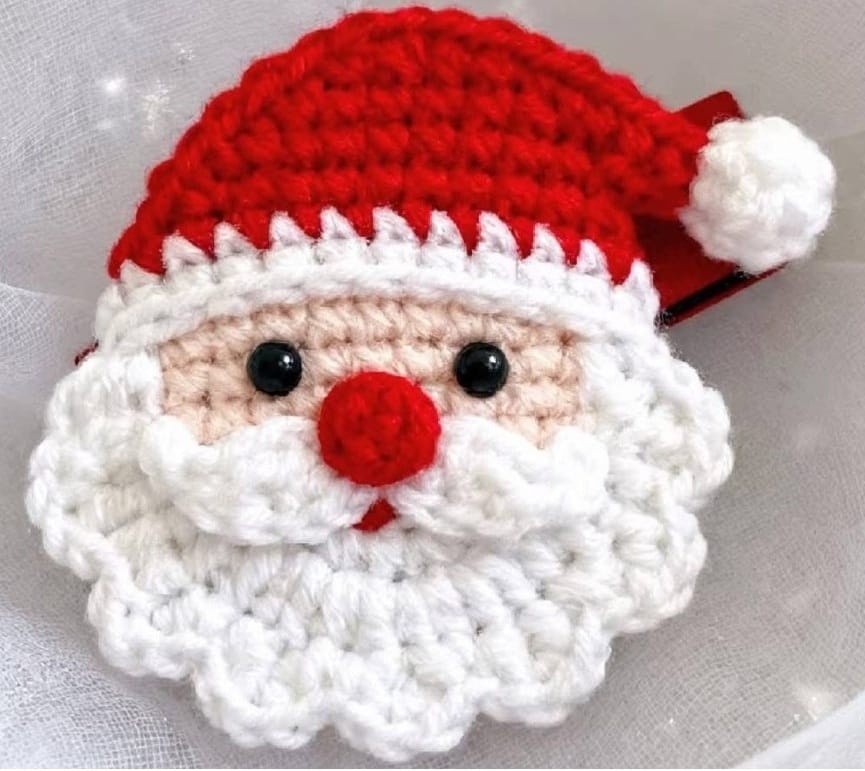
Crochet Santa Claus Applique Pattern is a cheerful holiday crochet project that brings together simple stitches, classic Christmas colors, and a charming Santa face in one small handmade decoration. The design shown in the photo features a rounded red Santa hat, a soft white trim and pom-pom, a peach-colored face, a fluffy white beard, a bright red nose, and small black eyes.
This Crochet Santa Claus Applique Pattern is especially appealing because the finished Santa can be adapted for different purposes. You can attach the applique to a Christmas stocking, blanket, sweater, gift bag, decorative pillow, table runner, holiday basket, or handmade card.
The process begins with choosing suitable yarn and a crochet hook, followed by making the face, hat, beard, nose, eyes, and finishing details. The pattern is designed as a flexible guide inspired by the reference image, so you can adjust the stitch count and yarn weight to create a smaller or larger decoration while keeping the recognizable Santa appearance.
Materials and Tools for the Crochet Santa Claus Applique Pattern
To make your Crochet Santa Claus Applique Pattern, begin with a few basic crochet supplies. You will need yarn in red, white, and a skin-tone or light beige shade for the main components. Black yarn or small safety-style craft eyes can be used for the eyes, while a small amount of red yarn can create the round Santa nose.
Medium-weight yarn is a practical choice for this project because it creates a substantial applique without becoming excessively bulky. If you prefer a smaller decoration, use thinner yarn and a smaller hook. For a larger applique, thicker yarn and a correspondingly larger hook can be used.
Choose a crochet hook that works comfortably with your yarn. A slightly smaller hook than the one normally recommended for the yarn can help create firm stitches, which is useful for an applique that needs to hold its shape. Avoid making the stitches so tight that the fabric becomes difficult to work.
You will also need a yarn needle for sewing the separate pieces together and weaving in the ends. A pair of sharp scissors will help with trimming yarn cleanly. A small amount of stuffing can be useful if you want the red nose or other details to have a slightly raised appearance.
For attaching the finished Crochet Santa Claus Applique Pattern to another project, you can use matching sewing thread or yarn. If the applique will be placed on a frequently handled item, secure stitching around several points of the design will help keep it firmly in place.
Before beginning, decide how large you want your finished Santa to be. The reference image has a compact, rounded shape, making it suitable for small Christmas projects. Making a quick sample with your selected yarn will help you determine whether the hook and tension produce the size you want.
Crocheting the Santa Face, Hat, and Beard
Start the Crochet Santa Claus Applique Pattern with the face. Using the skin-tone yarn, create a small rounded shape with basic crochet stitches worked in joined or continuous rounds. Begin with a small foundation circle and gradually increase the number of stitches so the piece expands evenly.
As you work the face, keep an eye on its shape. You want a rounded or slightly oval piece rather than a sharply angular one. Even tension will help prevent visible bumps and make it easier to attach the beard and hat later.
Once the face reaches the desired width, work a few rounds without increasing. This creates a shallow face shape that provides enough space for the eyes and nose. Finish the piece and leave a yarn tail long enough for sewing if you intend to attach it directly to the main project.
Next, create the red Santa hat. The hat can be made as a simple triangular or rounded cap that sits over the upper portion of the face. Begin with a small number of stitches and increase gradually as the rows progress, creating the wider lower portion of the hat.
The lower edge of the hat should be wide enough to sit comfortably across the top of the face. You can create the distinctive white trim separately and sew it along the bottom edge, or crochet the trim directly onto the hat using white yarn.
For the white trim, work a row of compact stitches and add small raised stitches or loops to imitate the fluffy appearance shown in the reference image. The trim does not have to be perfectly uniform. Slight variations can actually make the handmade Santa look more playful.
The pom-pom at the end of the hat can be made as a small white crocheted ball. Create a tiny rounded piece, add a little stuffing if desired, close the opening, and sew it securely to the tip of the red hat.
Creating the Beard, Facial Details, and Assembly
The beard is the most distinctive feature of this Crochet Santa Claus Applique Pattern. Use white yarn to create a wide textured piece that covers the lower part of the face. The beard can be made with rows of stitches that create a slightly wavy or scalloped lower edge.
To achieve a fluffy appearance similar to the reference photo, consider using textured stitches or small clusters along the beard. You can alternate compact stitches with slightly fuller stitches to create visual depth without making the piece too thick.
Create two smaller white sections for the mustache. These can be worked as small rounded or curved motifs positioned on either side of the nose. The two sections should overlap slightly in the center so that they form a recognizable mustache shape.
For the nose, use red yarn to crochet a tiny rounded ball. A small amount of stuffing can be placed inside before closing the piece. The nose should be large enough to stand out against the light-colored face and white mustache.
The eyes can be created using small black crocheted circles, embroidered black yarn, or appropriately sized craft eyes. If the applique is intended for a project used by young children, embroidered eyes are generally a practical option because they avoid separate small components.
Once all the individual pieces are ready, place them together without sewing first. Position the hat over the top of the face, place the beard along the lower section, and arrange the mustache and nose in the center. This allows you to adjust the proportions before permanently attaching anything.
Sew the pieces together carefully using a yarn needle. Start with the larger components, such as the hat and beard, before attaching the smaller facial details. Keep the stitches on the back of the applique as discreet as possible.
Finishing and Using Your Crochet Santa Claus Applique Pattern
After assembling your Crochet Santa Claus Applique Pattern, inspect the front and back carefully. Check that the hat is securely attached, the beard is positioned evenly, and the facial features are centered. Small adjustments can make a significant difference in the finished appearance.
Weave all remaining yarn tails into the back of the applique. Work the needle through several stitches before trimming the excess. This helps prevent the ends from becoming loose during use or washing.
If your applique looks slightly curled, gently shape it with your fingers. Depending on the yarn, light blocking may also help flatten the piece. Always consider the care instructions for your specific yarn before using heat or moisture.
The finished Santa can be sewn onto a wide variety of handmade projects. Try adding it to a Christmas stocking for a traditional holiday decoration, or attach several Santa faces to a festive blanket or table runner.
You can also use the Crochet Santa Claus Applique Pattern on gift bags and reusable fabric or crochet packaging. A handmade Santa attached to a simple gift bag can turn an ordinary package into a decorative keepsake.
For clothing or accessories, make sure the applique is securely attached and that the yarn and other materials are appropriate for the item. A smaller Santa can work nicely on a winter hat, scarf, tote bag, or holiday sweater.
Another fun option is to create several Santas in different colors and sizes. Try a traditional red and white version, a burgundy Santa, or a pastel holiday palette. You can also change the beard texture or add tiny embroidered details to give each applique its own personality.
FAQ About the Crochet Santa Claus Applique Pattern
Is the Crochet Santa Claus Applique Pattern suitable for beginners?
Yes. The project can be adapted for beginners because most of the shapes are small and use basic crochet techniques. The facial details and beard require some additional assembly, but you can work slowly and adjust each piece before sewing it together.
What yarn is best for this Santa applique?
Medium-weight cotton or acrylic yarn can work well. Cotton creates defined stitches and a structured appearance, while acrylic yarn can provide a softer and lighter finish. Choose yarn that is comfortable to crochet and suitable for the project where the applique will be used.
Can I make the Santa smaller?
Yes. Use thinner yarn and a smaller crochet hook, or reduce the number of rounds in the face and hat. Creating a small sample first is helpful because the exact finished size will depend on your yarn, hook, and tension.
Can I make a larger Santa?
Absolutely. Thicker yarn and a larger hook will increase the size. You can also add additional rounds to the face and adjust the hat and beard accordingly.
How do I make the beard look fluffy?
Textured stitches, clusters, loops, and scalloped edges can all create a fluffy effect. You can experiment with different stitch combinations until you find a texture that resembles the soft beard in the reference image.
Can the eyes be crocheted instead of using craft eyes?
Yes. Small black crochet circles or embroidered eyes are excellent alternatives. Embroidery also gives you more control over the size and expression of the finished Santa.
How can I attach the applique to a blanket?
Position the finished Santa on the blanket and use a yarn needle with matching yarn to sew around the perimeter. Add a few stitches through larger interior sections if necessary, but avoid pulling the applique too tightly.
Can I use this design on Christmas stockings?
Yes. The rounded Santa face makes a charming decoration for a handmade stocking. Make sure the applique is securely sewn to the stocking before the item is used.
Can I change the colors?
Definitely. Although red, white, beige, and black create the traditional Santa appearance, you can experiment with different shades. Dark red, cream, green, gold, or pastel colors can produce a unique holiday style.
How do I make the pom-pom?
A tiny crocheted sphere is one option. You can also create a small yarn pom-pom and sew it firmly to the tip of the hat. Keep the pom-pom proportional to the size of the applique.
Can I make the beard from a separate piece?
Yes. A separate beard is actually convenient because it allows you to adjust its size and texture before attaching it to the face. It can also make the applique easier to customize.
What other projects can use this applique?
The Crochet Santa Claus Applique Pattern can decorate stockings, blankets, scarves, hats, tote bags, gift bags, pillows, holiday baskets, table decorations, and other seasonal handmade projects.
Conclusion
The Crochet Santa Claus Applique Pattern is a fun and versatile holiday crochet project that combines simple shapes with charming details. The rounded face, red Santa hat, fluffy white beard, small mustache, bright nose, and expressive eyes create a recognizable Christmas character that can be added to many handmade projects.
The main steps are choosing suitable yarn, crocheting the face and hat, creating the white trim and pom-pom, shaping the beard and mustache, adding the facial details, and sewing all the components together securely. Taking time to arrange the pieces before attaching them will help you achieve balanced proportions.
One of the greatest advantages of this Crochet Santa Claus Applique Pattern is its versatility. You can change the size, colors, facial expression, beard texture, or hat style to create a Santa that matches your own holiday aesthetic. Once you are comfortable with the basic construction, you can experiment with several variations and create an entire collection of festive appliques.
If you make this project, leave your honest opinion and suggestions about the pattern. Your experience, creative variations, and ideas can help other crochet enthusiasts discover new ways to use this cheerful Santa design in their own Christmas projects.