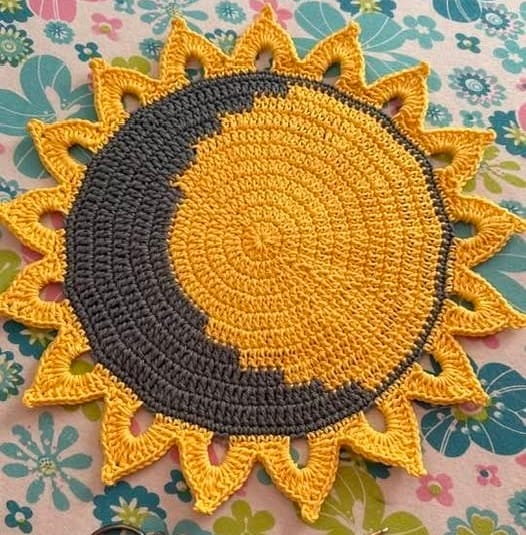
Crochet Eclipse Placemat Pattern is a creative crochet project inspired by the striking beauty of a solar eclipse. The circular placemat shown in the photo combines two contrasting colors to represent the dramatic transition between light and shadow, while the decorative pointed border resembles radiant sun rays.
One of the most attractive features of this Crochet Eclipse Placemat Pattern is its combination of simplicity and visual impact. The center is worked in continuous circular rounds, making it suitable for crocheters who enjoy relaxing repetitive stitches, while the final decorative edging introduces texture and movement.
In this tutorial, you will learn how to create a placemat inspired by the design shown in the image. From selecting the right yarn and hook to crocheting the circular base, changing colors smoothly, creating the eclipse effect, and finishing with the beautiful sun-ray border, every step contributes to a functional and decorative handmade project.
Materials and Tools for the Crochet Eclipse Placemat Pattern
To begin your Crochet Eclipse Placemat Pattern, select a durable cotton yarn. Cotton is an excellent choice for placemats because it is sturdy, holds its shape well, and is suitable for everyday use. It also provides excellent stitch definition, allowing the circular design and decorative border to stand out clearly.
Choose two contrasting colors for the eclipse effect. The sample shown in the image uses a bright golden yellow paired with a deep charcoal gray. This combination creates a dramatic visual contrast that closely resembles the appearance of a solar eclipse. However, you can also experiment with navy blue and cream, black and gold, terracotta and beige, or any colors that complement your dining space.
A crochet hook suitable for your yarn weight is essential. Most medium-weight cotton yarns work well with hooks between 4.0 mm and 5.0 mm, although you should always check the yarn label for recommendations. Using a slightly smaller hook can help create a firm fabric that lies flat on the table.
Additional supplies include a yarn needle for weaving in ends, sharp scissors, stitch markers to identify the beginning of each round, and a measuring tape. These simple tools make the construction process more organized and help maintain consistent sizing throughout the project.
Before beginning, decide on the finished diameter of your placemat. The sample appears large enough for a dinner plate and utensils, but you can easily increase or decrease the number of rounds to create placemats, centerpieces, or decorative doilies in different sizes.
Finally, make a small practice swatch if you are using unfamiliar yarn. This allows you to check your tension and ensure that your stitches are consistent before starting the full Crochet Eclipse Placemat Pattern.
Crocheting the Circular Eclipse Base
The foundation of the Crochet Eclipse Placemat Pattern begins with a magic ring or adjustable loop. This technique creates a tightly closed center and gives the placemat a clean, professional appearance. Work the first round into the ring using your chosen stitch, keeping the stitches evenly spaced.
Continue increasing in each round to maintain a flat circle. Even increases are important because they prevent the placemat from curling or developing unwanted waves. Use stitch markers if necessary to identify the beginning of each round and keep your counting accurate.
As the circle grows, continue crocheting with the yellow yarn until the desired portion of the eclipse has been completed. The yellow area represents the illuminated section of the sun, creating the bright focal point of the design.
To create the eclipse effect, introduce the second color gradually. Instead of making a perfectly straight division, shape the gray section with gentle curves that mimic the shadow crossing the sun. This curved transition gives the placemat a much more natural and artistic appearance.
When changing colors, complete the final yarn-over of the last stitch using the new color. This creates a smoother transition and minimizes visible gaps between the two sections. Continue working carefully to maintain consistent stitch tension across the color change.
As you complete additional rounds, the contrast between the yellow and gray becomes more dramatic. The circular shape remains intact while the overlapping colors create the illusion of a celestial event. Keep checking that the placemat remains flat by laying it on a smooth surface after every few rounds.
Before adding the decorative edging, inspect the circle carefully. If the edges begin to ripple, slight adjustments to your tension may help. A flat, even base is essential because it provides the foundation for the striking sun-ray border.
Creating the Sun-Ray Border
The decorative edging is what transforms the Crochet Eclipse Placemat Pattern into a truly distinctive design. Inspired by the rays of the sun, the pointed border frames the circular center and creates an elegant finish that immediately draws attention.
Begin the border by joining the yellow yarn around the outer edge of the circle. Work a preparation round if necessary to ensure an even number of stitches before beginning the pointed motifs. Consistent stitch placement will help each ray appear symmetrical.
Each sun ray can be formed by combining chain stitches with taller crochet stitches that gradually increase and decrease in height. This technique creates a pointed triangular shape. Once one ray is complete, repeat the same sequence around the entire circumference.
Spacing is important for achieving a balanced appearance. Count your stitches carefully so that every point is evenly distributed around the circle. Uniform spacing creates a professional finish and highlights the geometric beauty of the design.
As you complete each point, gently shape it with your fingers before moving to the next one. If desired, lightly block the finished placemat after completion to enhance the crisp appearance of the rays and ensure that every point lies neatly.
The yellow edging creates a striking contrast against the darker eclipse section while visually connecting with the bright center. This combination reinforces the celestial theme and gives the placemat its signature appearance.
After the final ray has been completed, join the last stitch neatly to the beginning of the border. Weave in the remaining yarn tails securely using a yarn needle, taking care to hide them between the stitches so they are not visible from the front.
Finishing and Styling Your Crochet Eclipse Placemat Pattern
Once your Crochet Eclipse Placemat Pattern is complete, inspect the entire piece for loose ends or uneven stitches. A careful final inspection allows you to correct small imperfections before using the placemat regularly.
If your placemat curls slightly after crocheting, gentle blocking can improve its shape. Lightly dampen the finished piece, place it on a flat surface, shape the circular edge and sun rays evenly, and allow it to dry completely. This process helps the placemat maintain its intended appearance.
The finished placemat can be used for everyday meals or reserved for special occasions. Its bold design makes it suitable for modern dining tables, seasonal displays, or themed table settings inspired by astronomy and nature.
This project also makes an excellent handmade gift. Create a coordinated set of four or six placemats using the same colors, or personalize each placemat with different eclipse-inspired color combinations. Handmade table accessories are thoughtful gifts for birthdays, housewarmings, weddings, and holiday celebrations.
If you enjoy experimenting with crochet, consider adapting the same construction into matching coasters, table runners, or decorative centerpieces. Using the same eclipse motif throughout your dining collection creates a cohesive and elegant handmade look.
Another creative variation is to replace the traditional eclipse colors with seasonal palettes. Warm oranges and reds create an autumn-inspired version, while blues and silvers produce a moonlit appearance. The flexibility of the Crochet Eclipse Placemat Pattern allows endless opportunities for personalization.
With proper care, a cotton crochet placemat can remain beautiful for many years. Gentle washing according to the yarn manufacturer’s recommendations and careful storage will help preserve the shape, color, and texture of your handmade project.
FAQ About the Crochet Eclipse Placemat Pattern
Is the Crochet Eclipse Placemat Pattern suitable for beginners?
Yes. The circular base uses basic crochet techniques, making it accessible to beginners who are comfortable working in rounds. The decorative border requires a little more attention but becomes repetitive after the first few points.
What yarn works best for this placemat?
Cotton yarn is highly recommended because it is durable, washable, and maintains its shape well. Cotton also provides excellent stitch definition, making the eclipse design more visible.
Can I make the placemat larger?
Absolutely. Simply continue adding rounds before beginning the decorative border. Keep increasing evenly so the circle remains flat throughout the project.
How do I create the eclipse effect?
The eclipse appearance comes from combining two contrasting colors in a curved overlapping section. Careful color changes and smooth shaping create the illusion of shadow passing across the sun.
Can I use different colors?
Yes. Although yellow and gray closely resemble the reference image, you can experiment with any contrasting color combination that suits your personal style or home décor.
Why is my placemat curling?
Curling usually indicates that the circle needs more increases or that the crochet tension is too tight. Laying the work flat after every few rounds helps identify this issue early.
Can I use this pattern for a centerpiece?
Certainly. By increasing the diameter, the same design can become an attractive decorative centerpiece for dining or coffee tables.
How do I keep the sun rays even?
Count stitches carefully between each point and repeat the same stitch sequence consistently. Blocking the finished placemat can also improve the symmetry of the rays.
Can I make matching accessories?
Yes. The same eclipse motif can be adapted into coasters, mug rugs, trivets, table runners, or decorative wall hangings for a coordinated handmade collection.
How should I wash the finished placemat?
Follow the care instructions for your chosen yarn. Cotton placemats are generally easy to maintain and can often be gently washed and reshaped while drying.
Conclusion
The Crochet Eclipse Placemat Pattern is a beautiful crochet project that combines artistic inspiration with everyday practicality. Its circular construction, dramatic eclipse color contrast, and elegant sun-ray border create a unique table accessory that stands out in any dining setting.
The project begins with a carefully crocheted circular base, followed by the smooth transition between contrasting colors that forms the eclipse effect. The decorative pointed edging completes the design by representing the radiant energy of the sun. With careful stitch placement, consistent tension, and thoughtful finishing, the result is a striking handmade placemat suitable for everyday use or special occasions.
One of the greatest strengths of the Crochet Eclipse Placemat Pattern is its versatility. By changing the yarn colors, adjusting the size, or modifying the border style, you can create a completely personalized version while preserving the celestial inspiration that makes this design so memorable.
If you decide to make your own Crochet Eclipse Placemat Pattern, leave your honest opinion and suggestions about the project. Your ideas and creative variations may inspire other crochet enthusiasts to explore new color combinations, border designs, and ways to personalize this beautiful handmade placemat.