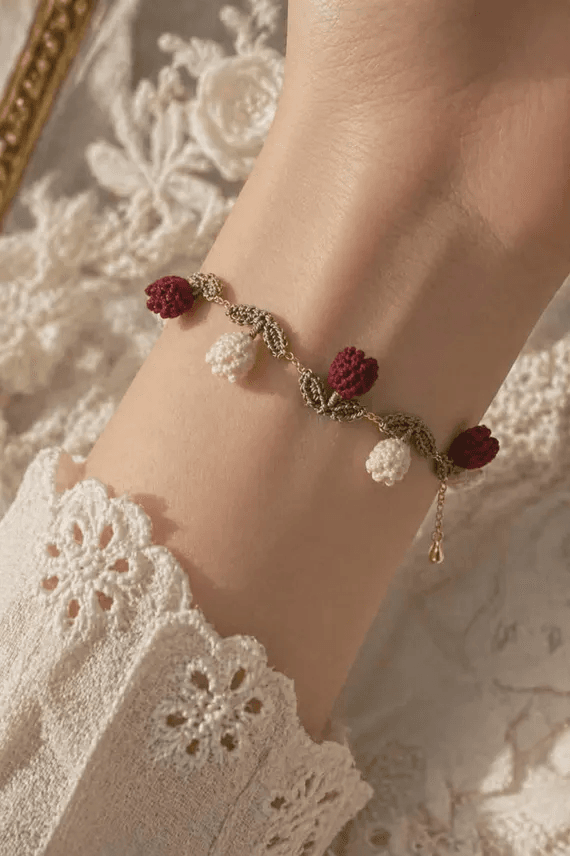
Crochet Tulip Bracelet Pattern is a delicate handmade jewelry project that combines tiny crocheted flowers with a graceful bracelet design. Inspired by the soft and romantic bracelet shown in the photo, this project features small tulip-like blossoms in burgundy and cream, connected by delicate green crochet stems.
The beauty of this Crochet Tulip Bracelet Pattern comes from its small details. Instead of making one large crochet flower, the design uses miniature floral motifs positioned along a fine crocheted chain. The flowers create the main decorative element, while the green stems and leaves connect everything into a botanical arrangement.
This tutorial explains how to create a similar bracelet step by step, from choosing your thread and crochet hook to forming the tiny flowers, creating the connecting vine, attaching the motifs, and finishing the closure. Because miniature crochet requires precision, working with suitable thread and maintaining consistent tension will help you achieve a neat result.
Materials and Tools for the Crochet Tulip Bracelet Pattern
To begin your Crochet Tulip Bracelet Pattern, choose a fine crochet thread rather than bulky yarn. Cotton crochet thread is particularly suitable because it creates defined stitches and allows the tiny flowers to retain their shape. A smooth thread will also make it easier to work small details without excessive fuzziness.
For the flowers, choose two colors that complement each other. The reference bracelet uses a deep red or burgundy shade together with cream or white flowers. You can follow that combination or experiment with pink, lavender, yellow, coral, or soft blue. Using two flower colors creates visual variety while keeping the bracelet cohesive.
For the stems and leaves, choose a fine green thread. A muted green can create a vintage botanical appearance, while a brighter green produces a more cheerful design. If you prefer a minimalist bracelet, you can use the same color for all the flowers and keep the green elements subtle.
A small crochet hook appropriate for your chosen thread will be necessary. The exact hook size depends on the thread, so check the manufacturer’s recommendation and make a small test motif first. The goal is to create firm, compact stitches rather than loose loops.
You will also need a needle with an eye large enough for your crochet thread, scissors, a measuring tape, and a small bracelet clasp or closure. A few jump rings can be useful if you want to connect a commercial clasp to the crocheted chain.
Before starting, measure the wrist where the bracelet will be worn. Add a little extra length for comfort and for the closure. It is much easier to adjust the bracelet before all the flowers have been permanently attached.
How to Crochet the Tiny Tulip Flowers
The first major step in the Crochet Tulip Bracelet Pattern is creating the miniature flowers. Since the flowers are small, work slowly and keep your stitches consistent. Tiny crochet motifs can become uneven if the tension changes significantly from one flower to another.
Start by forming a small adjustable loop or foundation ring with your flower-colored thread. Work a series of compact stitches into the ring according to the shape you want for your tulip. The flower in the reference has a rounded, textured appearance rather than a completely flat blossom.
To create a simple miniature tulip shape, you can build the center with compact stitches and then form several slightly raised sections around it. These sections give the flower a softly rounded silhouette. The exact number of stitches can be adjusted according to the thickness of your thread and the size of flower you prefer.
Once the flower reaches the desired size, close the round carefully. Leave a short thread tail so you can use it later to attach the flower securely to the bracelet. Avoid cutting the tail too short because having enough thread makes finishing much easier.
Repeat the process to create several flowers. Making the flowers in batches is often easier than completing one entire bracelet section at a time. You can create all the burgundy flowers first, followed by the cream flowers, and then arrange them together before attaching anything.
Lay the finished flowers on a flat surface and experiment with the arrangement. In the reference design, the blossoms are spaced along the bracelet rather than placed directly next to one another. Alternating colors can produce a balanced floral pattern.
If some flowers look slightly different from others, do not worry. Handmade crochet naturally has small variations. However, try to keep the general size consistent so that the finished bracelet looks intentionally coordinated.
Creating the Green Vine, Stems, and Leaves
The connecting vine gives the Crochet Tulip Bracelet Pattern much of its botanical character. Use your green crochet thread to create a narrow chain that will form the foundation of the bracelet. Measure the chain against the wrist as you work.
Make the foundation chain slightly shorter than the total desired bracelet length if you plan to add a clasp and extension chain. It is better to leave room for adjustment than to make the finished bracelet too tight.
Once the foundation chain is complete, work small stitches along it to create a more substantial vine. A combination of chain stitches and slip stitches can create a delicate appearance while keeping the bracelet flexible.
For the leaves, make small pointed shapes at selected positions along the vine. One simple approach is to work a few chain stitches and then return along them with slip stitches or compact stitches, creating a narrow leaf shape.
The leaves do not need to be identical. Slight variations can make the bracelet look more natural and handmade. Keep them relatively small so they do not overwhelm the miniature flowers.
Position the leaves between the flowers. In the reference bracelet, the green vine appears to weave gently between the blossoms, creating a continuous floral arrangement. Try to avoid placing every flower at exactly the same distance because a slightly organic arrangement can look more natural.
After creating the vine, check its length again against the wrist. Make any adjustments before attaching the flowers permanently. This is an important stage because adding or removing length later may require repositioning several motifs.
Attaching the Flowers and Finishing the Bracelet
Once the flowers and green vine are ready, begin assembling your Crochet Tulip Bracelet Pattern. Arrange the flowers according to the layout you selected earlier. Place the blossoms on top of the vine and check their spacing before sewing them into place.
Use the thread tails from each flower to attach the motifs securely to the green foundation. If the tails are not long enough, use a small amount of matching thread and a fine needle. Make several discreet stitches through the back of each flower.
Avoid pulling the thread too tightly. Excessive tension can cause the flower to become distorted or make the bracelet curl. The flowers should remain slightly dimensional while still being securely connected to the vine.
Continue attaching the flowers one at a time. Alternate burgundy and cream blossoms if you want an appearance similar to the reference image. You can also create groups of the same color for a different visual effect.
After all the flowers are attached, weave the remaining thread ends through the back of the stitches. Trim the excess carefully. Check each flower and leaf to make sure no loose ends remain.
Now prepare the closure. A small jewelry clasp can be attached to one end of the bracelet with a jump ring, while a short extension chain can be attached to the opposite end. This arrangement makes it easier to adjust the bracelet for a comfortable fit.
Before wearing the finished bracelet, gently check every connection point. Make sure the clasp is secure and that the flowers do not pull away from the vine when the bracelet is handled. If a motif feels loose, reinforce it with a few additional stitches.
Your Crochet Tulip Bracelet Pattern is now complete. The finished accessory should have a delicate botanical appearance, with miniature flowers surrounded by green stems and leaves. The lightweight design makes it particularly suitable for adding a subtle handmade detail to an outfit.
FAQ About the Crochet Tulip Bracelet Pattern
Is the Crochet Tulip Bracelet Pattern suitable for beginners?
Yes, although miniature crochet can require more patience than larger projects. Beginners who are comfortable with basic crochet stitches can start with a simple version and gradually work toward more detailed flowers and leaves.
What type of thread should I use?
Fine cotton crochet thread is a good option because it produces crisp stitches and allows you to create small motifs. Choose a thread that works comfortably with your crochet hook and does not split excessively.
Can I make the flowers larger?
Absolutely. Increasing the number of stitches or using thicker thread will produce larger flowers. If you make the flowers larger, remember to increase the bracelet’s foundation and spacing so the design remains balanced.
How many flowers should the bracelet have?
There is no fixed number. The number depends on the bracelet length and the size of your flowers. The reference design uses several small flowers distributed along the vine, but you can use fewer or more according to your preference.
Can I use different flower colors?
Yes. You can create a monochromatic bracelet or combine several colors. Pastel shades can produce a soft appearance, while stronger colors can make the flowers stand out more clearly.
How do I make the bracelet fit different wrist sizes?
Measure the intended wrist before beginning and add enough length for the closure. An extension chain is particularly useful because it provides several adjustment points.
Can I make matching accessories?
Yes. The same miniature flowers can be used to create matching earrings, necklaces, hair accessories, decorative pins, or small charms. Keeping the same colors throughout can create a coordinated set.
Why do my tiny flowers look uneven?
Miniature crochet is sensitive to tension. Try to keep your stitches consistent and use the same hook and thread throughout. Blocking the finished motifs gently can also help improve their shape.
How can I keep the flowers securely attached?
Use the thread tails to sew each flower firmly to the vine. Several small stitches distributed across the back of the flower are generally more secure than one large stitch.
Can I replace the crochet closure with a button?
Yes. A small button and crocheted loop can provide an attractive handmade alternative to a metal clasp. Make sure the loop is appropriately sized so the bracelet can be fastened comfortably.
Can this pattern be adapted for children?
The design can be adapted in size, but small jewelry components can present a safety concern for young children. Any handmade accessory intended for a child should be age-appropriate and checked carefully for secure construction.
Conclusion
The Crochet Tulip Bracelet Pattern is a charming project that brings together miniature crochet flowers, delicate vines, tiny leaves, and a simple jewelry closure. The result is a handmade accessory inspired by nature and suitable for anyone who enjoys detailed crochet work.
The key stages are creating the small flowers, crocheting the green foundation, adding the leaves, arranging the floral motifs, securely attaching each component, and finishing the bracelet with an adjustable closure. Taking your time with each small element will help produce a cleaner and more consistent final result.
One of the best features of this project is its versatility. You can change the flower colors, adjust the bracelet length, make larger or smaller blossoms, or create a completely different floral arrangement. It is also a wonderful way to experiment with fine crochet thread and use basic stitches in a creative project.
If you make your own Crochet Tulip Bracelet Pattern, share your honest opinion and suggestions about the project. Your ideas may help other crochet enthusiasts discover new color combinations, variations, and ways to personalize this delicate handmade bracelet.