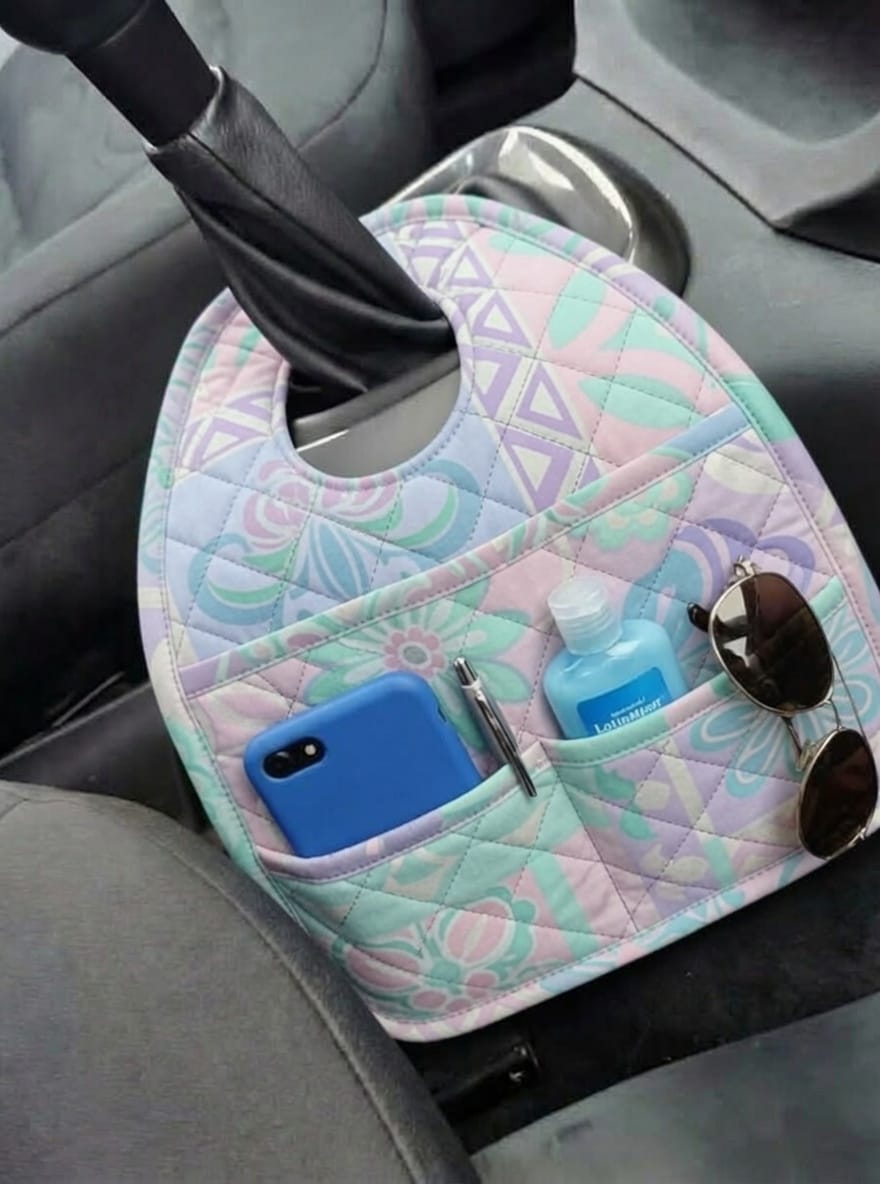
Quilted Car Organizer Pattern is a practical sewing project designed to bring more organization to your vehicle while giving you an opportunity to use beautiful fabrics and quilting techniques. Inspired by the organizer shown in the reference photo, this project features a quilted body, a rounded hanging section, and convenient front pockets that can hold small everyday items.
A handmade Quilted Car Organizer Pattern can be customized in many ways. You can choose traditional cotton prints, coordinated solids, floral fabrics, geometric patterns, or even leftover pieces from previous quilting projects. The organizer shown in the photo has warm earthy colors and decorative quilting, but the same basic construction can be adapted to almost any color palette.
In this tutorial, you will learn how to create a similar Quilted Car Organizer Pattern from beginning to end. The process includes choosing the materials, cutting the fabric, preparing the quilted layers, constructing the pockets, shaping the upper opening, creating the hanging loop, assembling the organizer, and finishing the edges.
Materials and Tools for the Quilted Car Organizer Pattern
To begin your Quilted Car Organizer Pattern, choose a medium-weight woven cotton for the exterior. Cotton is easy to cut and sew, and it works particularly well for quilting. A tightly woven fabric will also give the finished organizer a neat appearance and make it easier to maintain.
For the exterior, prepare enough fabric for two main panels measuring approximately 10 inches wide by 12 inches high. These dimensions are only a suggested starting point. Before cutting, measure the area where you intend to place the organizer and adjust the size if necessary.
You will also need matching or coordinating fabric for the lining. Cut two pieces using the same approximate dimensions as the exterior. A contrasting lining can add a fun detail, while a coordinating solid can create a more understated finish.
Batting is another important component. It provides the soft quilted texture and gives the organizer additional body. Lightweight cotton batting or an appropriate fusible fleece can work well. Avoid excessive thickness because bulky layers can make curved seams and pockets harder to sew accurately.
For the front pockets, prepare one or more pieces of fabric approximately 10 inches wide by 6 inches high. You can make one large pocket or divide it into several compartments. The reference design demonstrates how multiple pockets can create convenient spaces for smaller belongings.
Basic tools include a sewing machine, rotary cutter or fabric scissors, cutting mat, quilting ruler, iron, pins or clips, fabric marker, and coordinating thread. A walking foot can be helpful when quilting several layers, although it is not absolutely necessary for simple straight-line quilting.
Cutting and Preparing Your Fabric
Accurate cutting is one of the most important parts of the Quilted Car Organizer Pattern. Begin by measuring and cutting the two exterior panels. Try to keep the edges as straight as possible because accurately sized pieces make the later assembly much easier.
Cut two matching pieces of batting. If the batting extends slightly beyond the fabric edges, do not worry. It can be trimmed after the quilting has been completed. Place each exterior fabric panel on top of a batting piece, with the right side of the fabric facing upward.
Next, cut your lining panels. Keep these pieces organized separately from the exterior pieces so they do not accidentally become mixed during construction. If your lining fabric has a directional pattern, pay attention to the direction before cutting.
For the front pocket, cut a rectangle approximately 10 by 6 inches. Fold the upper edge toward the wrong side of the fabric by about half an inch and press it. Fold it once more if desired, then stitch along the edge to create a clean pocket opening.
You can create multiple compartments by marking vertical lines on the pocket. For example, a wide pocket can be divided into two or three sections. Think about the items you would like the organizer to hold before deciding where to place the dividing seams.
The hanging loop can be cut from a strip approximately 2 to 2½ inches wide and 7 inches long. Fold it lengthwise, press the center, then bring the raw edges toward the center and press again. Stitch along the long edges to create a durable fabric loop.
Quilting and Creating the Organizer Body
Now begin quilting the exterior panels. Place the fabric and batting together and secure the layers with clips or pins. Mark your quilting design with a removable fabric marker if necessary.
For a beginner-friendly Quilted Car Organizer Pattern, straight diagonal lines are a simple option. You can create parallel lines in one direction or cross them to form a diamond pattern. The quilting design shown in the reference image has a decorative appearance, but you do not need an advanced pattern to achieve an attractive result.
Sew slowly along the marked lines. Keep the fabric flat as it moves through the machine. If the layers begin to shift, stop and smooth them before continuing. Consistent stitching is more important than sewing quickly.
Repeat the process for the second exterior panel. Once both panels are quilted, trim them to the same finished dimensions. Check that the corners are square and that the two pieces match before moving on to the pockets.
Take the prepared pocket and place it on the lower section of the quilted front panel. Align the bottom and side edges carefully. Clip or pin the pocket in position and stitch along the sides and bottom.
Leave the top edge open. This creates the storage area. To make separate compartments, sew vertical lines through the pocket from the lower edge toward the opening. Reinforce the stitching at the beginning and end of each divider so the pocket remains secure during regular use.
Assembling the Quilted Car Organizer Pattern
With the pocket attached, place the front and back exterior panels together with their right sides facing each other. Align the sides and bottom edges carefully. Clip around the perimeter so the layers remain stable during sewing.
Sew the sides and bottom of the organizer while leaving the upper opening unsewn. Use an appropriate seam allowance consistently. When approaching curved areas, sew slowly and make small adjustments to keep the seam smooth.
The rounded upper opening is an important feature of this Quilted Car Organizer Pattern. The shape can be created using a simple curved template. Place the template on the upper portion of the fabric, mark the curve, and cut carefully. Make sure the curve is symmetrical if you are creating matching front and back panels.
Prepare the lining in the same way. Place the two lining pieces right sides together and sew the side and bottom seams. Leave an opening in the lower lining seam large enough to turn the project right side out later.
Now place the exterior inside the lining so that the right sides of the fabrics are facing each other. Align the upper edges and side seams. Clip around the opening, paying extra attention to the curves.
Before stitching the top edge, position the hanging loop between the exterior and lining. The raw ends of the loop should align with the raw edge of the opening. Sew securely across this area, reinforcing the stitching around the loop.
Sew around the entire upper opening. Once the seam is complete, carefully turn the organizer right side out through the opening left in the lining. Push the curved edges gently into shape and press the seams.
Close the opening in the lining with a neat machine stitch or hand stitch. Finally, topstitch around the upper opening if desired. This creates a polished edge and helps keep the lining in place.
FAQ About the Quilted Car Organizer Pattern
What is a Quilted Car Organizer Pattern used for?
A Quilted Car Organizer Pattern creates a fabric storage accessory for a vehicle. Depending on its size and pocket arrangement, it can hold small lightweight belongings and help keep the interior more organized.
Can beginners sew this car organizer?
Yes. The project uses several beginner-friendly techniques, including straight seams, quilting, pressing, pocket construction, and basic bag assembly. Curved sections may require a little extra patience, but they can be sewn successfully by working slowly.
What fabric should I use?
Medium-weight cotton is a practical choice. It is easy to handle and available in many colors and prints. Choose fabrics that are sturdy enough for regular use and follow the care recommendations for the specific material.
Can I make the organizer smaller?
Yes. The suggested measurements are flexible. Measure the space available in your vehicle and reduce the width or height as necessary. Remember to adjust the lining, batting, and pocket pieces proportionally.
Can I add more pockets?
Absolutely. Additional pockets can be included on the front or back. You can also divide a large pocket into several smaller compartments according to what you want to store.
How do I make the organizer more structured?
Lightweight interfacing or fusible fleece can provide additional structure. Combining interfacing with batting may produce a firmer organizer, but avoid making it so thick that the fabric becomes difficult to sew.
Can I use quilt scraps?
Yes. The project is a great opportunity to use fabric scraps. You can piece smaller fabrics together to create a patchwork exterior before adding the batting and quilting.
How long does this project take?
The time varies according to sewing experience, quilting complexity, and the number of pockets. A simple version with straight quilting can be completed much more quickly than a highly detailed version.
Can the hanging loop be changed?
Yes. The loop can be made longer or shorter depending on where you want to position the organizer. Measure the intended hanging point before cutting the loop so the finished project sits comfortably.
How can I personalize my Quilted Car Organizer Pattern?
Try changing the fabric combination, pocket sizes, quilting design, or overall dimensions. You can also use seasonal fabrics or coordinate the organizer with other handmade accessories in your vehicle.
Conclusion
The Quilted Car Organizer Pattern is a practical project that combines useful storage with the charm of handmade quilting. By starting with carefully measured fabric pieces, adding batting, quilting the exterior, constructing convenient pockets, and finishing the upper opening with a hanging loop, you can create an organizer inspired by the reference design.
The most important part of the process is careful preparation. Accurate cutting, consistent seam allowances, thoughtful pocket placement, and careful pressing can make a noticeable difference in the finished result. There is no need to use an elaborate quilting design; even simple lines can give the organizer attractive texture and structure.
One of the biggest advantages of this Quilted Car Organizer Pattern is how easily it can be customized. Experiment with different prints, colors, pocket configurations, and dimensions until you find a version that works for your vehicle and your personal style.