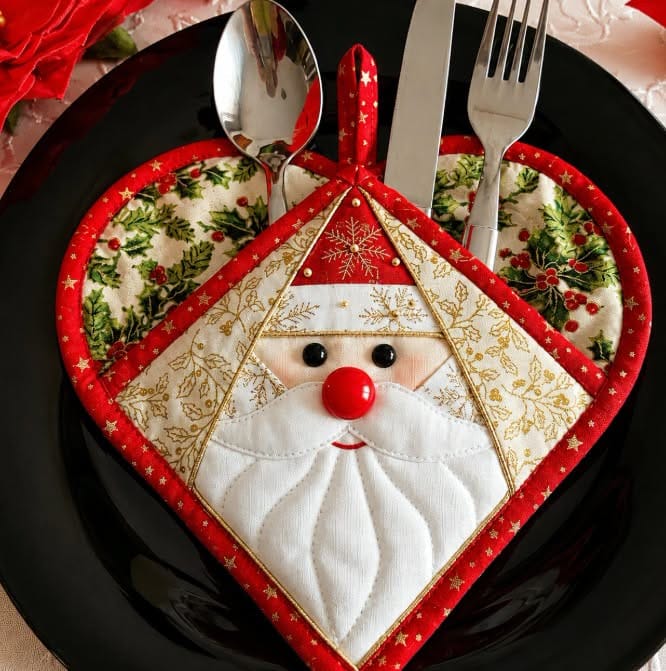
The Heart Santa Cutlery Holder Pattern is a festive sewing project that brings together traditional Christmas colors, a charming Santa Claus design, and the practical function of a tableware holder. Inspired by the beautiful heart-shaped Santa shown in the reference image, this project is perfect for decorating a Christmas table, creating handmade gifts, or adding a personal touch to holiday gatherings.
The design combines patchwork, appliqué, quilting, and simple sewing techniques. The heart shape forms the main body of the holder, while the Santa face becomes the central decorative feature. Red fabric creates the cheerful Christmas frame and hat, cream and white fabrics form the face and beard, and small embellishments bring Santa to life.
One of the best things about this project is that it can be customized. You can use traditional Christmas prints, coordinate the fabric with your existing table decorations, or create several versions in different colors. The finished holders can be made as a matching set for the entire family, making them both decorative and useful.
Whether you are an experienced quilter or a beginner looking for a manageable holiday project, this Heart Santa Cutlery Holder Pattern offers plenty of opportunities to practice basic sewing skills while creating something special for Christmas.
Materials You Will Need
Before starting, prepare all your materials. Having everything ready will make the project easier and help you work more efficiently.
Fabric
Choose quilting cotton or another medium-weight woven fabric. You will need:
- Red Christmas fabric for the outer heart and Santa’s hat
- White or cream fabric for Santa’s beard
- Light peach or flesh-tone fabric for Santa’s face
- Green or Christmas-print fabric for decorative details
- Coordinating patterned fabric for the heart sections
- Fabric for the back of the holder
- Thin cotton batting or quilt batting
Small fabric scraps are particularly useful for this project because many of the decorative pieces are relatively small.
Sewing Supplies
You will also need:
- Sewing machine
- Matching sewing thread
- Fabric scissors
- Rotary cutter
- Cutting mat
- Quilting ruler
- Pins or sewing clips
- Fabric marking pencil
- Iron and ironing board
- Hand-sewing needle
- Embroidery thread
- Small black buttons or black embroidery thread
- Red button, bead, or fabric piece for Santa’s nose
- Optional fabric glue for appliqué placement
If you plan to make several holders, prepare all the fabric pieces at the same time. This can significantly speed up the process.
Choosing the Right Fabrics
The reference design has a distinctly festive appearance because it uses strong Christmas colors. Red is the dominant color, while white and cream provide contrast for Santa’s face and beard.
For a traditional appearance, choose deep red fabric combined with white, cream, green, and gold accents. Christmas prints featuring stars, snowflakes, holly, or small ornaments can be used around the heart.
If you prefer a softer style, consider burgundy, ivory, muted green, and beige. A modern version could use red and white solids with only one patterned fabric as an accent.
When combining several fabrics, try to maintain contrast between neighboring pieces. The Santa face should remain easy to recognize, so avoid placing a complicated print directly behind the face unless the print is subtle.
Preparing the Heart Template
The first step is to create the heart template. The exact finished size can be adjusted according to the size of your plates and cutlery.
Draw a symmetrical heart on paper. A simple way to achieve symmetry is to fold the paper in half, draw one side of the heart, and cut it while folded. Open the paper to reveal a balanced heart shape.
Once the basic heart is ready, decide how you want to divide it into fabric sections.
The reference design has a decorative border surrounding the central Santa motif. You can reproduce that idea by creating:
- An outer red border
- A central Santa face
- A triangular hat
- A white beard
- Decorative fabric sections around the face
Make paper templates for each individual section. Clearly label each piece with the fabric color or pattern that you intend to use.
Remember to account for seam allowances when preparing your templates. Consistent seam allowances will help the finished pieces fit together neatly.
Cutting the Fabric
Place each paper template on the corresponding fabric and mark around it. Cut carefully using sharp fabric scissors or a rotary cutter.
For pieces that will be sewn together, include an appropriate seam allowance. If you are using appliqué instead of traditional piecing for some sections, the construction may require a different allowance or no allowance at all.
Cut two main heart-shaped pieces if you want a fully lined holder: one for the front and one for the back. Cut a piece of batting slightly larger than the finished heart.
For Santa’s face, beard, hat, and other decorative pieces, keep the fabric organized in separate groups.
It is helpful to place the cut pieces on a table in approximately the order in which they will be assembled. This allows you to check the overall color balance before sewing.
Creating the Santa Face
The Santa face is the focal point of the project.
Start with the face piece. Depending on your preferred construction method, you can sew it into the heart as part of the patchwork or attach it afterward using appliqué.
For a patchwork version, carefully sew the surrounding fabric pieces to the face, pressing each seam as you go.
For an appliqué version, position the face on the heart background and secure it with a narrow zigzag stitch, satin stitch, or another decorative stitch.
Next, add the beard. The beard can be made from white cotton fabric, cream fabric, felt, or even a lightly textured material. Keep the beard shape rounded and slightly curved to create the appearance of Santa’s traditional beard.
The eyes can be embroidered with black thread or created with small black buttons. If the holder will be used around young children, securely stitched embroidery may be preferable to loose small embellishments.
For the nose, a small red fabric circle, button, or embroidered detail works well.
Making Santa’s Hat
Santa’s hat adds an important visual element to the design.
Cut a triangular or slightly curved hat shape from red fabric. You can use a Christmas print for extra character or a solid red fabric for a classic look.
Add a white strip along the bottom of the hat to represent the trim. A small white fabric circle or pom-pom can be placed at the tip.
Position the hat above Santa’s face and sew it securely.
If desired, quilt the hat separately before attaching it. Small decorative stitches can add texture without overwhelming the design.
Assembling the Heart
Once the individual components are ready, begin assembling the main heart.
Sew the central sections together carefully, matching seams and edges. Press each seam after sewing. Pressing is especially important in patchwork because it helps the pieces remain flat and makes the finished design look cleaner.
Continue adding the surrounding sections until the complete heart front is assembled.
If you are using appliqué, place each decorative piece according to your template and secure it before completing the outer border.
The red border should frame the Santa design and create the strong Christmas appearance seen in the reference.
Adding the Batting
Place the completed heart front over a layer of batting.
Smooth the fabric carefully so there are no wrinkles or folds.
You can secure the layers with pins, clips, or temporary fabric adhesive.
Quilt the layers together using your sewing machine. Straight diagonal lines, simple crosshatching, or decorative quilting can all work beautifully.
The quilting does not need to be complicated. Even evenly spaced lines can give the holder a polished handmade appearance.
Keep the quilting relatively simple around Santa’s face so that the character remains the visual focus.
Preparing the Back
Place the completed quilted front on top of the backing fabric.
Cut the backing to match the heart shape. If desired, you can create a contrasting back using a Christmas print.
Sew the front and back together with the right sides facing, leaving an opening for turning.
Carefully trim excess fabric around curves and the heart indentation. Do not cut through the stitching.
Turn the holder right side out through the opening and gently push out the edges.
Press the entire piece carefully before closing the opening with a neat slip stitch or a close machine stitch.
Creating the Cutlery Pocket
The holder needs a pocket or opening where the cutlery will be placed.
A practical approach is to create a second heart-shaped or partial-heart fabric layer on the lower portion of the main heart. This layer becomes the pocket.
Cut the pocket piece according to the size of the finished holder. Finish its upper edge with bias binding or a narrow folded hem.
Place the pocket on the front of the heart and stitch around the sides and lower edge, leaving the top open.
The result is a secure space where a fork, spoon, knife, or other table accessory can be inserted.
For a more decorative appearance, use contrasting thread around the pocket edge.
Adding Decorative Details
Small details can transform a simple fabric project into a beautiful Christmas decoration.
Consider adding:
- Embroidered snowflakes
- Tiny stars
- Gold decorative stitching
- Holly leaves
- Small fabric berries
- Decorative buttons
- Metallic thread
- Christmas-themed quilting
Keep embellishments securely attached. If the holder will be washed frequently, avoid decorations that could easily come loose.
You can also personalize each holder by embroidering a family member’s initial on the back or near the border.
Finishing the Edges
The outer edge should be neat and durable.
One option is to use bias binding around the entire heart. Choose red binding for a traditional Christmas look, or select a contrasting green or cream fabric.
Begin at an inconspicuous point and carefully sew the binding around the curves. Take your time around the indentation at the top of the heart because this area can be slightly more difficult to sew neatly.
Fold the binding over the edge and stitch it down securely.
Press the finished holder one final time.
Helpful Sewing Tips
If this is your first patchwork project, take your time with the cutting stage. Accurate cutting is often more important than sewing speed.
Use a consistent seam allowance throughout the project. Inconsistent seam allowances can cause the pieces to become slightly misaligned.
Press seams instead of simply finger-pressing them. A good pressing technique can make even simple patchwork look much more professional.
When sewing curves, slow down and adjust the fabric gradually. Avoid pulling the fabric through the machine, as this can distort the heart shape.
Before attaching Santa’s facial details permanently, place them temporarily on the project and check their position. Small changes can make a noticeable difference to the finished expression.
Ideas for Personalizing Your Holder
The Heart Santa Cutlery Holder Pattern can be adapted in many ways.
Instead of Santa, you could create different Christmas characters using the same heart-shaped construction. A snowman, Christmas tree, reindeer, or gingerbread character could easily become the central motif.
You can also create a coordinated set using different fabrics. For example, each family member could have a holder with a different Christmas print while keeping the same red border.
Another idea is to make miniature versions as ornaments. Simply reduce the template and add a hanging loop at the top.
For a rustic farmhouse style, use linen, muted red, cream, and green fabrics. For a traditional holiday table, use brighter red and green fabrics with gold accents.
Using the Holder for Christmas Table Settings
Once finished, place the holder directly on the dinner plate or beside it on the table.
Insert the fork, spoon, and knife into the pocket. The Santa face will remain visible above the cutlery, creating a fun centerpiece for each place setting.
The heart shape makes the holder especially suitable for family dinners, Christmas parties, holiday brunches, and seasonal gatherings.
You can also place a small handwritten name card inside the pocket, turning the holder into both a decoration and a personalized place setting.
For a complete Christmas table, coordinate the holders with napkins, placemats, table runners, and other handmade decorations.
Before You Finish
Take a moment to inspect the completed holder from every angle. Check that the edges are securely stitched, the pocket opening is strong, and all decorative elements are firmly attached. If you are making a set, compare the finished pieces to ensure that their sizes and overall shapes are consistent. A final light pressing can help smooth the fabric and emphasize the quilting. This is also the perfect time to make any small adjustments, such as reinforcing a corner, trimming a loose thread, or adding another decorative stitch. These finishing details may seem minor, but they can make the finished project feel much more polished and carefully made. Most importantly, enjoy the creative process. Handmade Christmas decorations do not need to be perfectly identical to be beautiful; the small differences are part of what gives handmade projects their character and charm. With a little patience and attention to detail, this heart-shaped Santa holder can become a lovely addition to your holiday traditions and can even be brought out year after year.
Conclusion
The Heart Santa Cutlery Holder Pattern is a fun and practical Christmas sewing project that combines patchwork, quilting, appliqué, and festive decoration in one charming design. The heart-shaped construction provides a beautiful foundation, while the Santa face gives the project its unmistakable holiday personality.
With basic sewing supplies and a selection of Christmas fabrics, you can create one holder or an entire matching set for your holiday table. The pattern is also flexible enough to personalize with different colors, fabrics, embellishments, and decorative stitching.
Whether you are making it for your own Christmas dinner, preparing handmade gifts, or simply looking for a creative seasonal sewing project, this Santa cutlery holder is a wonderful choice. Take your time with the cutting, pressing, and finishing details, and you will have a cheerful handmade decoration that adds warmth and personality to your Christmas table.