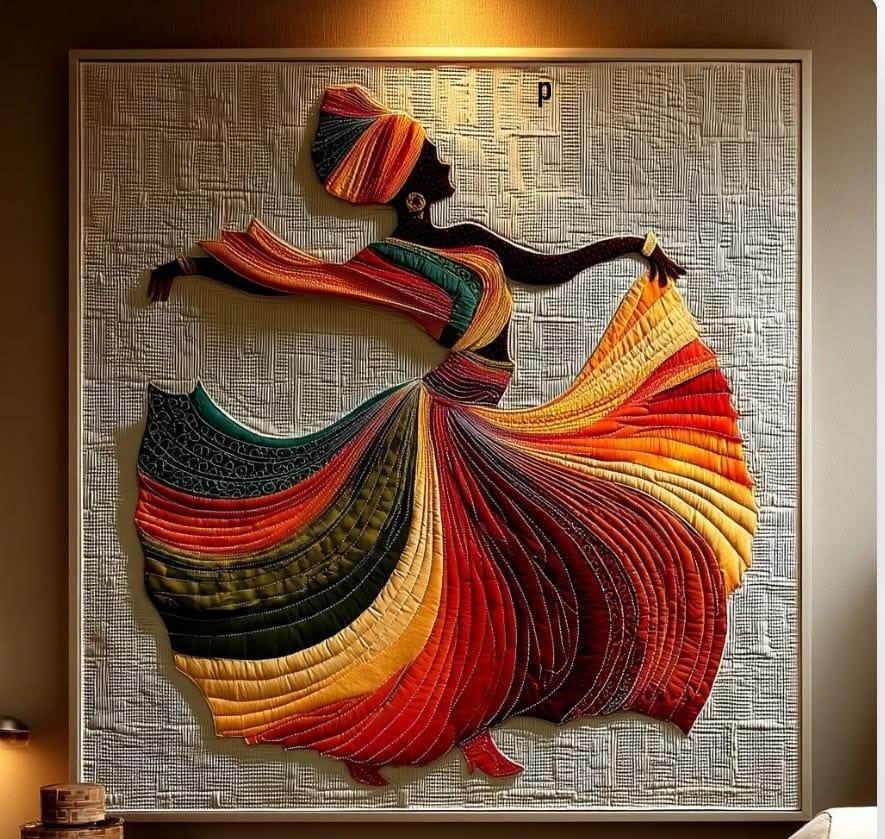
The Dancing Flame Quilt Pattern is a striking textile-art project inspired by movement, rhythm, and the graceful shape of a dancer surrounded by flowing flames. The reference design features a stylized figure whose skirt appears to sweep outward in dramatic curves, creating the impression of motion.
This pattern is particularly suitable for quilters who enjoy appliqué, curved fabric shapes, thread painting, and decorative quilting. Although the finished artwork looks intricate, the project can be approached in manageable sections. The dancer, scarf, hair, bodice, and flowing skirt can each be prepared separately before being assembled onto a background.
The finished piece can be used as a wall quilt, decorative panel, statement piece, or even adapted into a larger quilt. The pattern is also flexible enough to accommodate different color palettes. You could create a fiery composition using reds and oranges, a cooler version using blues and purples, or a softer interpretation using creams, pinks, and muted golds.
Materials You Will Need
Before beginning the Dancing Flame Quilt Pattern, gather the following supplies:
- Background quilting cotton
- Red fabric
- Orange fabric
- Golden-yellow fabric
- Burgundy or deep red fabric
- Green or dark green fabric
- Black or very dark fabric
- Cream or beige fabric
- Small fabric scraps for details
- Cotton batting
- Backing fabric
- Sewing machine
- Quilting thread
- Embroidery thread
- Rotary cutter
- Cutting mat
- Quilting ruler
- Fabric scissors
- Fabric marking pen
- Pins or fabric clips
- Iron and ironing board
- Paper or printable template material
For the best result, choose fabrics with different values and textures. Solid fabrics are excellent for the larger flame-like sections, while subtle prints can add interest without distracting from the silhouette.
Understanding the Design
The central feature of this quilt is the dancing figure.
Rather than creating a realistic portrait, the design uses a stylized silhouette. The figure’s head is positioned toward the upper section of the composition, while the torso flows naturally into a large, sweeping skirt.
The skirt is the most visually important area. It consists of many curved sections that radiate outward from the waist. These sections resemble flames, fabric folds, or ribbons moving through the air.
This creates a sense of movement even though the finished quilt is stationary.
The scarf or flowing fabric near the upper body adds another layer of movement. Its long curved shape visually connects the upper body with the expansive skirt.
Choosing Your Color Palette
Color selection is one of the most important parts of this project.
The reference image uses a warm palette dominated by:
- Deep red
- Bright red
- Orange
- Golden yellow
- Burgundy
- Olive green
- Black
- Cream
You do not need to reproduce these colors exactly.
For a classic flame effect, place darker colors near the center or underneath lighter sections, then gradually introduce brighter orange and yellow pieces toward the outer edges.
Another option is to use analogous colors, such as red, orange, and yellow. This produces a cohesive appearance.
For a more dramatic quilt, combine warm colors with small amounts of dark green or black.
Preparing the Pattern
Begin by creating a full-size drawing of the dancing figure.
The easiest approach is to sketch the composition on paper first. Focus on the overall silhouette rather than small details.
Draw:
- The head
- Hair or head covering
- Neck
- Upper body
- Arms
- Waist
- Flowing skirt
- Scarf or fabric extension
- Small decorative details
The skirt should have a wide, flowing shape.
Instead of making the lower edge perfectly straight, create several curved points and sections to suggest movement.
Once the drawing is complete, divide it into separate pattern pieces.
Creating the Figure Template
Trace the silhouette onto lightweight paper.
Separate the design into manageable pieces rather than attempting to cut the entire figure from one fabric.
For example, the head can be one piece, the hair another, and the bodice another.
The skirt can then be divided into multiple curved sections.
Label every pattern piece with its intended color. This is especially helpful when using many similar shades.
If you are creating a symmetrical design, fold your template paper where appropriate to help maintain balance. However, the dancing figure can intentionally remain asymmetrical because asymmetry contributes to the feeling of movement.
Cutting the Background
Choose a neutral background fabric.
A light gray, cream, beige, or soft taupe works particularly well because it allows the colorful figure to stand out.
Cut the background fabric larger than the final artwork. This gives you room to square the quilt after quilting.
Press the background before beginning the appliqué process.
A smooth, wrinkle-free surface will make positioning the fabric pieces considerably easier.
Creating the Dancing Figure
Start with the central body.
Position the torso on the background and temporarily secure it.
Next, place the head and neck.
The silhouette should have a graceful posture rather than appearing completely rigid.
The arms can be made from narrow fabric shapes. Position them so they complement the flowing scarf and skirt.
If necessary, adjust the pieces several times before permanently sewing them.
This is one of the advantages of raw-edge appliqué: you can experiment with the arrangement before final stitching.
Building the Flowing Skirt
The skirt is the most creative part of the project.
Cut several curved fabric pieces in different colors.
Begin near the waist and gradually arrange the pieces outward.
Think of each section as a flame or ribbon.
Some sections can be narrow and dramatic, while others can be wide and soft.
Alternate light and dark fabrics to create depth.
For example, a burgundy section can sit next to bright orange, followed by golden yellow and then deep red.
The curves should generally flow in the same direction, but slight variations will make the skirt appear more natural.
Creating the Flame Effect
The flame effect comes primarily from the shape and arrangement of the fabric pieces.
Avoid making every section identical.
Instead, vary:
- Width
- Length
- Curvature
- Color
- Quilting direction
The outer sections can be longer and more exaggerated.
This creates the impression that the skirt is expanding outward as the dancer moves.
Golden-yellow and orange sections can be positioned along the outer edges to create the appearance of glowing flames.
Dark red and burgundy pieces can provide contrast closer to the center.
Adding the Scarf
The flowing scarf is another important part of the composition.
Cut a long, curved strip of fabric.
You can use several fabric strips layered together to create a multicolored scarf.
The scarf should appear to move in the opposite or complementary direction to the skirt.
This contrast creates visual balance.
Secure the scarf temporarily before stitching it permanently.
Make sure it does not visually compete with the face or central body.
Appliqué Techniques
There are several ways to attach the fabric pieces.
Raw-Edge Appliqué
This is one of the easiest techniques.
Place each fabric piece directly on the background and stitch around the edge using a zigzag, satin, or decorative stitch.
Turned-Edge Appliqué
For a cleaner traditional appearance, turn the edges of each fabric piece underneath before attaching them.
This takes more time but creates a refined finish.
Fusible Appliqué
Fusible web can be used to temporarily secure pieces before stitching.
This is particularly useful for the small facial and decorative elements.
Whichever method you choose, work slowly around curves.
Quilting the Design
After the appliqué is completed, add the batting and backing.
The quilting is especially important in this pattern because it reinforces the impression of movement.
Use curved quilting lines that follow the direction of the skirt.
The reference design features numerous flowing lines across the fabric sections. You can reproduce this effect with free-motion quilting or carefully planned machine quilting.
The lines do not need to be identical.
Slight variations can actually enhance the organic appearance.
Quilting the Skirt
Use quilting lines that begin around the waist and flow outward.
This makes the skirt appear to radiate from the dancer’s body.
For darker sections, lighter thread can create definition.
For lighter sections, darker or coordinating thread can emphasize the individual curves.
Do not overcrowd every section. Leave enough fabric visible so the color arrangement remains clear.
Adding Decorative Stitching
Decorative stitching can add considerable depth to the finished piece.
Consider using:
- Curved lines
- Parallel lines
- Feather-like stitches
- Small leaf motifs
- Spiral quilting
- Simple geometric patterns
You can also use metallic or contrasting embroidery thread sparingly.
The goal is to enhance the movement rather than cover the entire surface with decoration.
Finishing the Hair and Face
The face should remain relatively simple.
The reference design relies heavily on the silhouette rather than detailed facial features.
You can create the profile using a single dark fabric shape.
Hair can be made from black, burgundy, brown, or another contrasting fabric.
Small embroidery stitches can be added if desired.
Avoid adding too many facial details because the simplicity of the profile is part of the artistic style.
Adding the Final Borders
Once the quilting is complete, square the quilt carefully.
Measure all four sides before cutting.
Add a narrow or wide border according to your preference.
A neutral border can help frame the colorful central figure.
Alternatively, a dark border can create a dramatic gallery-style appearance.
Press the finished quilt before adding binding.
Binding the Quilt
Cut your binding strips and join them into one continuous strip.
Attach the binding to the front of the quilt, working carefully around the corners.
Fold it over to the back and stitch it securely.
Take your time to keep the corners neat.
A carefully finished binding gives the quilt a professional appearance and protects the edges from wear.
Creative Variations
The Dancing Flame Quilt Pattern can be adapted far beyond the original color scheme.
You could create a:
Sunset Dancer
Use coral, peach, pink, gold, and purple.
Winter Dancer
Use icy blue, silver, white, gray, and navy.
Forest Dancer
Use olive, moss, brown, cream, and dark green.
Jewel-Tone Dancer
Use emerald, sapphire, ruby, purple, and gold.
You can also change the background. A dark background makes warm colors appear particularly dramatic, while a pale background gives the quilt a lighter and more contemporary appearance.
Tips for Beginners
If this is your first art quilt, do not try to complete everything at once.
Divide the project into stages.
First prepare the template.
Then cut the fabric.
Next arrange the pieces.
After that, attach the appliqué.
Finally, quilt the entire piece.
Taking photographs during the layout stage can also help you remember the arrangement before moving the pieces to the sewing machine.
Keep extra scraps nearby so you can replace a piece if necessary.
Most importantly, do not worry about making every curve perfectly identical. The design is based on movement, and small differences can make the finished quilt feel more organic.
Before You Finish
Before adding the final binding, place the completed quilt flat and inspect the entire composition from a distance. This helps you see whether the colors are balanced and whether the dancer remains the main focal point. Look particularly at the skirt, because the curved sections should appear to flow naturally from the waist toward the outer edges. If one area looks too heavy or too bright, you can still adjust the quilting or add a small appliqué detail. Check the edges for loose threads and make sure all appliqué sections are securely stitched. It is also a good idea to gently press the quilt once more, using an appropriate setting for your fabrics. If you plan to display the finished piece on a wall, consider adding a hanging sleeve to the back. A sleeve allows the quilt to hang evenly without placing unnecessary stress on the fabric. These final details may take a little extra time, but they help transform a handmade quilt into a finished piece of textile art that can be displayed and enjoyed for years.
Conclusion
The Dancing Flame Quilt Pattern is an expressive art-quilting project that combines fabric, color, movement, and decorative stitching. Its flowing dancer silhouette and flame-inspired skirt make it a beautiful statement piece for anyone who enjoys creative quilting.
The pattern can be adapted to different skill levels and personal styles. Beginners can simplify the number of fabric sections, while experienced quilters can experiment with intricate appliqué, free-motion quilting, embroidery, and layered fabrics.
The most important element is the sense of movement. By carefully arranging curved pieces and using quilting lines that follow the direction of the figure, you can create a quilt that appears almost alive.
With thoughtful fabric selection, patient construction, and creative quilting, the Dancing Flame Quilt can become a unique piece of textile art that adds warmth, color, and personality to any room.