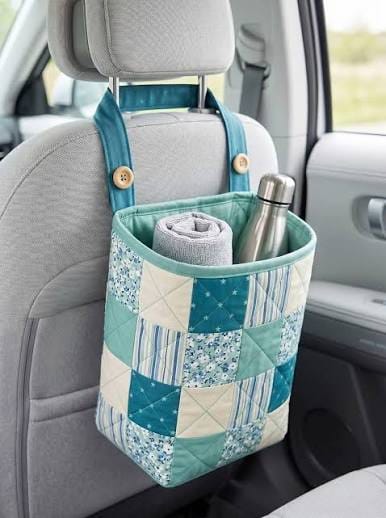
Keeping a car organized can make everyday journeys much more comfortable. A Car Organizer Pattern like the one shown in the image is a beautiful way to create useful storage while adding a handmade touch to your vehicle. Designed to hang conveniently from the back of a car seat, this fabric organizer provides an easy place to store tissues, snacks, small personal items, travel accessories, toys, and other essentials.
The example features a charming patchwork design made from coordinated autumn-inspired fabrics. Shades of mustard yellow, rust, burgundy, cream, and muted green are combined into geometric blocks, creating a cozy quilted appearance. The organizer has a spacious open compartment, sturdy hanging straps, and a reinforced structure that helps it maintain its shape.
This is an especially enjoyable sewing project because it can be adapted to suit your needs. You can make the organizer larger or smaller, add pockets, change the strap style, or select fabrics that coordinate with your car interior.
Why Make a Car Organizer?
A handmade car organizer can solve many common storage problems. Small objects tend to move around the vehicle, making them difficult to find when needed. An organizer provides a dedicated location where frequently used items can remain within easy reach.
It can be particularly useful for families because children can have their own section for books, small toys, coloring supplies, tissues, or travel accessories. Adults can also use the organizer for sunglasses, charging cables, notebooks, water bottles, wipes, and other lightweight items.
Unlike generic organizers, a handmade version allows you to choose the exact dimensions, colors, fabrics, and details you want.
Materials You’ll Need
For a project inspired by the pictured design, gather the following supplies:
- Cotton quilting fabric
- Coordinating fabric for the lining
- Lightweight or medium-weight batting
- Fusible interfacing
- Sewing thread
- Sewing machine
- Fabric scissors or rotary cutter
- Cutting mat
- Quilting ruler
- Pins or clips
- Iron
- Measuring tape
- Large buttons, if desired
- Webbing or fabric for the straps
- Seam ripper
- Optional binding fabric
Cotton fabric is a particularly good choice because it is easy to sew, widely available, and comes in countless colors and prints.
Choosing Your Fabric
Fabric selection is one of the most enjoyable parts of making a patchwork car organizer.
The example shown uses a combination of solid-looking fabrics and prints. Some squares feature leaves and botanical motifs, while others use geometric patterns. The colors are coordinated closely enough to create a unified appearance without making the design look repetitive.
You could recreate a similar palette with:
- Mustard
- Burnt orange
- Rust
- Burgundy
- Olive green
- Cream
- Brown
For a completely different look, consider pastel fabrics, modern monochromatic prints, denim, florals, or bright children’s fabrics.
When selecting fabrics, try to choose materials with similar weights. This makes the finished organizer easier to sew and helps the quilted panels maintain a consistent shape.
Planning the Size
Before cutting your fabric, determine where you want the organizer to hang and what you intend to store inside it.
Measure the width of the car seat and the distance between the headrest posts. The organizer should be wide enough to provide useful storage without interfering with the driver’s or passenger’s space.
A practical starting point is an organizer approximately 30–35 cm wide and 35–45 cm tall, but these measurements can be adjusted.
For a deeper organizer, increase the depth of the bottom and side sections. If you plan to store larger items, consider adding additional compartments rather than making the main compartment excessively deep.
Creating the Patchwork Front
The patchwork front is the feature that gives this organizer its distinctive appearance.
Begin by cutting fabric squares of equal size. You can use a combination of solid fabrics and patterned fabrics to create visual interest.
Arrange the squares before sewing them together. Move the pieces around until you’re happy with the distribution of colors and prints.
Sew the squares together in rows, pressing the seams after each row. Once all rows are complete, sew the rows together carefully.
For a more traditional quilted appearance, add batting and a backing fabric behind the patchwork panel.
Quilting the Panel
The pictured organizer has visible diagonal quilting that creates diamond shapes across the fabric.
You don’t have to reproduce the exact quilting design. Simple straight lines can look equally attractive.
Possible quilting patterns include:
- Diagonal lines
- Crosshatching
- Vertical and horizontal lines
- Simple diamonds
- Wavy lines
- Free-motion quilting
If you’re new to quilting, straight-line quilting is generally the easiest place to start.
Use a walking foot if available, particularly when quilting several layers together. This can help feed the fabric more evenly through the machine.
Constructing the Organizer Body
Once your front panel is finished, prepare the back, lining, and structural pieces.
The organizer can be constructed from a front panel, back panel, and bottom section. Adding a separate bottom piece creates more depth and allows the organizer to stand open rather than collapsing flat.
For extra structure, place interfacing between the outer fabric and lining.
A layer of batting can also provide padding and enhance the quilted appearance.
When assembling the pieces, pay close attention to seam allowances and corner alignment.
Adding the Lining
The lining gives the inside of the organizer a clean and finished appearance.
Choose a durable cotton fabric that coordinates with the outer patchwork. A solid color can make the interior easier to see, while a patterned lining can add another decorative detail.
Sew the lining separately before joining it to the outer organizer.
Leave an appropriate opening during assembly so that the piece can be turned right side out. After turning, press the seams carefully and close the opening with a neat topstitch or concealed stitch.
Making the Hanging Straps
The straps are essential because they support the organizer from the headrest.
You can make them from:
- Cotton fabric
- Quilt binding
- Heavy-duty webbing
- Recycled fabric strips
For a fabric strap, cut a long strip, fold it lengthwise, sew along the edge, turn it right side out, and press it flat.
For greater strength, reinforce the stitching where the straps attach to the organizer.
The example uses wide fabric straps with button details. This creates both a decorative feature and a practical adjustment point.
Adding Buttons
Buttons can provide an attractive finishing touch.
Large wooden or decorative buttons work particularly well with rustic patchwork designs. You can use the buttons purely as decoration or incorporate them into the strap adjustment system.
If the organizer will be used around young children, make sure all decorative elements are firmly secured.
Adding Extra Pockets
One of the easiest ways to make your organizer more useful is to add exterior pockets.
Possible pocket sizes include:
- Small phone pocket
- Tissue pocket
- Cable pocket
- Snack pocket
- Toy pocket
- Sunglasses pocket
You can make several pockets from coordinating scraps left over from the patchwork.
Before attaching each pocket, finish the upper edge with a folded hem or binding. Then sew the remaining edges securely to the organizer.
Ideas for Different Uses
Although the organizer is designed for a car, its basic construction can be adapted for many other purposes.
You could use a similar design as:
- A stroller organizer
- A wheelchair storage bag
- A craft-room organizer
- A sewing supply holder
- A children’s travel organizer
- A bedside storage bag
- A camper or RV organizer
Simply modify the dimensions and attachment method according to where you intend to use it.
Making a Children’s Version
For children, choose colorful fabrics featuring animals, stars, vehicles, flowers, or favorite themes.
You can add several pockets so that books, crayons, toys, tissues, and small games each have their own place.
A child’s organizer can also be made slightly shorter so that items remain easy to reach without becoming a distraction while the vehicle is moving.
Making a More Elegant Version
If you prefer a sophisticated look, use three or four coordinating fabrics rather than many different prints.
A palette of cream, beige, gray, navy, or muted green can create a more understated design.
You can also replace patchwork with a single beautiful fabric and use quilting lines as the main decorative element.
Leather-look straps or neutral webbing can provide a modern finish.
Tips for a Professional Finish
A few small details can make a significant difference in the finished project.
Press each seam as you sew rather than waiting until the entire organizer is assembled. Accurate pressing helps the patchwork lie flat and makes matching seams easier.
Use a consistent seam allowance throughout the project. When joining multiple patchwork squares, even small differences can accumulate and affect the final shape.
Reinforce stress points, especially where the straps attach to the organizer. These areas experience more tension when the organizer is filled.
Finally, topstitch around the upper edge. This creates a crisp finish and helps secure the lining.
Customizing the Patchwork Design
The patchwork doesn’t have to follow a specific arrangement.
You could create:
- Checkerboard blocks
- Diagonal rows
- Log cabin-inspired designs
- Half-square triangles
- Scrappy patchwork
- Seasonal color combinations
For a fall-inspired organizer like the one shown, leaf prints and warm earth tones create a particularly cozy result.
For spring, try floral prints with soft greens and blues. For summer, bright yellow, turquoise, coral, and white can create a cheerful appearance. During the holidays, red, green, cream, and gold fabrics can produce a festive organizer.
Caring for Your Finished Organizer
Because a car organizer can collect dust and occasional spills, washable fabrics are recommended.
Before washing, remove any non-washable decorative elements.
Follow the care instructions for your fabric and interfacing. Cotton projects can often be gently washed, but excessive heat may cause shrinkage or affect the structure.
After washing, reshape the organizer while damp and allow it to dry completely before placing it back in the car.
Conclusion
A Car Organizer Pattern is a wonderful sewing project for anyone who enjoys combining quilting, patchwork, and practical home crafts. The design shown in the image demonstrates how beautiful fabric combinations can turn a simple storage bag into an attractive accessory for everyday use. With its quilted panels, roomy interior, sturdy straps, and customizable construction, this organizer can be adapted to suit almost any vehicle or personal style.
Whether you choose a colorful patchwork design, a minimalist fabric combination, or a seasonal theme, the project gives you plenty of opportunities to experiment with fabric and quilting techniques. It is also an excellent way to use fabric scraps that might otherwise remain in your sewing collection.
Most importantly, a handmade organizer adds convenience without sacrificing style. Once completed, you’ll have a useful place for everyday essentials while also enjoying the satisfaction of knowing that you made it yourself. With careful measuring, sturdy stitching, and thoughtful fabric choices, this Car Organizer Pattern can become a practical and beautiful companion for every journey.