Creating a stunning quilt is both an art and a craft, and the Ember Quilt Pattern is an exceptional choice for those looking to add warmth and elegance to their collection.
This pattern blends traditional techniques with a modern aesthetic, making it an ideal project for quilters of all skill levels. Whether you are a beginner or an experienced quilter, this design offers a rewarding experience and a breathtaking final product.
One of the highlights of the Ember Quilt Pattern is its versatility. The pattern allows for various fabric choices, color schemes, and layout adjustments to match personal styles.
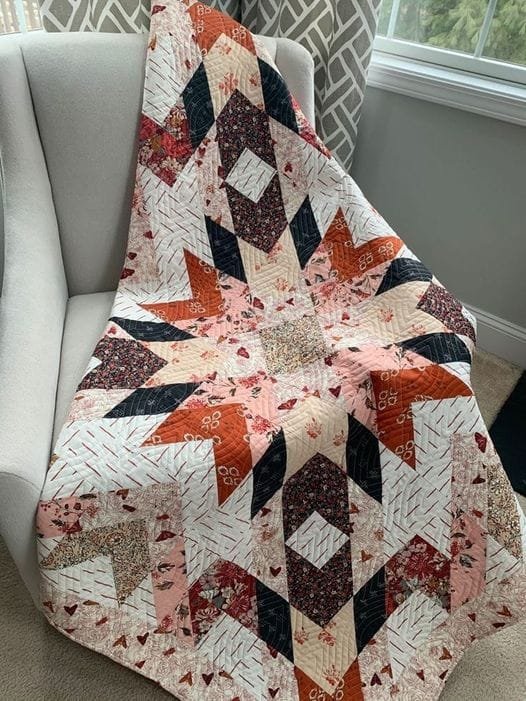
Whether you prefer a vibrant and fiery look or a soft and cozy palette, this quilt pattern adapts beautifully to your preferences.
Another advantage of the Ember Quilt Pattern is its structured yet flexible design. The geometric elements provide a balanced composition, while the stitching techniques bring texture and depth to the piece.
This quilt is perfect for home décor, gifting, or showcasing in exhibitions. With careful selection of fabric and precise cutting, you can achieve a professional and polished quilt that will be cherished for years to come.
1. Materials and Tools Needed
To create the Ember Quilt Pattern, gathering the right materials and tools is essential. Ensuring that you have high-quality supplies will result in a quilt that is both durable and visually appealing.
- Fabric Choices: Cotton, linen, or a blend of natural fibers work best for quilting. Choose a color scheme that complements the ember-inspired theme.
- Cutting Tools: Rotary cutters and self-healing cutting mats ensure precise and clean cuts for your fabric pieces.
- Sewing Machine: A reliable sewing machine with quilting capabilities will streamline the stitching process and enhance accuracy.
- Thread and Needles: High-quality thread in coordinating colors and quilting needles for both machine and hand-stitching.
- Measuring Tools: A quilting ruler, tape measure, and fabric markers help achieve precision in measurements and alignments.
- Batting and Backing Fabric: Choose a lightweight or medium-weight batting for a cozy yet manageable quilt thickness.
2. Step-by-Step Instructions
Following these steps will ensure a smooth and enjoyable quilting experience, from cutting your fabric to stitching the final design.
- Step 1: Cutting Fabric Pieces Measure and cut fabric pieces according to the pattern guidelines. Ensure accuracy to maintain a balanced quilt layout.
- Step 2: Arranging the Blocks Lay out your fabric blocks in the desired arrangement before sewing. This helps visualize the final design and make necessary adjustments.
- Step 3: Sewing the Blocks Together Use a quarter-inch seam allowance for stitching. Press the seams open or to the side for a neat finish.
- Step 4: Adding Borders and Sashing Borders frame the quilt beautifully, while sashing enhances the design structure. Ensure consistent alignment while attaching these elements.
- Step 5: Layering the Quilt Sandwich Assemble the quilt top, batting, and backing fabric. Use quilting pins or spray adhesive to secure the layers.
- Step 6: Quilting and Finishing Touches Stitch along the design lines using free-motion quilting or straight-line quilting techniques. Finish the quilt with a well-sewn binding.
3. Tips for Perfecting Your Quilt
Mastering the Ember Quilt Pattern requires practice and attention to detail. These tips will help you refine your quilting skills and enhance the final outcome.
- Choose a Cohesive Color Palette: Warm hues like reds, oranges, and browns create an ember-inspired look, while blues and purples offer a unique contrast.
- Press Seams Properly: Well-pressed seams ensure flat and professional-looking quilt blocks.
- Use High-Quality Thread: Prevent breakage and maintain durability with a strong quilting thread.
- Stitch Slowly and Steadily: Precision is key, so take your time sewing each section accurately.
- Test Stitching on Scrap Fabric: Before quilting the final piece, practice on scrap fabric to adjust tension and stitch length.
- Block Your Quilt Before Binding: Ensuring that the quilt is squared will lead to a neater and more symmetrical finish.
4. Common Mistakes and How to Avoid Them
Avoiding common quilting mistakes will save time and frustration, leading to a smoother quilting experience.
- Inaccurate Cutting: Use a rotary cutter and ruler for precise cuts to avoid misaligned quilt blocks.
- Ignoring Seam Allowances: Always maintain a consistent quarter-inch seam allowance for uniformity.
- Skipping Fabric Pre-Washing: Pre-washing prevents fabric shrinkage and color bleeding in the final quilt.
- Overstretching Fabric: Handle fabric gently to maintain its shape and prevent distortion.
- Poor Quilt Basting: Secure the quilt layers properly before quilting to prevent shifting.
- Rushing Through the Process: Take your time to ensure accuracy in every step of quilting.
FAQ
Q: What skill level is needed for the Ember Quilt Pattern?
A: This pattern is suitable for both beginners and experienced quilters. With clear step-by-step instructions, even novice quilters can achieve great results.
Q: Can I customize the colors and fabric choices?
A: Absolutely! The Ember Quilt Pattern is highly adaptable, allowing you to choose fabrics that match your style and preference.
Q: How long does it take to complete this quilt?
A: The time required depends on your experience level and the complexity of your design. On average, it can take a few days to a couple of weeks.
Q: What is the best batting for this quilt?
A: A lightweight cotton or polyester blend works best for a cozy and durable quilt.
Q: How should I care for my finished quilt?
A: Machine wash on a gentle cycle with mild detergent and air dry or tumble dry on low heat.
Join our VIP broadcast list and gain access to exclusive patterns, all for free. As a VIP member, you’ll receive the best patterns daily, delivered directly to your device. ✨📱 It’s a unique opportunity to stay up-to-date with the latest trends and designs, curated just for you. Don’t miss out on enhancing your projects and discovering new inspirations with the best patterns every day! 🎨🔝
Conclusion
The Ember Quilt Pattern is a captivating and rewarding project that combines traditional quilting methods with modern aesthetics. By following the steps outlined in this tutorial, you can create a stunning quilt that showcases your creativity and craftsmanship.
Whether for personal use, gifting, or display, this pattern offers endless possibilities for customization. Have you tried this pattern before? Share your thoughts, experiences, and suggestions in the comments below!

