The Carnival Pinwheels Tote by Amy Butler – Tutorial is a must-try project for anyone who loves creating unique and functional handmade items.
This tote bag pattern is a vibrant and colorful way to showcase your sewing skills while crafting something that is both stylish and practical.
Whether you’re a beginner or an experienced sewer, this tutorial will guide you through the process of making your very own Carnival Pinwheels Tote.
Amy Butler is a well-known designer in the world of crafting, and her patterns are loved for their creativity, beauty, and ease of use.
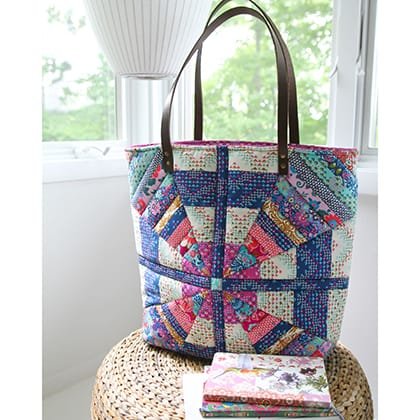
The Carnival Pinwheels Tote is no exception. Its playful design, inspired by the swirling pinwheels of a carnival, makes it perfect for carrying your essentials in style.
From trips to the beach to everyday errands, this tote is a great addition to your collection of handmade bags.
In this article, we’ll take you step-by-step through the process of creating your own Carnival Pinwheels Tote.
We’ll cover everything from selecting the right fabric to assembling the bag, offering tips along the way to ensure your project is a success. Let’s get started!
1. Materials and Fabric Selection
Before diving into the construction of the Carnival Pinwheels Tote by Amy Butler, it’s essential to gather the right materials. Choosing the perfect fabric is key to ensuring your tote is both durable and visually appealing.
Firstly, pick a fabric that reflects the carnival theme. Bold, bright colors and playful patterns are ideal. Look for cotton or canvas fabric, as these materials provide the structure and durability needed for a tote bag. You can opt for a solid color for the main body and a pinwheel print for the accent to truly embrace the design.
Next, gather the basic materials. You’ll need fabric for the exterior and lining, interfacing to give the bag some structure, thread in a coordinating color, and a sewing machine. Amy Butler’s pattern usually includes specific yardage recommendations, so be sure to follow those guidelines to avoid running out of fabric mid-project.
Once you’ve gathered all your materials, take the time to wash and press your fabric. This helps prevent shrinking later on and makes the sewing process easier. Prepping your fabric might seem like an extra step, but it’s essential for a polished final product.
Another important consideration is the type of interfacing. Fusible interfacing is easy to use and adds sturdiness to your tote, allowing it to hold its shape. Choose medium to heavyweight interfacing for the exterior fabric, especially if you plan to carry heavier items in your tote.
Lastly, consider embellishments. Adding a zipper pocket, decorative buttons, or embroidery can personalize your Carnival Pinwheels Tote and make it stand out even more. While not necessary, these small details can take your bag from simple to stunning.
2. Cutting and Preparing the Fabric
Now that you have all your materials ready, it’s time to start the cutting process. Cutting your fabric accurately is essential to ensure that all pieces fit together correctly when assembling the Carnival Pinwheels Tote by Amy Butler.
Begin by laying out your pattern pieces on the fabric. It’s crucial to follow the grainline markings on the pattern to ensure the fabric behaves correctly once sewn. If you’re using a fabric with a directional print, make sure the design is oriented the same way for each piece.
Use a rotary cutter and a cutting mat for precise cuts, especially when working with large fabric pieces. This tool makes it easier to cut straight lines and reduces the risk of fraying edges. Scissors can also work, but be sure to sharpen them beforehand to avoid jagged edges.
After cutting the fabric pieces, don’t forget to cut the interfacing. The interfacing should match the shape and size of your fabric pieces but is typically applied to the wrong side of the fabric. To apply fusible interfacing, place it on the wrong side of the fabric and press with an iron, following the manufacturer’s instructions. This step will give your tote more structure and durability.
Once everything is cut, mark any necessary notches, darts, or stitching lines as indicated in the pattern. These markings are essential for aligning your pieces correctly during assembly. Use tailor’s chalk or a disappearing fabric marker to make these marks clearly visible.
It’s also a good idea to organize your pieces before you begin sewing. Lay them out in the order in which you’ll be assembling them, ensuring all the required elements are accounted for. This will streamline the construction process and help you avoid any mistakes along the way.
3. Sewing the Carnival Pinwheels Tote
With everything cut and prepped, it’s time to start sewing your Carnival Pinwheels Tote by Amy Butler. This part of the tutorial focuses on assembling the main components of the bag and bringing it all together.
Start by sewing the exterior pieces of the tote together. If your design includes pinwheel accents, you’ll want to assemble those first before attaching them to the main body of the bag. Pinwheels are created by stitching together triangles or squares of fabric, which are then sewn onto the tote. Ensure each seam is pressed flat to give your bag a clean, professional look.
Once the exterior pieces are assembled, it’s time to move on to the lining. The lining should be sewn similarly to the exterior but leave a small opening at the bottom for turning the bag inside out later. This trick makes finishing the tote easier and gives it a neat appearance without visible seams.
Next, attach the straps. The straps should be sturdy enough to carry the weight of your belongings, so consider using interfacing or reinforcing them with extra stitching. Sew the straps to the exterior of the tote, ensuring they are evenly spaced and securely fastened.
Once the straps are attached, it’s time to sew the exterior and lining together. Place the exterior and lining pieces right sides together, with the straps tucked inside. Sew around the top edge of the bag, ensuring you catch all layers in the seam. After sewing, turn the bag right side out through the opening left in the lining, then close the opening with a few stitches.
Finally, topstitch around the top edge of the bag to give it a finished look. This step not only adds a decorative touch but also reinforces the seam, making your tote more durable.
4. Final Touches and Customization
Congratulations! You’ve completed the main construction of your Carnival Pinwheels Tote by Amy Butler. Now it’s time to add some final touches and customization to make the bag uniquely yours.
If you want to add a bit more structure to your tote, consider adding a base insert. You can make this by cutting a piece of cardboard or plastic to fit the bottom of the bag and covering it with fabric. This insert will help the tote hold its shape, especially if you plan to carry heavier items.
Adding a pocket or two to the interior of the bag is another great customization option. Pockets are handy for organizing smaller items like keys or a phone, and they can be easily added to the lining before sewing it into the bag. You can make a simple patch pocket or a more complex zippered pocket, depending on your skill level.
Decorative elements like buttons, patches, or embroidery can also enhance the look of your tote. These little details can be personalized to reflect your style and make the bag truly one-of-a-kind. For example, you could add a button closure to the top of the tote for added security.
If you prefer a more polished finish, consider adding bias tape around the edges of the bag. This adds a clean, professional look and reinforces the seams, ensuring your tote will last longer. You can use a contrasting color for a pop of fun or match the tape to your fabric for a more subtle effect.
Lastly, give your bag a final press with the iron to smooth out any wrinkles and ensure all seams are crisp. This step gives your tote a finished, professional appearance that you’ll be proud to show off.
FAQ
Q: What fabric is best for the Carnival Pinwheels Tote?
A: Cotton or canvas fabric is ideal for this project because they are durable and easy to work with. You can also use interfacing to give the tote more structure.
Q: Can beginners sew the Carnival Pinwheels Tote?
A: Yes, the Carnival Pinwheels Tote by Amy Butler is suitable for beginners. The pattern includes detailed instructions, and the project involves basic sewing techniques.
Q: How long does it take to complete this tote?
A: Depending on your skill level, it can take between 3 to 5 hours to complete the tote, including cutting and assembling the pieces.
Q: Can I customize the tote?
A: Absolutely! You can personalize the tote by choosing different fabrics, adding pockets, or including decorative elements like buttons or embroidery.
Q: What size is the finished tote?
A: The finished size will vary depending on the pattern, but most Carnival Pinwheels Totes are large enough to carry everyday essentials, with dimensions typically around 14” wide by 16” tall.
Q: Do I need a sewing machine to make this tote?
A: While it is possible to sew the tote by hand, using a sewing machine will save time and provide more durable seams.
Join our VIP broadcast list and gain access to exclusive patterns, all for free. As a VIP member, you’ll receive the best patterns daily, delivered directly to your device. ✨📱 It’s a unique opportunity to stay up-to-date with the latest trends and designs, curated just for you. Don’t miss out on enhancing your projects and discovering new inspirations with the best patterns every day! 🎨🔝
Conclusion
In this Carnival Pinwheels Tote by Amy Butler – Tutorial, we’ve covered the materials needed, the step-by-step process of cutting and sewing, and tips for customizing your tote. Whether you’re new to sewing or a seasoned pro, this project is a fantastic way to create something both beautiful and functional.
PATTERN HERE
We hope this guide inspires you to try your hand at making your own Carnival Pinwheels Tote. Don’t forget to share your experiences and leave a comment with your thoughts, feedback, and any suggestions for future projects. Happy sewing!

