Creating a Bird Block Quilt is a fun and creative way to bring nature-inspired designs into your quilting projects. In this Bird Block Quilt – Tutorial, we’ll walk you through the step-by-step process to help you create a stunning bird block that can become the centerpiece of your quilt.
Whether you’re a beginner or an experienced quilter, this tutorial is designed to help you easily follow along and create your own masterpiece.
The Bird Block Quilt is a versatile pattern that allows you to experiment with different fabrics and colors to make unique, eye-catching designs.
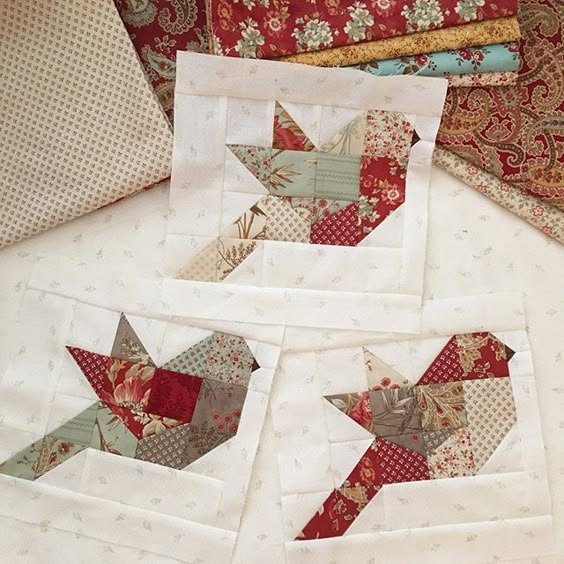
The bird block adds a touch of charm to any quilt, making it perfect for baby quilts, decorative wall hangings, or even full-sized bed quilts. By following this tutorial, you’ll learn how to assemble the bird block with precision and creativity.
In this Bird Block Quilt – Tutorial, we’ll cover everything from choosing the right fabric, cutting and preparing your pieces, and assembling the block to completing the quilt.
With careful attention to detail, your bird block will come to life, and you’ll have a quilt that showcases both your craftsmanship and creativity.
1. Selecting the Perfect Fabrics for Your Bird Block Quilt
Choosing the right fabrics is a crucial step in creating a beautiful Bird Block Quilt. The fabrics you select will define the overall look of your quilt, whether you want a realistic bird or something more abstract. Here’s how to approach your fabric selection:
- Fabric Color Palette: Start by choosing a color palette that complements the bird design. If you’re going for a realistic look, earthy tones like browns, greens, and blues can be great choices. For a more whimsical quilt, consider bright and bold colors that make the bird pop.
- Fabric Patterns: Patterns can add depth and texture to your quilt. Use solid fabrics for the bird’s body and contrasting patterned fabrics for the background or wings to create visual interest. Don’t be afraid to mix florals, polka dots, or even geometric patterns for a dynamic quilt.
- Theme: Consider the overall theme of your quilt. If your quilt is for a nature or garden theme, you may want to choose fabrics with floral or natural motifs to complement the bird design.
- Pre-washing Your Fabric: It’s essential to pre-wash your fabric before cutting and sewing. This prevents any shrinkage or bleeding of colors after the quilt is finished. Pre-washing ensures your quilt stays in perfect condition after washing.
- Quality of Fabric: The quality of your fabric is important for both durability and appearance. Choose high-quality cotton quilting fabrics, which are easy to sew and provide a smooth finish for your blocks.
- Scrap Fabrics: A bird block quilt is an excellent opportunity to use up your scrap fabrics. Mix and match small pieces of fabric to add a unique and personal touch to each block.
The fabric selection process for the Bird Block Quilt is where you can get creative and really make the design your own. Take time to audition fabrics and play with different combinations to achieve the look you want.
2. Cutting and Preparing Your Fabric Pieces
Once you have selected your fabrics, the next step in the Bird Block Quilt – Tutorial is to cut and prepare your pieces. This is a critical step in ensuring that your quilt comes together seamlessly. Here’s how to do it:
- Tools You’ll Need: You’ll need a rotary cutter, cutting mat, and quilting ruler for precise cuts. These tools will ensure clean, straight edges on your fabric pieces, which is essential for accurate piecing.
- Measuring for the Bird Block: Begin by measuring and cutting your fabric pieces for the bird’s body, wings, and background. The size of the pieces will depend on the overall dimensions of your block. Make sure to include a ¼ inch seam allowance on all sides.
- Cutting the Bird Body: The body of the bird is usually the focal point of the block. Cut out a piece of fabric in the shape of the bird’s body, ensuring it’s large enough to allow for the seam allowance.
- Cutting the Wings and Background: The bird’s wings are typically smaller, contrasting pieces that can be cut from a different fabric. For the background, you’ll cut squares or rectangles that will frame the bird in the block.
- Checking Seam Allowances: Accuracy is key in quilting, so double-check that all your cuts account for seam allowances. Use a ruler to measure and mark each piece before cutting to avoid any misalignment during the sewing process.
- Ironing Your Pieces: After cutting, press each fabric piece with an iron to remove wrinkles. This will make it easier to align your fabric pieces during sewing.
- Labeling Your Pieces: If you’re cutting multiple pieces for several blocks at once, it’s helpful to label each piece so you don’t confuse them later. You can use small sticky notes or fabric markers for easy identification.
Precision cutting and preparation are essential for a successful Bird Block Quilt. With properly cut pieces, the assembly process will be much smoother, and the final product will be much more polished.
3. Assembling the Bird Block
Once your fabric pieces are cut and prepared, it’s time to start assembling your Bird Block Quilt. This is the part where the bird design begins to come to life. Follow these steps for successful assembly:
- Laying Out the Pieces: Before you begin sewing, lay out all your fabric pieces on a flat surface. This will give you a visual reference of how the finished block will look and help you catch any errors before sewing.
- Sewing the Bird Body: Start by sewing the pieces of the bird’s body together. Use a ¼ inch seam allowance and press the seams open after each step to create a flat block.
- Adding the Wings: Once the body is complete, sew the wing pieces to the body. Be sure to line up the edges carefully to avoid uneven seams.
- Assembling the Background: After completing the bird, sew the background pieces around the bird block. This will frame the bird and complete the overall design of the block.
- Pressing the Block: Once the block is fully assembled, press it with an iron to set the seams. This will give the block a neat and crisp finish.
- Checking for Accuracy: After assembling the block, check the measurements to ensure it is the correct size. If necessary, trim any excess fabric to ensure the block fits with the rest of your quilt.
- Repeat for Additional Blocks: If you are making multiple bird blocks for a full quilt, repeat this process for each block. Once all the blocks are assembled, you can begin piecing them together to create the full quilt top.
The assembly process for the Bird Block Quilt may take some time, but with patience and attention to detail, you’ll end up with a beautifully crafted block that will stand out in your quilt.
4. Finishing Your Bird Block Quilt
Now that your bird blocks are assembled, it’s time to finish your Bird Block Quilt. This step involves sewing the quilt top, adding batting and backing, and finally quilting the layers together. Here’s how to finish your quilt:
- Sewing the Quilt Top: Once you’ve assembled all your bird blocks, sew them together to create the quilt top. Arrange the blocks in the desired pattern, and use a ¼ inch seam allowance to sew them together.
- Adding Batting and Backing: After completing the quilt top, add batting and backing to your quilt. Lay the batting between the quilt top and the backing fabric, ensuring everything is smooth and even.
- Basting the Quilt: Baste the quilt layers together using safety pins or basting spray. This will hold the layers in place while you quilt them together.
- Quilting the Layers: Now it’s time to quilt the layers together. You can quilt by hand or machine, using straight lines or free-motion quilting to secure the layers. Focus on quilting around the bird block to highlight the design.
- Binding the Edges: Once the quilting is complete, bind the edges of your quilt to give it a finished look. Choose a fabric that complements the bird block and sew it around the edges of the quilt.
- Final Pressing and Finishing Touches: After binding, give your quilt a final press to ensure everything lies flat. Trim any loose threads and admire your finished Bird Block Quilt.
With your quilt now complete, you can enjoy your beautiful Bird Block Quilt as a decorative piece or gift it to someone special. The effort and creativity you’ve put into this project will shine through in the final product.
FAQ
What is a Bird Block Quilt?
A Bird Block Quilt is a quilt made up of blocks featuring a bird design, typically pieced together with different fabrics to create a charming and nature-inspired quilt.
What fabrics should I use for a Bird Block Quilt?
High-quality cotton fabrics are ideal for quilting. You can use solids, prints, or even scrap fabrics to create a unique bird block design.
How large should the bird block be?
The size of the bird block depends on the overall dimensions of your quilt. A typical block may range from 6 to 12 inches, but you can adjust the size based on your preferences.
Is this project beginner-friendly?
Yes, the Bird Block Quilt – Tutorial is suitable for beginners with basic quilting skills. The design is straightforward, and the tutorial provides step-by-step instructions.
Can I customize the bird design?
Absolutely! Feel free to get creative with colors, patterns, and shapes to make the bird design your own. You can also experiment with different bird species for added variety.
How long does it take to make a Bird Block Quilt?
The time it takes to complete a Bird Block Quilt varies depending on the size and complexity of the quilt. On average, it may take a few days to a couple of weeks, depending on your pace.
Join our VIP broadcast list and gain access to exclusive patterns, all for free. As a VIP member, you’ll receive the best patterns daily, delivered directly to your device. ✨📱 It’s a unique opportunity to stay up-to-date with the latest trends and designs, curated just for you. Don’t miss out on enhancing your projects and discovering new inspirations with the best patterns every day! 🎨🔝
Conclusion
In this Bird Block Quilt – Tutorial, we’ve covered everything from fabric selection to assembling and finishing your quilt. Whether you’re making a single bird block or an entire quilt, this project is a rewarding way to showcase your quilting skills.
We hope you found this tutorial helpful and inspiring. If you have any questions or suggestions, please leave a comment below. We’d love to hear your feedback and see your beautiful bird block creations!

