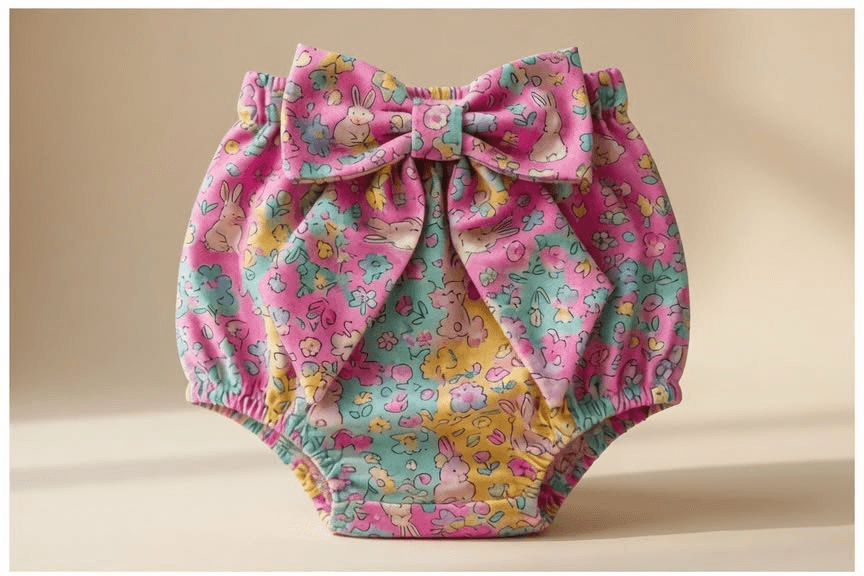
Fabric Baby Diaper Cover Pattern is a charming sewing project that combines comfort, practicality, and adorable style into one handmade baby accessory. The Fabric Baby Diaper Cover Pattern shown in the image features a soft elastic-waist bloomer with gathered leg openings and a large decorative bow centered at the front.
Made from colorful cotton fabric printed with playful bunny and floral motifs, this diaper cover is perfect for everyday wear, baby photo sessions, birthdays, baby showers, or as a thoughtful handmade gift. The simple construction makes it an enjoyable project for beginners while offering plenty of opportunities for experienced sewists to personalize the design.
You can choose fabrics that match different seasons, holidays, or nursery themes while adjusting the size for newborns, infants, or toddlers. The elastic waistband and leg openings provide a comfortable fit that allows babies to move freely, while the roomy shape easily fits over disposable or cloth diapers.
The pattern displayed beneath the finished diaper cover provides a clear cutting guide with gentle curves for the leg openings and straight edges for the waistband. The design uses a single main pattern piece that is folded and sewn together before adding elastic and finishing details.
Materials Needed for the Fabric Baby Diaper Cover Pattern
Before starting your Fabric Baby Diaper Cover Pattern, gather all the necessary materials to make the sewing process smooth and enjoyable. Having everything prepared allows you to work efficiently while achieving accurate results.
Choose a lightweight cotton fabric similar to the one shown in the image. Cotton is soft against delicate skin, breathable, washable, and comfortable enough for everyday wear. Printed fabrics featuring animals, flowers, or playful patterns create especially adorable diaper covers.
You will also need matching polyester thread, fabric scissors or a rotary cutter, sewing clips or pins, measuring tape, tailor’s chalk, an iron, and a sewing machine. A universal sewing needle works well with most quilting cotton fabrics.
Soft braided elastic is required for the waistband and both leg openings. The waistband elastic should provide a secure but comfortable fit, while the leg elastic creates the gentle gathers that help the diaper cover stay in place.
Optional supplies include lightweight interfacing for the decorative bow, decorative labels, matching ribbons, or lace trim if you wish to personalize the finished garment further.
Always wash, dry, and iron your fabric before cutting the pattern pieces. Prewashing prevents shrinkage after sewing and ensures the finished diaper cover maintains its intended size.
Step-by-Step Guide to Sewing the Diaper Cover
Begin your Fabric Baby Diaper Cover Pattern by transferring the pattern measurements shown in the image onto your fabric. Carefully cut the main body piece while maintaining smooth curves around the leg openings.
Fold the fabric with the right sides together and stitch the front and back rise seams. These seams create the basic bloomer shape that will later be joined at the sides and finished with elastic.
Press each seam open or toward one side using a warm iron. Pressing throughout construction helps the garment maintain a neat and professional appearance.
Next, fold and stitch the waistband casing, leaving a small opening through which the elastic can be inserted. Repeat the same process for each leg opening, creating narrow casings that will hold the elastic securely.
Attach a safety pin to one end of the elastic and carefully thread it through each casing. Adjust the elastic length until the gathers appear even and comfortable without becoming overly tight.
Overlap the elastic ends securely using several rows of stitching. Close the casing openings and distribute the gathers evenly around the waistband and legs to complete the main body of the diaper cover.
Making and Attaching the Decorative Bow
The oversized bow shown in the image is the highlight of the Fabric Baby Diaper Cover Pattern. Begin by cutting two identical bow rectangles along with one smaller strip that will form the center wrap.
Place the large rectangles with the right sides together and sew around the edges, leaving a small opening for turning. Trim the corners carefully before turning the bow right side out.
Press the bow flat using an iron, ensuring all edges remain crisp and smooth. A neatly pressed bow creates a much more polished finished accessory.
Pinch the center of the bow to create evenly balanced folds. Secure the gathered middle with a few hand stitches so the shape remains in place during assembly.
Wrap the smaller center strip around the gathered middle and stitch it securely on the back. This creates the finished knot that gives the bow its elegant appearance.
Hand stitch the completed bow to the center front waistband of the diaper cover using strong stitches. Position it evenly so it sits directly above the gathered front, just as shown in the sample image.
Finishing Touches and Care Tips
After assembling your Fabric Baby Diaper Cover Pattern, inspect every seam carefully to ensure the elastic is evenly distributed and all stitching is secure. Trim any loose threads for a clean finish.
Lightly press the finished garment while avoiding direct heat on the elastic. Pressing smooths the fabric and enhances the overall appearance of the diaper cover.
This pattern is highly customizable. You can create seasonal versions using holiday prints, pastel fabrics for spring, or neutral colors for everyday wear.
Additional decorative options include lace edging, ruffled leg openings, embroidered initials, decorative buttons, or coordinating bows in different sizes.
These diaper covers make thoughtful handmade gifts for baby showers, birthdays, newborn photography sessions, and first birthday celebrations. Matching headbands or bibs can also be sewn using leftover fabric.
To maintain the diaper cover, machine wash on a gentle cycle using mild detergent and tumble dry on low heat or air dry. Proper care will help preserve the elastic and keep the cotton fabric soft after repeated washing.
FAQ
Is the Fabric Baby Diaper Cover Pattern suitable for beginners?
Yes. The pattern uses basic sewing techniques, making it an excellent project for beginners with some experience sewing simple garments.
What fabric works best?
Lightweight cotton is the most popular choice because it is breathable, soft, durable, and easy to sew.
Can I adjust the size?
Absolutely. The pattern can easily be enlarged or reduced to fit newborns, infants, or toddlers by adjusting the overall dimensions.
Do I need a serger?
No. A regular sewing machine is sufficient. Zigzag stitching or pinking shears can be used to finish raw edges if desired.
Can I make it without the bow?
Yes. The diaper cover works perfectly without the decorative bow, creating a clean and classic bloomer design.
Can I sell finished diaper covers?
Yes. Handmade baby clothing is popular at craft fairs, boutiques, and online handmade marketplaces, provided you comply with local regulations and safety requirements.
Conclusion
This Fabric Baby Diaper Cover Pattern is a delightful sewing project that combines comfort, functionality, and adorable style into a practical baby garment. Inspired by the design shown in the image, the pattern features a comfortable elastic waistband, gently gathered leg openings, and a beautiful oversized front bow that adds a charming finishing touch.
VIDEO TUTORIAL
With only a few basic sewing techniques and readily available materials, you can create a diaper cover that is perfect for everyday wear, special occasions, or meaningful handmade gifts. The pattern is easy to customize with different fabrics, trims, and embellishments, making every finished piece unique. We hope this tutorial has inspired you to sew your own fabric baby diaper cover. If you enjoyed this guide, please leave your honest opinion and share your suggestions for future sewing projects.