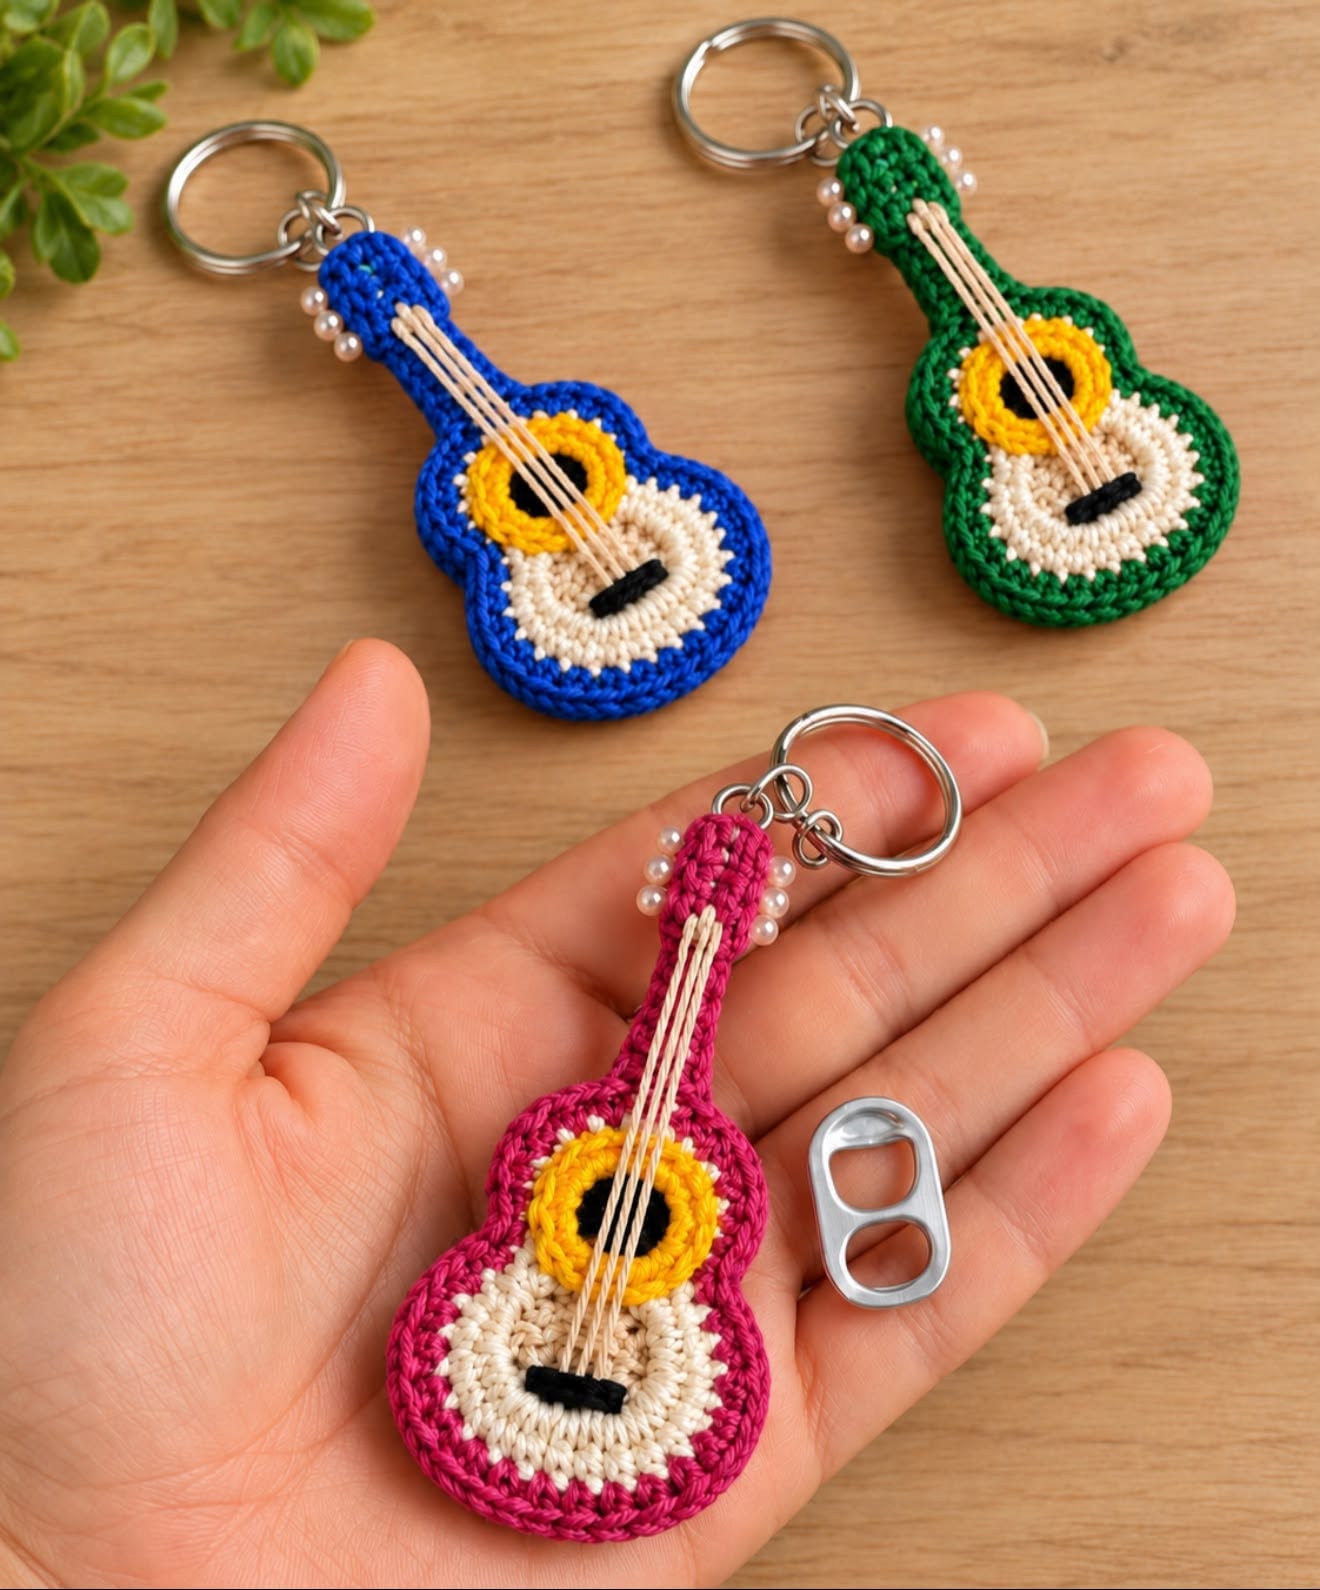
A Crochet Guitar Keychain Pattern is a fun way to turn a little yarn into a musical accessory. This miniature guitar makes a thoughtful handmade gift for musicians, music teachers, guitar lovers, and anyone who enjoys unique crochet projects.
With a few basic stitches, simple shaping, and carefully chosen colors, you can create a charming guitar that fits comfortably on a key ring, backpack, purse, or instrument case. It is also a wonderful project for using leftover yarn.
Whether you are a beginner or an experienced crocheter, this guide covers the materials, techniques, assembly tips, and finishing details that help your miniature guitar look neat, durable, and ready for everyday use.
Materials and Tools for a Crochet Guitar Keychain
Choosing the right supplies makes a noticeable difference in the finished keychain. Because the guitar is small, lightweight materials and a suitable hook help create firm stitches that hold the shape without leaving large gaps.
Cotton yarn is an excellent option because it offers stitch definition and helps the guitar maintain a clean outline. Acrylic yarn can also work well, especially when you want a wider selection of colors or a softer finish. Brown, tan, black, white, and red are popular choices for creating different guitar styles.
You will need a crochet hook suited to your yarn, scissors, a yarn needle, and a keychain ring with a short chain or attachment loop. A small amount of stuffing is optional if you want a slightly padded guitar body.
For beginners, medium or fine yarn that is easy to handle is often more convenient than extremely thin thread. However, a smaller hook than the yarn label recommends can help produce tighter stitches. Test a small sample before starting so you can check the fabric’s firmness and appearance.
How to Crochet the Miniature Guitar Shape
The guitar body is the main feature of this project. A classic acoustic guitar has a rounded lower section, a narrower middle, and a smaller upper section. You can recreate this silhouette with two matching body pieces, using increases and decreases to shape the edges.
Start with a small magic ring or a short chain, depending on the pattern construction you prefer. Work single crochet stitches to build the lower body, adding increases gradually to create a rounded shape. As the body widens, check that your stitches remain even and that the fabric lies flat rather than curling.
To form the guitar’s waist, reduce the width slightly before shaping the upper bout. The neck can be crocheted separately as a narrow rectangle or worked as an extension of the body. A small rectangular headstock at the top completes the recognizable guitar silhouette.
If you are making two body pieces, keep their stitch counts and dimensions as similar as possible. Place them together and sew around the edges, adding a tiny amount of stuffing if desired. Avoid overfilling the body because too much stuffing can distort the guitar’s outline and make the keychain bulky.
Colors, Details, and Finishing Techniques
Color choices can transform the same basic guitar shape into several different designs. Brown and tan create a traditional acoustic appearance, while black, white, or bright colors can give the accessory a modern electric-guitar style. Contrasting yarn also makes the neck, bridge, and decorative details easier to recognize.
A small circle or oval on the body can represent the sound hole of an acoustic guitar. You can crochet this detail separately and sew it securely in place, or embroider a simple circle using dark yarn. A narrow strip of contrasting yarn can represent the fretboard, while short embroidered lines suggest the frets.
For the strings, embroidery is often more practical than attaching long pieces of loose thread. Use a yarn needle to create several fine, straight lines along the neck and body. Keep the stitches snug and secure, especially if the keychain will be handled frequently.
Before attaching the key ring, weave in all yarn ends and inspect the seams. Sew the ring attachment firmly through a reinforced section near the headstock or upper neck. Since keychains experience repeated pulling and movement, a few extra securing stitches can improve durability.
Practical Tips for Durability and Everyday Use
A crochet guitar keychain is small, but it still needs to withstand friction, movement, and occasional pulling. Tight stitches, secure seams, and well-attached hardware are more important than complicated decorative techniques. Choose a hook that produces a dense fabric without making the yarn uncomfortable to work with.
Keep the design proportional. A body that is too wide or a neck that is too long may make the accessory awkward to carry. Before sewing the pieces together, compare the body and neck dimensions and adjust them if the guitar looks unbalanced.
The key ring attachment deserves special attention because it bears much of the stress during daily use. Avoid attaching the hardware only to a single loose stitch. Instead, reinforce the area with several passes of strong yarn or secure sewing thread, and check the attachment by gently pulling it before using the finished item.
For care, remove loose dust with a soft brush or cloth. If the yarn allows washing, follow its care instructions and avoid soaking metal hardware unnecessarily. Let the piece dry completely before returning it to a bag or key set. Keep small accessories away from young children and pets because the metal ring and other detachable parts can present choking hazards.
Frequently Asked Questions
Is a crochet guitar keychain suitable for beginners?
Yes. The project can be beginner-friendly when it uses basic stitches such as single crochet, increases, decreases, and simple sewing. Small details may require patience, but the main shape can remain uncomplicated.
What yarn works best for a miniature guitar?
Cotton yarn is a strong choice because it provides clear stitch definition and a firm finish. Acrylic yarn is also suitable if you prefer softer fibers or more color options. Choose yarn that works comfortably with a small hook.
How can I make the guitar look more realistic?
Use contrasting colors to define the body, neck, fretboard, and sound hole. Embroidered strings and small fret marks can add detail without making the accessory too bulky. Keeping the proportions balanced is equally important.
Do I need stuffing for the guitar body?
No. Two flat pieces sewn together create a lightweight keychain that is easy to carry. A small amount of stuffing can add dimension, but it is optional and should not distort the shape.
How do I keep the keychain from falling apart?
Use tight, even stitches, weave in yarn ends securely, and reinforce the seams. Attach the key ring through a sturdy section with multiple stitches, then test the connection gently before everyday use.
Can I customize the guitar for a gift?
Absolutely. Match the colors to someone’s favorite guitar, music style, or personal preferences. You can also make a small collection in different colors for friends, music students, teachers, or craft fair customers.
How long does this project take?
A simple design may take an hour or two, depending on your experience and the number of details. More elaborate versions with embroidered strings, layered pieces, and decorative accents will take longer.
Conclusion
A Crochet Guitar Keychain Pattern is a creative, approachable project that combines basic crochet techniques with musical charm. With suitable yarn, careful shaping, and a securely attached key ring, you can make a miniature guitar that is both attractive and practical.
Experiment with colors, adjust the proportions, and add details that reflect your personal style. If you try this project, share your favorite color combinations or ideas for improving the design. Your suggestions may inspire other crocheters to create their own musical accessories.