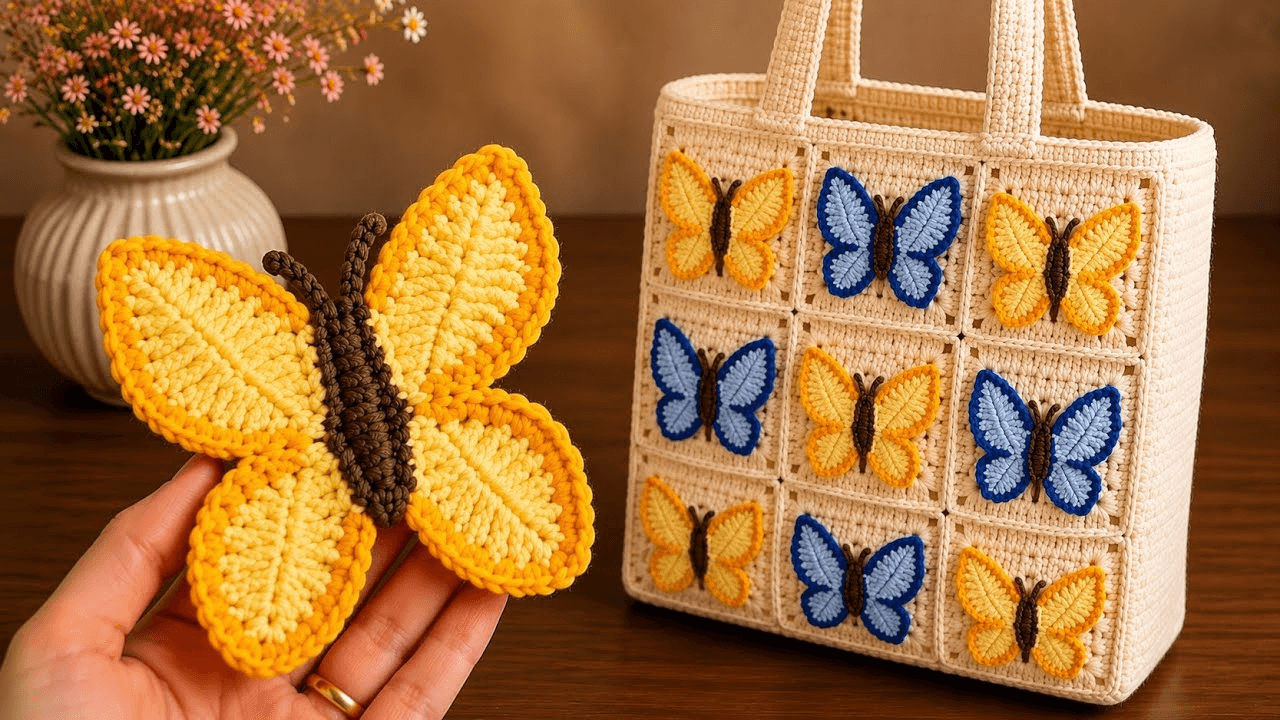
Crochet Butterfly Square Tote Bag Pattern is a beautiful handmade project that combines classic crochet squares with a delicate butterfly-inspired design. The result is a practical tote bag with a decorative appearance, making it an excellent project for anyone who enjoys creating useful accessories with yarn.
A crochet butterfly tote bag can be created by joining several individual crochet squares together and arranging the colors so that the butterfly motif becomes the focal point. This construction method is especially appealing because each square can be made separately before the final assembly.
This Crochet Butterfly Square Tote Bag Pattern is also a wonderful way to practice several fundamental crochet techniques, including working in rounds, changing colors, joining motifs, creating structured edges, and making sturdy handles.
Materials and Preparation for the Crochet Butterfly Square Tote Bag
To begin your Crochet Butterfly Square Tote Bag Pattern, choose a yarn that is durable enough for an accessory while still providing good stitch definition. Cotton and cotton-blend yarns are particularly useful for tote bags because they tend to hold their shape well and make the individual crochet stitches easy to see.
Select a main background color and several contrasting shades for the butterfly motif. A light background with colorful wings can make the butterfly stand out beautifully. Alternatively, you can create a monochromatic bag by using several shades from the same color family.
You will need an appropriate crochet hook, scissors, a yarn needle, measuring tape, and stitch markers. The exact hook size depends on your yarn and personal tension. Before beginning the full project, crochet a small sample to see how firm or flexible the fabric feels.
The number of squares needed depends on the size of the tote you want to create. A smaller bag can be made with fewer motifs, while a larger shopping-style tote can use additional squares. The important point is to keep all motifs the same finished size so the assembly remains even.
When choosing yarn, remember that the finished bag may stretch slightly when carrying items. A moderately firm crochet fabric generally works better than a very loose fabric for a tote.
Plan the color arrangement before assembling the squares. If the butterfly motif is divided between multiple blocks, place the squares on a flat surface and experiment with their positions until the wings and body form a balanced composition.
Creating the Crochet Butterfly Squares
The foundation of the Crochet Butterfly Square Tote Bag Pattern is the individual crochet square. Each square can begin from the center and develop outward in rounds. This method creates a structured motif while providing plenty of opportunities for color changes.
Start with your chosen center color and work a small circular foundation. The first rounds should establish the central section of the square while keeping the stitches evenly distributed.
As you move into the next rounds, introduce the colors that will form the butterfly. Butterfly wings can be suggested through symmetrical blocks of color positioned on opposite sides of the center.
The butterfly body can be represented by a narrow central section, while the upper and lower portions of the motif can expand outward to create the appearance of wings. You do not need complicated shaping to achieve an attractive butterfly-inspired effect.
Continue building the square with regular corner increases. The corners are important because they determine whether the motif remains square as it grows.
Keep track of your stitch count at the end of each round. Consistent increases help ensure that every square reaches the same dimensions and lies flat.
If you want a more detailed butterfly, experiment with additional colors around the wings. Small contrasting sections can create the impression of wing patterns without requiring complicated stitches.
Once each square has reached the desired size, finish the final round neatly. Weave in the yarn ends before assembly whenever possible. This keeps the construction process organized and prevents a large number of loose ends from accumulating.
Joining the Squares and Building the Tote
After completing the crochet squares, the next step in the Crochet Butterfly Square Tote Bag Pattern is joining them into the body of the tote. Arrange the squares according to your planned butterfly design before stitching them together.
There are several ways to join crochet squares. A simple whip stitch creates a flexible seam, while a slip-stitch join can produce a more defined line between motifs. You can also use a decorative crochet joining method if you want the seams to become part of the overall design.
Work carefully along each edge and keep the tension consistent. Pulling the joining yarn too tightly can cause the bag to become distorted, while very loose joins may create gaps.
Once the front and back panels are assembled, place them together with the correct sides facing inward. Join the side and bottom edges securely, leaving the top open.
For additional structure, you can reinforce the bottom corners with a few extra stitches. This is especially helpful if the tote will occasionally carry heavier lightweight items.
Create a top border around the opening. Several rounds of single crochet can provide a firm edge and help the bag maintain its shape.
At this stage, inspect the bag from all sides. Make sure the butterfly motif is centered and that the seams are secure before moving on to the handles.
Creating Handles and Finishing the Butterfly Tote Bag
The handles are an important part of the Crochet Butterfly Square Tote Bag Pattern because they need to be comfortable while remaining strong enough for regular use. Crochet handles can be made by creating long chains and working several rows of sturdy stitches over them.
Determine where you want the handles positioned before attaching them. Measuring from the center of the bag can help keep both sides symmetrical.
For shorter handles, position them close to the top edge so the bag can be carried by hand. For longer handles, extend the straps enough to allow comfortable carrying over the shoulder.
Work several rows over each handle to create a wider strap. A wider strap distributes pressure more evenly and can feel more comfortable than a very narrow crocheted chain.
Attach each handle securely with multiple rows of stitches. Reinforcing the attachment points is especially important because these areas receive more stress when the bag is carried.
After the handles are attached, weave in all remaining yarn ends. Check the inside and outside of the bag carefully for loose strands.
You can add a decorative border around the top edge using a contrasting color. Small scallops, simple shells, or a clean single-crochet finish can all complement the butterfly motif.
For additional personalization, consider adding a small crochet flower, leaf, button, or embroidered detail. Keep decorative elements securely attached and balanced with the main butterfly design.
Once everything is finished, gently reshape the tote and allow it to rest flat. If the yarn permits blocking, light blocking can help straighten the squares and improve the overall appearance of the finished crochet butterfly tote bag.
FAQ About the Crochet Butterfly Square Tote Bag Pattern
Is the Crochet Butterfly Square Tote Bag Pattern beginner-friendly?
The individual squares can be suitable for beginners who understand basic crochet stitches, although assembling multiple motifs and creating sturdy handles may require a little more practice.
What yarn is best for a crochet tote bag?
Cotton or cotton-blend yarn is a popular choice because it provides good stitch definition and can create a relatively sturdy fabric.
How many crochet squares do I need?
The number depends entirely on the desired size. Fewer squares create a small handbag, while additional squares can produce a larger tote.
Can I change the butterfly colors?
Absolutely. Butterfly motifs look beautiful in many color combinations. You can use pastels, jewel tones, bright colors, or neutral shades.
Can I make the bag larger?
Yes. Add more squares to increase the width or height, or make each individual square larger.
How do I keep all the squares the same size?
Maintain consistent stitch tension and use the same number of rounds for every square. Measuring completed motifs before assembly is also helpful.
Can I line the tote bag?
Yes. A fabric lining can provide additional structure and help prevent small items from passing through the crochet stitches.
Are crochet handles strong enough?
They can be, provided they are made with sturdy yarn and securely reinforced where they attach to the bag.
Can I use a different joining method?
Yes. Whip stitching, slip-stitch joins, single-crochet joins, and decorative joining techniques can all be used depending on the appearance you want.
Can the butterfly motif be made more detailed?
Certainly. Additional colors, embroidery, surface crochet, or small decorative stitches can add more detail to the wings.
How should I care for the finished bag?
Follow the care instructions for the yarn you selected. Gentle cleaning and careful reshaping can help maintain the bag’s appearance.
Can this pattern be used for gifts?
Yes. A handmade crochet butterfly tote bag can make a thoughtful gift for someone who enjoys colorful accessories, crochet, or handmade fashion.
Conclusion
The Crochet Butterfly Square Tote Bag Pattern is a creative project that brings together colorful crochet motifs, practical construction, and beautiful butterfly-inspired decoration. By creating individual squares, arranging them into a balanced design, joining the panels, and adding sturdy handles, you can make a personalized tote with a distinctive handmade character.
The square construction also makes the project highly adaptable. You can change the number of motifs, experiment with different yarn colors, modify the handle length, or add a fabric lining depending on how you plan to use the finished bag.
The butterfly design provides plenty of opportunities for creativity. Bright contrasting colors can make the wings immediately noticeable, while softer shades can create a delicate and understated accessory. You can even experiment with different color combinations for every bag you make.
With patience, consistent crochet tension, and careful assembly, the Crochet Butterfly Square Tote Bag Pattern can become a practical handmade accessory that showcases your creativity. It is also a satisfying project for using small amounts of leftover yarn in coordinated colors.
If you make your own Crochet Butterfly Square Tote Bag Pattern, leave your honest opinion and suggestions about the project. Your ideas about colors, square arrangements, handles, and decorative details can inspire other crochet enthusiasts to create their own unique butterfly tote bags.