Welcome to our comprehensive guide on the Twisted Bargello Quilt – Tutorial! This stunning quilt design features intricate patterns and vibrant colors that can transform any space in your home.
Whether you are an experienced quilter or just starting your quilting journey, the Twisted Bargello pattern offers a rewarding challenge that results in a beautiful, eye-catching piece. In this tutorial, we will guide you step-by-step through the process of creating your own Twisted Bargello Quilt.
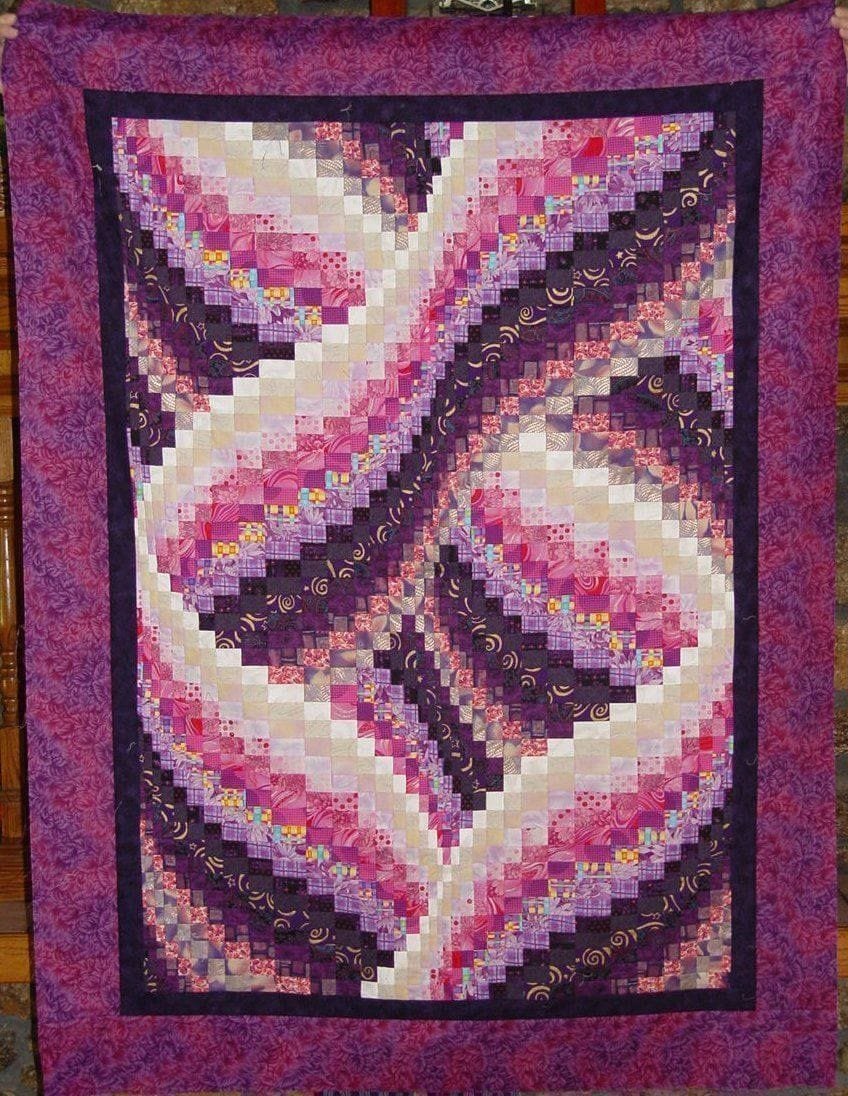
The unique aspect of the Twisted Bargello quilt lies in its design, which creates the illusion of movement and depth through cleverly arranged fabric strips. The combination of color and pattern not only makes this quilt visually striking but also allows for endless customization possibilities.
Choosing different fabrics can result in vastly different outcomes, so you have the opportunity to create a quilt that truly reflects your personal style.
Before we dive into the Twisted Bargello Quilt – Tutorial, let’s ensure you have all the necessary materials and a clear understanding of the techniques involved. By the end of this article, you will be equipped with everything you need to create a beautiful quilt that can be cherished for years to come. Let’s get started!
1. Materials Needed for the Twisted Bargello Quilt
To successfully create the Twisted Bargello Quilt, it’s essential to gather the right materials. Here’s what you’ll need to get started on your quilting adventure.
First, choose a selection of fabric strips. You’ll want to use a variety of colors and patterns, typically in a range of 4 to 10 fabrics. Each fabric strip should ideally measure 2.5 inches wide by the length of the fabric. Using quilting cotton is recommended for its durability and ease of handling. Look for fabrics that complement each other to enhance the visual appeal of your quilt.
Next, prepare your rotary cutter, cutting mat, and ruler. A rotary cutter will allow you to make precise cuts for your fabric strips, ensuring they are uniform in size. The cutting mat protects your surfaces, while the ruler helps guide your cuts accurately. Accuracy is vital in quilting to ensure the pieces fit together seamlessly.
You’ll also need a sewing machine equipped with a quarter-inch foot for precise seam allowances. Additionally, gather pins, fabric scissors, and a seam ripper. Pins will help hold your fabric strips in place while you sew, fabric scissors are essential for trimming threads, and a seam ripper is invaluable for correcting any mistakes.
Finally, don’t forget to have batting and backing fabric ready for your quilt. The batting provides warmth and thickness, while the backing fabric adds a polished finish to your quilt. Selecting a backing fabric that coordinates with your top fabrics can elevate the overall design.
2. Preparing Your Fabric for the Twisted Bargello Quilt
Now that you have all your materials, the next step in the Twisted Bargello Quilt – Tutorial is preparing your fabric. Proper preparation will set the foundation for a successful quilting experience.
Start by washing and pressing your fabric strips. Pre-washing helps remove any sizing or chemicals that may be present in new fabrics. This step also prevents shrinking after the quilt is completed. After washing, use an iron to press each strip, ensuring they are flat and ready for cutting.
Once your fabric strips are prepped, arrange them in the order you want them to appear in your quilt. A good approach is to create a gradient or a pattern that flows from light to dark colors, or from bold to subtle prints. Take your time to play with the arrangement; this is your opportunity to be creative!
Next, cut your fabric strips into segments. Depending on the design you are aiming for, you may need to cut them into various lengths. For the Twisted Bargello quilt, cutting your strips into segments of approximately 10 inches will help create the twisted effect.
After cutting, it’s important to organize your segments. Group them based on the sequence you plan to sew them together. Using a design wall or laying them out on the floor can help visualize the final layout before you start sewing.
Finally, ensure that you have a clean and organized workspace. A tidy area allows for greater focus and less frustration while you work on your quilt. Gather all your tools and materials in one spot, making it easier to reach for what you need as you progress through the tutorial.
3. Step-by-Step Instructions for the Twisted Bargello Quilt
Now we’re ready to dive into the step-by-step instructions for creating the Twisted Bargello Quilt. Follow these detailed directions closely for the best results.
Begin by sewing the fabric segments together. Take your first two segments and place them right sides together, aligning the edges. Use your sewing machine to stitch along the edges with a quarter-inch seam allowance. After sewing, press the seams open to reduce bulk.
Continue adding fabric segments in the same manner. As you sew each piece, make sure to alternate the direction of the fabric strips. This will create the twisted appearance that is characteristic of the Bargello design. Be mindful of maintaining your seam allowances for a clean finish.
Once you have completed the first row, it’s time to move on to the next. Sew each row of segments together until you have completed all of your rows. Take care to keep your strips aligned properly to avoid any distortions in the design. It’s helpful to refer back to your original layout as you sew.
After all your rows are sewn, it’s essential to join them together. Lay your rows out again in the desired order, and pin them together, right sides facing. Sew along the seams, pressing as you go. This process is where the quilt really starts to take shape!
Once the top of your quilt is complete, it’s time to attach the batting and backing. Layer your quilt top, batting, and backing fabric, ensuring all edges are aligned. Use safety pins or a basting spray to hold the layers in place.
Finally, quilt your layers together. You can choose to quilt by hand or with a sewing machine. Stitch in the ditch along the seams for a clean, modern look, or create a more intricate design throughout the quilt. Once you’ve completed the quilting, trim any excess batting and backing fabric.
4. Finishing Touches for the Twisted Bargello Quilt
With the main assembly of your Twisted Bargello Quilt complete, it’s time to add the finishing touches. These final steps will elevate your quilt and ensure it’s ready for use.
Start by trimming the edges of your quilt to create a uniform border. Use a rotary cutter and ruler to carefully cut away any excess fabric, ensuring all edges are straight. This step is important for a polished appearance.
Next, create the binding for your quilt. Cut strips of fabric measuring 2.5 inches wide and the length of your quilt perimeter. Join these strips end-to-end to form one long strip. Fold it in half lengthwise and press, creating a crease down the center.
Attach the binding to your quilt by aligning it with the raw edges of the quilt. Sew along the edge, using a quarter-inch seam allowance. When you reach the corners, fold the binding at a 45-degree angle to create mitered corners for a clean finish.
After attaching the binding, fold it over to the back of the quilt and hand stitch it down. This technique ensures the binding is securely attached and provides a neat look on both the front and back of your quilt.
Lastly, give your quilt a final press with an iron to remove any wrinkles. This step enhances the appearance and prepares your quilt for display or use. Take a moment to admire your hard work—you’ve created a stunning Twisted Bargello Quilt!
FAQ about the Twisted Bargello Quilt – Tutorial
Q1: What skill level is required to make the Twisted Bargello Quilt?
The Twisted Bargello Quilt is suitable for intermediate quilters. Basic quilting skills are necessary, but the tutorial provides step-by-step guidance to help you along the way.
Q2: Can I use different fabric types for this quilt?
While quilting cotton is recommended for its durability, you can experiment with other fabric types, such as flannel or rayon. Just be mindful of how they affect the overall drape and appearance of the quilt.
Q3: How long does it take to complete a Twisted Bargello Quilt?
The time to complete the quilt depends on your skill level and the complexity of your design. On average, it may take anywhere from several days to a couple of weeks.
Q4: Is it necessary to pre-wash fabric before using it?
Yes, pre-washing is recommended to remove any chemicals and prevent shrinking. This will ensure your quilt maintains its size and integrity after washing.
Q5: Can I customize the size of the Twisted Bargello Quilt?
Absolutely! You can adjust the dimensions by changing the number of fabric strips or altering the length of your segments. Just ensure you maintain consistent cutting and sewing techniques.
Q6: What is the best way to care for my finished quilt?
To care for your quilt, wash it in cold water on a gentle cycle and tumble dry on low heat. Avoid bleach, as it can damage the fabric and affect the colors.
Join our VIP broadcast list and gain access to exclusive patterns, all for free. As a VIP member, you’ll receive the best patterns daily, delivered directly to your device. ✨📱 It’s a unique opportunity to stay up-to-date with the latest trends and designs, curated just for you. Don’t miss out on enhancing your projects and discovering new inspirations with the best patterns every day! 🎨🔝
Conclusion
In this tutorial, we explored the intricacies of the Twisted Bargello Quilt – Tutorial. From gathering materials and preparing your fabric to sewing and finishing your quilt, we hope this guide has empowered you to embark on your quilting journey. The Twisted Bargello quilt is not only a beautiful project but also a rewarding experience that enhances your quilting skills.
We’d love to hear your thoughts and suggestions! Please leave your feedback and share your experiences with the Twisted Bargello Quilt in the comments below. Happy quilting!

