The Twinkle block – Tutorial is a delightful guide for quilters looking to create a charming and eye-catching block that embodies the twinkling stars of a night sky.
This versatile block is perfect for beginners and experienced quilters alike, making it a fantastic addition to any quilting project. In this tutorial, we will walk you through the steps of making the Twinkle block, providing tips and tricks along the way to ensure your success.
Quilting is not just about creating beautiful pieces; it’s also about expressing your creativity and style. The Twinkle block offers a unique way to play with colors and fabrics, allowing you to customize your design to fit your personal aesthetic.
Whether you want to make a full quilt or simply incorporate this block into a larger project, this tutorial has everything you need.
Join us as we dive into the world of quilting with this comprehensive Twinkle block – Tutorial. By the end of this guide, you’ll have the knowledge and confidence to create your own stunning Twinkle block. Let’s get started!
1. Materials Needed for the Twinkle Block
Before embarking on your quilting journey, it’s essential to gather all the necessary materials for creating the Twinkle block. Having everything ready will make your sewing experience smooth and enjoyable.
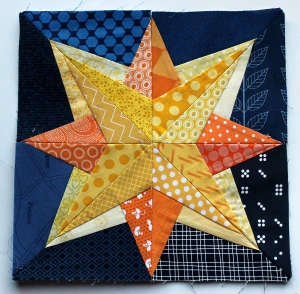
- Fabric Selection: Start with a selection of fabrics that inspire you. The Twinkle block can be made with contrasting colors to enhance the star-like design. Consider using a combination of solids and prints to create depth and visual interest.
- Cutting Tools: A rotary cutter, cutting mat, and quilting ruler are vital for accurately cutting your fabric. Precision is key in quilting, and these tools will help you achieve clean edges and perfect measurements.
- Sewing Machine: A reliable sewing machine is essential for piecing your Twinkle block together. Make sure it’s in good working order and threaded with your chosen thread color.
- Iron and Ironing Board: Pressing your seams is crucial for a polished finish. An iron and ironing board will help you flatten your pieces and achieve crisp seams.
- Thread: Choose a high-quality thread that complements your fabric. A neutral color often works best, but you can opt for a contrasting thread for a unique touch.
- Additional Tools: Don’t forget pins, a seam ripper for corrections, and fabric scissors for any final trimming.
2. Cutting Your Fabric for the Twinkle Block
Once you have your materials, the next step is cutting your fabric pieces for the Twinkle block. Accurate cutting is crucial for achieving a professional look.
- Background Squares: Start by cutting your background fabric into squares. Typically, 5-inch squares work well, but you can adjust the size based on your desired finished block dimensions.
- Star Points: For the star points, cut larger squares and then slice them diagonally to create triangles. This method allows you to efficiently use your fabric and create precise star points.
- Center Piece: The center of the Twinkle block often features a standout fabric. Cut a square, usually around 3 inches, that will draw attention and enhance the overall design.
- Half-Square Triangles (HSTs): Many variations of the Twinkle block include half-square triangles. Cut squares, then draw a diagonal line, sew on either side, and cut along the line to create your HSTs.
- Organizing Pieces: After cutting, organize your pieces into piles. Group them by color or position in the block to streamline your assembly process.
- Consider Pre-Cuts: If you’re pressed for time, consider using fabric pre-cuts like charm packs or jelly rolls. These options simplify the cutting process and can be a fun way to mix and match fabrics.
3. Assembling the Twinkle Block
Now that your fabric is cut, it’s time to start assembling your Twinkle block. This step-by-step process will guide you through the assembly.
- Step 1: Layout: Begin by laying out all your pieces according to the design of the Twinkle block. This visual arrangement helps you see how everything will fit together and allows for any adjustments before sewing.
- Step 2: Sew Star Points: Start with the star points. Carefully sew the triangles together, ensuring to maintain a quarter-inch seam allowance. Press the seams open for a neat finish.
- Step 3: Create Rows: Once the star points are completed, sew them into rows. Align the pieces carefully, using pins if necessary, and press each row as you go.
- Step 4: Join Rows: After constructing the rows, join them together. Take care to match the seams for a seamless appearance, ensuring that the star points align perfectly.
- Step 5: Square Up: Once the block is fully assembled, it’s important to square it up. Trim any excess fabric to ensure even edges, which is essential for accurate piecing in your quilt.
- Step 6: Final Press: Give your completed Twinkle block a final press. This step is crucial for achieving a polished look and ensuring that all seams lie flat.
4. Customizing Your Twinkle Block
One of the best aspects of quilting is the ability to customize your designs. The Twinkle block is no exception, offering various ways to make it uniquely yours.
- Color Variations: Experiment with different color palettes. You can create a monochromatic look for a sophisticated feel or use bright, contrasting colors for a playful vibe.
- Adding Borders: Consider adding a border around your Twinkle block to enhance its design. A contrasting border can frame the block beautifully and provide a finished appearance.
- Combining Blocks: The Twinkle block can be combined with other blocks to create a larger quilt. Mixing various blocks can add depth and complexity to your overall design.
- Alternate Layouts: Play with the arrangement of your blocks. Rotating the Twinkle block can create interesting visual patterns and add dynamism to your quilt.
- Personal Touches: Incorporate personal touches, such as embroidery or appliqué, to make your Twinkle block stand out. This is a great way to express your individuality through your quilting.
- Different Textures: Use a variety of fabric textures, such as cotton, linen, or batik, to create a tactile experience. Mixing textures adds depth and visual interest to your block.
FAQ about Twinkle Block – Tutorial
Q1: What skill level is required to make the Twinkle block?
A: The Twinkle block is suitable for quilters of all skill levels, from beginners to advanced quilters.
Q2: Can I use scrap fabric to create the Twinkle block?
A: Absolutely! The Twinkle block is perfect for using up fabric scraps, allowing for a creative and unique design.
Q3: How do I ensure my points are sharp when sewing the Twinkle block?
A: To achieve sharp points, maintain a precise quarter-inch seam allowance and press seams flat after sewing.
Q4: What size should I cut the pieces for the Twinkle block?
A: Common sizes include 5-inch squares for the background and 3-inch squares for the center piece, but adjust based on your preferred finished size.
Q5: Can I make the Twinkle block larger or smaller?
A: Yes! You can resize the Twinkle block by adjusting the dimensions of your fabric pieces.
Q6: Is squaring up the block necessary?
A: Yes, squaring up your Twinkle block is essential for ensuring even edges, which will help your blocks fit together neatly in your quilt.
Join our VIP broadcast list and gain access to exclusive patterns, all for free. As a VIP member, you’ll receive the best patterns daily, delivered directly to your device. ✨📱 It’s a unique opportunity to stay up-to-date with the latest trends and designs, curated just for you. Don’t miss out on enhancing your projects and discovering new inspirations with the best patterns every day! 🎨🔝
Conclusion
In this Twinkle block – Tutorial, we explored the step-by-step process of creating a beautiful and customizable quilt block. From gathering materials to cutting, assembling, and personalizing your Twinkle block, this guide provides everything you need to bring your project to life.
We hope this tutorial has inspired you to try your hand at the Twinkle block and that you feel more confident in your quilting journey. We would love to hear your thoughts and suggestions for future tutorials, so please leave your feedback in the comments below! Happy quilting!

