Are you ready for an exciting crafting adventure? In this Trip Around The World – Tutorial, you will discover the beauty of quilting while learning how to create a stunning quilt block that represents a journey around the globe.
This project not only celebrates your creativity but also enhances your quilting skills. Whether you’re a beginner or an experienced quilter, this tutorial is designed to guide you through each step, making it easy and enjoyable.
The Trip Around The World quilt pattern is a classic design that showcases an array of fabrics, colors, and patterns, allowing you to express your unique style.
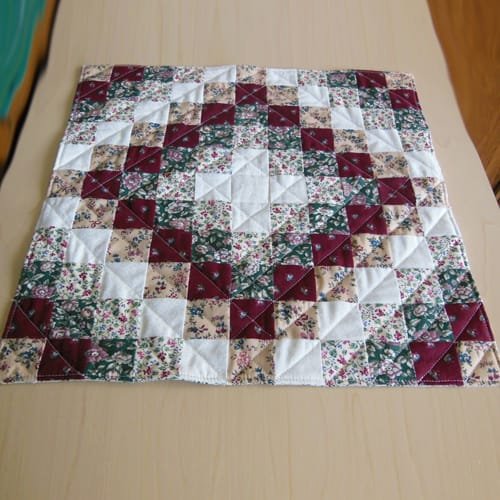
With its vibrant, interlocking squares, this quilt block is a delightful way to explore different fabric combinations. It is perfect for using up fabric scraps, giving them new life in a beautiful quilt that tells a story of exploration and creativity.
In this tutorial, we’ll cover everything you need to know to create your own Trip Around The World quilt block. From selecting fabrics to piecing and assembling your block, we’ll provide clear instructions and helpful tips to ensure your project is a success. So, let’s embark on this creative journey together!
1. Choosing Your Fabrics
Selecting the right fabrics is crucial for achieving a stunning Trip Around The World quilt block. Start by considering the color palette you want to work with. Traditional patterns often feature contrasting colors that create a vibrant effect. However, you can also opt for a more muted palette for a sophisticated look.
When choosing fabrics, consider using a mix of patterns, such as florals, stripes, and solids. This variety will add depth and interest to your quilt block. You can also incorporate fabrics that hold sentimental value, like pieces from clothing or home decor, making your quilt a personal keepsake.
As you gather fabrics, make sure to cut them into squares of equal size. Common sizes for Trip Around The World quilt blocks range from 2.5 inches to 6 inches. The size of your squares will affect the overall size of your quilt, so decide on the dimensions based on your project’s needs.
Don’t forget to pre-wash your fabrics to remove any sizing or chemicals that could affect the final product. This will also prevent any shrinkage after the quilt is completed. Once your fabrics are washed and dried, you’re ready to move on to cutting and arranging your squares.
Creating a design layout is a vital step in making your Trip Around The World quilt block. Start by laying out your squares on a design wall or flat surface. This will allow you to experiment with different arrangements until you find the perfect combination. Try to balance light and dark fabrics throughout the block for a harmonious look.
Remember, this is your quilt block, so feel free to play with colors and patterns! Don’t hesitate to make adjustments as you go along. Once you’re satisfied with your design, take a picture for reference and prepare for the next step.
2. Cutting Your Squares
Accurate cutting is essential in quilting, as it ensures your pieces fit together perfectly. For the Trip Around The World block, start by cutting your chosen fabrics into squares of the same size. Using a rotary cutter, mat, and ruler can significantly improve your cutting accuracy.
Before you begin cutting, make sure to press your fabric to eliminate wrinkles. This will help you achieve cleaner cuts and more precise squares. Depending on your design, you might need multiple squares of different fabrics, so keep your layout in mind while cutting.
As a tip, consider stacking a few layers of fabric together when cutting to save time. Just be sure to cut through all layers evenly to maintain uniformity. After cutting, organize your squares into groups based on their placement in the design. This will streamline the piecing process later on.
Once you have all your squares cut, double-check the sizes to ensure accuracy. This attention to detail will pay off when it comes time to assemble your quilt block. Having neatly cut squares will make sewing them together much easier and will enhance the overall quality of your finished product.
Take your time with this step. The effort you invest in accurately cutting your squares will reflect in the final appearance of your Trip Around The World quilt block.
Now that your squares are cut, it’s time to prepare for piecing them together.
3. Piecing the Squares Together
Piecing your squares is where your Trip Around The World quilt block starts to take shape. Begin by arranging your squares according to your design layout. Make sure to place them in a way that aligns with your envisioned pattern.
Start sewing the squares together in rows. To do this, take two squares and place them right sides together. Pin the squares to prevent shifting while sewing. Use a quarter-inch seam allowance, which is standard in quilting, to achieve precise seams.
After sewing the first two squares, press the seam allowances open or to one side, depending on your preference. Pressing the seams as you go helps to keep the fabric flat and reduces bulk in the final block. Continue this process for each pair of squares in the row, sewing them together one by one until you complete the row.
Once your first row is finished, repeat the process for the remaining rows of squares. Ensure that each row aligns with your design layout. As you piece the rows together, take care to match the seams for a clean and professional appearance.
After all rows are completed, you can join them together. Align the rows carefully, pinning at the seams to ensure they match. Again, sew with a quarter-inch seam allowance and press the seams after sewing. This will help create the intricate pattern that makes the Trip Around The World quilt block so captivating.
Finally, once all rows are sewn together, you’ll have a beautiful quilt block ready for the next step!
4. Finishing Touches
With your Trip Around The World quilt block pieced together, it’s time to add the finishing touches. Begin by trimming any uneven edges to ensure your block is square and uniform. Use a rotary cutter and ruler to achieve clean, straight edges.
After trimming, consider adding a border to your quilt block. A border can enhance the design and provide a frame that highlights your intricate work. Choose a fabric that complements your block, whether it’s a solid color or a coordinating pattern.
Once your borders are added, it’s time to quilt! You can either quilt by hand or use a sewing machine, depending on your comfort level. Quilting adds texture and dimension to your project, making it truly unique. Choose a quilting pattern that complements your design; simple straight lines can enhance the block’s geometric quality, while more intricate designs can add a personal touch.
After quilting, don’t forget to bind your quilt block to finish the edges neatly. There are various binding techniques available, so choose one that suits your style. A well-bound quilt block will look polished and professional.
Lastly, give your quilt block a final press to eliminate any wrinkles and to set the stitches. Once completed, you can incorporate your Trip Around The World quilt block into a larger quilt project or display it as a standalone piece of art.
FAQ
Q1: What is a Trip Around The World quilt block?
A: The Trip Around The World quilt block is a traditional quilting pattern made up of squares arranged in a way that creates an interlocking design. It often features a mix of colors and patterns, resembling a journey around the globe.
Q2: How do I choose fabrics for this quilt block?
A: When selecting fabrics, consider a color palette that appeals to you. Use a mix of solids, prints, and textures to create visual interest. Aim for a balance of light and dark colors to enhance the design.
Q3: What size squares should I use for this quilt block?
A: Common sizes for squares in a Trip Around The World block range from 2.5 inches to 6 inches. The size will depend on the overall dimensions of your quilt project.
Q4: Can I use fabric scraps for this project?
A: Absolutely! The Trip Around The World quilt block is perfect for using up fabric scraps. It allows you to showcase a variety of prints and colors, making your quilt unique.
Q5: What is the best way to press my seams?
A: Pressing seams open or to one side is recommended, as it helps reduce bulk and keeps your quilt block flat. Use a hot iron and press gently to avoid distorting the fabric.
Q6: How can I quilt my finished block?
A: You can quilt your finished block by hand or with a sewing machine. Choose a quilting pattern that complements your design, such as straight lines or free-motion quilting.
Join our VIP broadcast list and gain access to exclusive patterns, all for free. As a VIP member, you’ll receive the best patterns daily, delivered directly to your device. ✨📱 It’s a unique opportunity to stay up-to-date with the latest trends and designs, curated just for you. Don’t miss out on enhancing your projects and discovering new inspirations with the best patterns every day! 🎨🔝
Conclusion
In this Trip Around The World – Tutorial, you’ve learned how to select fabrics, cut squares, piece them together, and add the finishing touches to create a beautiful quilt block. This project celebrates your creativity and can be adapted to suit any style. Whether you use your block in a larger quilt or display it as a standalone piece, it’s a wonderful addition to your crafting journey.
We would love to hear your thoughts on this tutorial! Please leave your honest feedback and any suggestions you might have for future projects. Happy quilting!

