If you’re looking for a creative and precise quilting technique, you’ll love English Paper Piecing (EPP). This method has been popular for centuries, offering crafters the ability to create intricate patterns with ease and precision.
In this Top 10 Tips for English Paper Piecing – Tutorial, we’ll guide you through the best practices to enhance your skills, whether you’re a beginner or an experienced quilter.
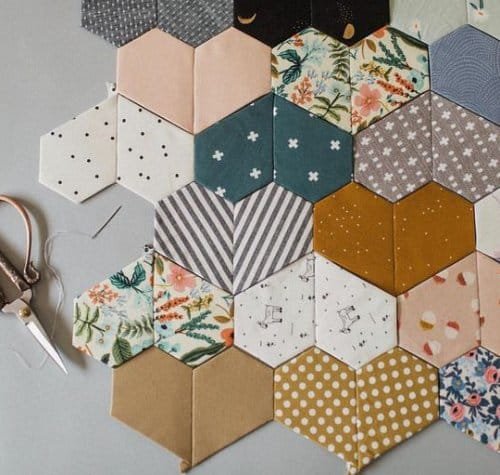
English Paper Piecing involves sewing fabric pieces over paper templates to achieve perfect shapes and seams. This technique is especially useful for creating complex geometric designs like hexagons and diamonds.
With the right tips and tricks, you can master this rewarding craft and produce stunning projects with professional results.
In this tutorial, we’ll not only share the Top 10 Tips for English Paper Piecing – Tutorial, but also provide detailed guidance to help you overcome common challenges.
By the end of this article, you’ll feel confident in your ability to tackle EPP projects with ease and creativity.
1. Choose the Right Materials for Success
Success in English Paper Piecing starts with selecting the right materials. The foundation of your project depends on the quality of your tools and supplies.
- Paper Templates: Invest in pre-cut, high-quality templates or cut your own from durable cardstock. The templates should be firm enough to hold their shape but easy to remove.
- Fabric Selection: Opt for tightly woven fabrics like cotton. These are easier to fold and sew, ensuring crisp edges.
- Needles and Thread: Use a fine needle and strong, lightweight thread, such as polyester or silk, to minimize visible stitches.
- Glue or Pins: Fabric glue pens can secure fabric to templates quickly, but traditional pins work well if you prefer a reusable option.
- Scissors and Rotary Cutters: Ensure your cutting tools are sharp for precise fabric cuts. Accuracy is key to maintaining consistent shapes.
- Storage: Keep your materials organized with small containers or pouches to avoid losing tiny pieces during assembly.
2. Master the Basting Process
Basting is a crucial step in English Paper Piecing, as it secures the fabric to the paper template, ensuring stability while sewing.
- Thread Basting: Use a contrasting thread color for easy removal later. Basting stitches should be long enough to hold the fabric but not too tight.
- Glue Basting: Apply a thin line of fabric glue along the template edges. Fold the fabric over and press it firmly to adhere.
- Choose Your Method: Decide between thread basting and glue basting based on your project needs and personal preference.
- Check for Tension: Ensure the fabric is snug around the template without stretching it. This prevents puckering in the final design.
- Practice on Scraps: If you’re new to basting, practice on fabric scraps to refine your technique.
- Work in Small Batches: Baste a few pieces at a time to stay organized and avoid overwhelming your workspace.
3. Perfect Your Stitching Technique
The way you sew your pieces together greatly affects the final look of your English Paper Piecing project.
- Thread Choice: Match the thread color to your fabric for invisible stitches or use neutral shades for versatility.
- Secure Knots: Begin and end each seam with a secure knot to prevent unraveling.
- Whipstitch: Use small, even whipstitches to join pieces. Avoid pulling too tightly to maintain the fabric’s alignment.
- Flat Back Stitch: For an alternative method, try the flat back stitch for cleaner seams and minimal bulk.
- Practice Patience: Stitching by hand takes time, but the precision and quality are worth the effort.
- Check Alignment: Frequently align your templates to ensure the shapes match perfectly, avoiding gaps or misaligned edges.
4. Assemble Your Project Like a Pro
The assembly process brings your English Paper Piecing design to life, transforming individual pieces into a cohesive work of art.
- Plan Your Layout: Arrange all pieces on a flat surface to visualize the design before sewing.
- Sew in Sections: Break your project into manageable sections, sewing smaller groups of shapes together first.
- Press as You Go: Use an iron to press seams and ensure crisp edges during assembly.
- Avoid Overhandling: Handle your pieces carefully to prevent fraying or stretching the fabric.
- Remove Templates Gradually: Once sections are complete, remove the paper templates gently to avoid distorting the shapes.
- Stay Organized: Label or photograph your layout if the project requires multiple sessions to complete.
FAQ: Your English Paper Piecing Questions Answered
1. What is the best fabric for English Paper Piecing?
Tightly woven cotton fabrics are ideal for EPP because they fold easily over templates and hold their shape well during stitching.
2. Can I reuse paper templates?
Yes, if you handle them carefully. Removing them gently and avoiding excess glue or tight stitches will allow multiple uses.
3. How do I avoid visible stitches?
Use a fine thread in a matching color and small, even stitches. The flat back stitch is another excellent option for invisible seams.
4. Is glue basting better than thread basting?
It depends on personal preference and project requirements. Glue basting is quicker, while thread basting offers more flexibility and reusability.
5. Can beginners do English Paper Piecing?
Absolutely! EPP is beginner-friendly. Start with simple shapes like hexagons and gradually move to more complex patterns.
6. How do I finish an EPP project?
After assembling the pieces, sew them onto a fabric backing or integrate them into a larger quilt design.
Join our VIP broadcast list and gain access to exclusive patterns, all for free. As a VIP member, you’ll receive the best patterns daily, delivered directly to your device. ✨📱 It’s a unique opportunity to stay up-to-date with the latest trends and designs, curated just for you. Don’t miss out on enhancing your projects and discovering new inspirations with the best patterns every day! 🎨🔝
Conclusion
Mastering English Paper Piecing is a rewarding journey that combines precision, creativity, and patience. In this Top 10 Tips for English Paper Piecing – Tutorial, we’ve covered essential advice to help you select materials, refine techniques, and assemble your projects with confidence. Whether you’re a beginner or an experienced quilter, these tips will enhance your skills and inspire beautiful creations.
VIDEO TUTORIAL
What did you think of this tutorial? Leave your honest feedback and share any additional tips or questions in the comments. We’d love to hear from you and help you on your EPP journey!

