A Thread Catcher Free Tutorial is the perfect starting point for quilters who want to keep their sewing space clean and organized. This small but incredibly useful project helps manage the loose threads that often pile up during quilting.
When you follow a Thread Catcher Tutorial, you not only create a functional tool but also gain a project that reflects your style. It is simple, practical, and can be made with fabric scraps you already have at home.
This guide will walk you through everything you need to know about a Thread Catcher Free Tutorial, from materials and construction to customization ideas and sewing tips.
Understanding the Purpose of a Thread Catcher
A Thread Catcher Tutorial always starts with explaining why this tool is essential. When sewing or quilting, small threads and fabric bits can quickly clutter your workspace. By using a thread catcher, you keep your table tidy and avoid unnecessary mess.
Another benefit is that it saves time. Instead of stopping to clean up after every sewing session, you have one designated spot to dispose of waste while you work. That efficiency makes sewing more enjoyable.
Thread catchers also protect your fabric. Without them, loose threads may stick to your project and cause frustration. Having a nearby fabric bin eliminates this problem.
Most tutorials highlight that a Thread Catcher Free Tutorial is a beginner-friendly project. Even if you are new to quilting, you can sew one in less than an hour with basic skills.
You also get to practice sewing straight lines and reinforcing seams, which are useful skills for larger quilt projects. This makes a thread catcher not only practical but also educational.
Finally, having a handmade catcher adds a personal touch to your sewing space. It feels good to use something you created with your own hands.
Materials Needed for the Thread Catcher
Every Thread Catcher Tutorial emphasizes gathering the right materials before you begin. Fortunately, this project requires very few supplies.
The main material is fabric. Quilters often use cotton because it is durable and easy to sew. You will need two different prints: one for the outside and one for the lining.
A stabilizer or interfacing is also recommended. This helps the thread catcher hold its shape, making it sturdy enough to stand on its own.
You will also need a small piece of batting if you want extra thickness. This step is optional, but it gives your catcher a quilted look and feel.
For tools, prepare your sewing machine, scissors, rotary cutter, ruler, pins, and an iron. Having everything nearby makes the sewing process smooth.
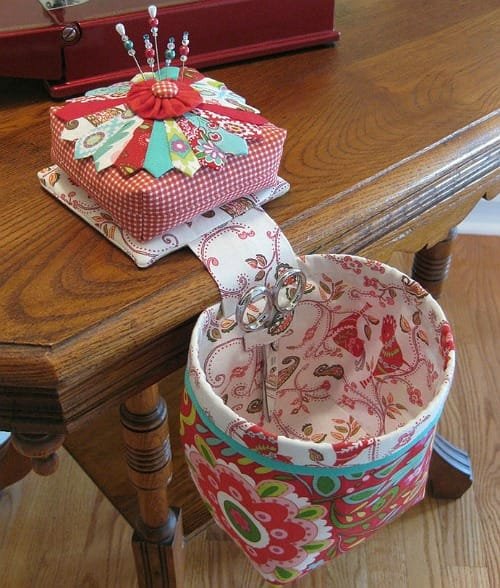
Some Thread Catcher Tutorials also include a pincushion attached to the top. If you want that feature, gather stuffing or crushed walnut shells for the pincushion part.
Lastly, choose a coordinating thread. Since the stitches may show, using a thread that blends with your fabric keeps the finish neat and professional.
Step-by-Step Thread Catcher Tutorial
The first step in a Thread Catcher Free Tutorial is cutting your fabric pieces. Most designs use two rectangles: one for the outside and one for the lining. Cut them to equal sizes.
Next, fuse the interfacing to the wrong side of your outer fabric. This ensures stability. Press with an iron until fully adhered.
Sew the outer fabric pieces together, leaving the top open. Repeat with the lining fabric, but leave a small opening at the bottom for turning later.
With right sides together, place the lining inside the outer fabric. Pin around the top edge. Sew all the way around with a quarter-inch seam allowance.
Turn the project right side out through the opening in the lining. Then, close the lining opening with a small stitch, either by machine or hand.
Finally, push the lining into the outer bag and press neatly. Topstitch around the top edge for durability and a professional look. Your thread catcher is now ready for use.
Creative Ideas and Customization
A Thread Catcher Tutorial often includes creative variations. One popular idea is adding a weighted pincushion to the top. This allows the catcher to hang off the edge of your sewing table while staying secure.
You can also make the thread catcher reversible. By choosing two different fabrics, you get the option to flip the catcher depending on your mood or project.
Some quilters like to quilt the outside fabric before assembling. This not only adds texture but also gives the catcher more character.
Decorative stitching is another fun customization. Instead of a plain topstitch, try using a decorative stitch on your machine for added flair.
You may also personalize the catcher with embroidery. Adding your initials or a quilting motif makes the project uniquely yours.
Finally, consider making thread catchers in different sizes. A smaller one can be used for travel sewing kits, while a larger one can hold scraps from bigger quilt projects.
FAQ About Thread Catcher Free Tutorial
What is the purpose of a thread catcher?
A thread catcher helps keep your sewing area organized by collecting loose threads and fabric scraps while you work.
Is a thread catcher hard to make?
No, a thread catcher is one of the easiest sewing projects for beginners. Most Thread Catcher Tutorials take less than an hour.
Do I need special materials for a thread catcher?
Not at all. Basic cotton fabric, interfacing, and sewing supplies are enough to make one.
Can I wash my thread catcher?
Yes, as long as you use washable fabric and stabilizers, you can machine wash your catcher if needed.
Can I add extra features to my thread catcher?
Yes, many tutorials show how to add pincushions, weights, or even side pockets for tools.
Is a thread catcher only for quilting?
While it is most popular with quilters, anyone who sews can benefit from using one.
Conclusion
In this Thread Catcher Free Tutorial, we explored what a thread catcher is, why it is useful, the materials you need, step-by-step instructions, and creative ways to customize it. This small project combines practicality with creativity, making it a favorite among quilters and sewists.
Now that you know how simple and fun it is, try making your own thread catcher. Once finished, share your thoughts, experiences, and suggestions. Your feedback helps improve future guides and inspires other sewing enthusiasts to start their own projects.

