The Honeymoon Quilt Block – Tutorial is an ideal guide for anyone looking to create a charming and elegant quilt block. With its timeless design, this block has been popular among quilters for generations and can be incorporated into various quilt styles.
Whether you’re planning to make a whole quilt from the Honeymoon Quilt Block or simply want to use it as part of a larger project, this tutorial will walk you through the steps needed to master this classic design.
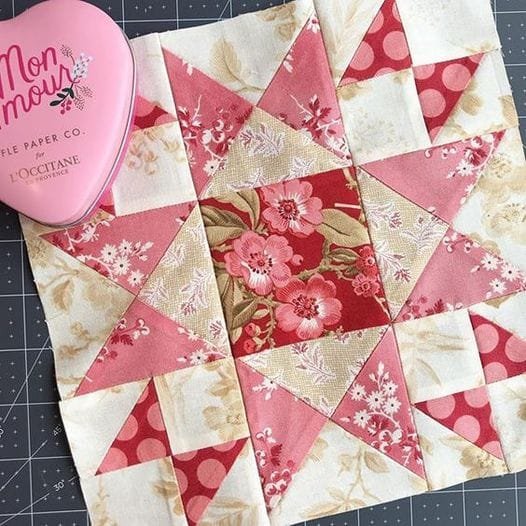
This quilt block is known for its clean lines and symmetrical structure, making it a perfect choice for both beginner and experienced quilters. The Honeymoon Quilt Block can be customized in different ways, using various fabric choices and color combinations to fit your personal style.
In this tutorial, you’ll learn everything from fabric selection to cutting and assembling the block, allowing you to create your own version of this beloved quilt design.
If you’re ready to dive into the world of quilting, the Honeymoon Quilt Block is a fantastic project that offers simplicity with stunning results. Let’s start by gathering our materials and learning the best methods for bringing this block to life.
1. Choosing the Right Fabrics for the Honeymoon Quilt Block
Fabric selection is one of the most crucial steps in creating a beautiful Honeymoon Quilt Block. The colors, patterns, and textures you choose will define the overall look of your quilt. Since this quilt block features symmetrical shapes and lines, selecting fabrics that complement one another will enhance its visual appeal.
To start, you’ll want to choose two or three fabrics that work well together. These fabrics can either be solid colors or prints, depending on the look you’re going for. For a more traditional quilt, consider using floral or vintage-inspired prints. For a modern twist, try using bold, geometric patterns or a mix of solids and prints.
It’s essential to make sure that your fabrics offer enough contrast to highlight the design of the Honeymoon Quilt Block. A good rule of thumb is to pair one light-colored fabric with a darker one, ensuring that the block’s pattern is clearly visible. Neutral fabrics can also be used as a background to make your more vibrant fabrics stand out.
When selecting fabrics, consider the weight and quality of the material. Quilting cotton is a popular choice due to its durability and ease of use, but feel free to experiment with other materials if you’re looking to add some texture or dimension to your block. Prewashing your fabric is also recommended to prevent shrinkage after your quilt is completed.
Once you’ve chosen your fabrics, you’re ready to start cutting and assembling your Honeymoon Quilt Block.
2. Cutting the Fabric Pieces
Cutting your fabric accurately is essential for ensuring that your Honeymoon Quilt Block comes together perfectly. Precision is key in this step, as even the slightest miscut can result in uneven blocks and misaligned seams. To help ensure accuracy, always use a rotary cutter, self-healing mat, and clear acrylic ruler.
Start by cutting your fabric into the required shapes for the Honeymoon Quilt Block. This block typically consists of a combination of squares, triangles, and rectangles, depending on the variation of the pattern you’re following. It’s important to follow the pattern measurements closely to ensure that each piece fits together seamlessly.
One tip to make the cutting process easier is to cut multiple layers of fabric at once. Stack two or three layers of fabric and cut them together, ensuring that the edges are aligned perfectly. This will save you time and help keep your pieces uniform in size.
After cutting your pieces, it’s a good idea to label each one, especially if you’re working on multiple blocks at the same time. This will help keep you organized and make the assembly process much smoother.
Once all your pieces are cut, take a moment to press them with a hot iron to remove any wrinkles. This step will make piecing your block much easier, as the fabric will lay flat and be more manageable during sewing.
3. Assembling the Honeymoon Quilt Block
Now that your pieces are cut, it’s time to assemble the Honeymoon Quilt Block. This is where the block starts to take shape and you begin to see the design come together. Start by laying out your pieces on a flat surface, arranging them according to the pattern.
Begin sewing the smaller pieces together first. Typically, this will involve sewing the triangles and squares together to create larger sections that will eventually form the full block. Use a quarter-inch seam allowance, which is standard for most quilting projects, and be sure to press the seams flat after each step.
As you sew, be mindful of aligning the edges and corners precisely. This will ensure that your block remains square and that the design looks neat and professional. If needed, use pins to hold the pieces together while sewing, especially for sections with multiple layers of fabric.
Once the smaller sections are sewn, you can begin assembling the full block. Join each section together, following the pattern to ensure that all pieces are in the correct orientation. As you sew the sections together, press the seams as you go to keep everything flat and manageable.
At this point, your Honeymoon Quilt Block should be fully assembled and ready for the final steps.
4. Finishing the Honeymoon Quilt Block
With your Honeymoon Quilt Block assembled, it’s time to finish the block and prepare it for use in your quilt. The first step is to give your block a final press with a hot iron. This will help set the seams and ensure that the block lies flat.
Next, check the size of your block. Depending on the pattern, the Honeymoon Quilt Block may need to be trimmed slightly to ensure that it fits perfectly with the other blocks in your quilt. Use a square ruler to measure and trim the edges if necessary, being careful to keep the block square.
If you’re making multiple blocks for a larger quilt, now is the time to repeat the process for each block. Assembly-line sewing can help speed up this process. Once you have all your blocks completed, you can begin piecing them together to form your quilt top.
After the quilt top is assembled, you can add the batting and backing and quilt the layers together. Whether you choose to hand-quilt, machine-quilt, or send your project to a longarm quilter, the Honeymoon Quilt Block will look stunning as part of your finished quilt.
FAQ
Q1: What is the Honeymoon Quilt Block?
A: The Honeymoon Quilt Block is a traditional quilt design featuring geometric shapes like squares and triangles arranged in a symmetrical pattern. It’s known for its timeless appeal and versatility.
Q2: Is the Honeymoon Quilt Block beginner-friendly?
A: Yes, the Honeymoon Quilt Block is great for beginners! Its straightforward design makes it easy to sew, but it also offers plenty of creative opportunities for more experienced quilters.
Q3: What fabrics work best for the Honeymoon Quilt Block?
A: Cotton quilting fabric is ideal for the Honeymoon Quilt Block because it is easy to work with and durable. You can choose a combination of solids and prints to make the block visually interesting.
Q4: Can I customize the size of the Honeymoon Quilt Block?
A: Yes! The Honeymoon Quilt Block can be scaled up or down to fit your project needs. Just adjust the size of the fabric pieces accordingly.
Q5: How do I ensure my seams are accurate when sewing the Honeymoon Quilt Block?
A: Use a quarter-inch seam allowance, which is standard in quilting, and take your time to ensure that each piece is aligned before sewing. Pinning the pieces together can help keep everything in place.
Q6: How many blocks do I need to make a full quilt?
A: The number of Honeymoon Quilt Blocks you’ll need depends on the size of the quilt you want to make. For example, a throw-sized quilt might require 20-30 blocks, while a bed-sized quilt may need more.
Join our VIP broadcast list and gain access to exclusive patterns, all for free. As a VIP member, you’ll receive the best patterns daily, delivered directly to your device. ✨📱 It’s a unique opportunity to stay up-to-date with the latest trends and designs, curated just for you. Don’t miss out on enhancing your projects and discovering new inspirations with the best patterns every day! 🎨🔝
Conclusion
In this Honeymoon Quilt Block – Tutorial, we’ve covered everything from fabric selection to cutting, piecing, and assembling your block. The Honeymoon Quilt Block is a versatile and timeless pattern that can be used in a variety of quilt styles. By following this tutorial, you’ll be able to create a stunning quilt block that showcases your creativity and quilting skills.
We hope this guide has been helpful and inspired you to start your own Honeymoon Quilt Block project. If you have any questions or suggestions, we’d love to hear from you. Please leave a comment below with your thoughts and feedback. Happy quilting!

