Creating a quilt is always a rewarding experience, and with The Escher Quilt Tutorial, you’ll learn how to craft a stunning optical illusion piece inspired by the works of M.C.
Escher. This quilt design incorporates geometric patterns and contrasting colors to achieve a mesmerizing effect that captivates anyone who sees it. Whether you’re a seasoned quilter or a beginner eager to try something new, this tutorial will walk you through the process step by step.
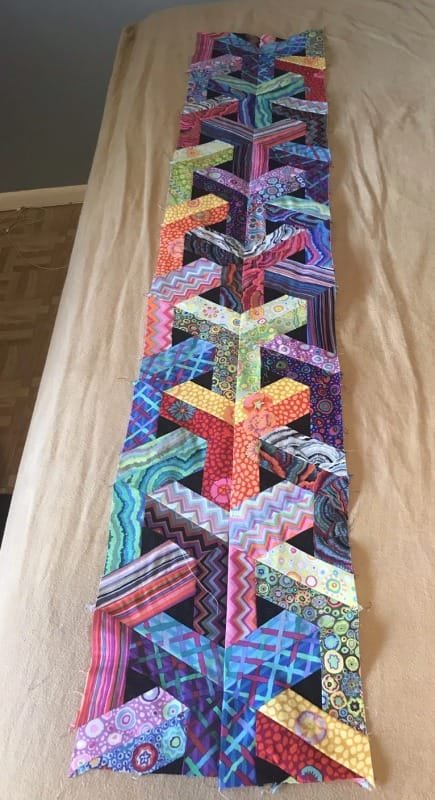
The Escher Quilt Tutorial is all about precision, creativity, and bold visual impact. The illusion created by its interlocking shapes makes it stand out as a work of art, perfect for display or gifting.
While it may look complex, breaking the process down into manageable steps will make it accessible and enjoyable to complete.
In this guide, you’ll learn about the tools and materials needed, the techniques to assemble the quilt, and how to add finishing touches.
With detailed instructions and tips, The Escher Quilt Tutorial will help you create a masterpiece that reflects your unique style. Let’s dive in and get started on this exciting quilting journey!
1. Materials and Tools Needed for The Escher Quilt
To begin your journey with The Escher Quilt Tutorial, it’s crucial to gather the right materials and tools. The success of your quilt largely depends on the quality and suitability of what you use. Here’s a comprehensive list to prepare you for the project:
- Fabric: Choose high-quality cotton fabric in three to four contrasting colors. The interplay of light and dark hues is essential for creating the Escher-like optical illusion.
- Rotary Cutter and Mat: A rotary cutter ensures precise cuts, and the mat protects your workspace while providing a surface for accurate measurements.
- Quilting Ruler: Use a transparent quilting ruler to measure and cut fabric pieces with precision.
- Thread: Opt for strong, matching threads to ensure durability and a polished appearance. Neutral colors often work best for seams.
- Sewing Machine: A reliable sewing machine with a quilting foot attachment will make sewing faster and easier.
- Pins and Clips: Use pins or fabric clips to hold pieces together while sewing. This helps maintain alignment and precision.
Having the right materials and tools will set the stage for a smooth quilting experience. Once you have everything ready, you’re prepared to start creating The Escher Quilt with confidence and precision.
2. Cutting and Preparing Your Fabric
The preparation stage is a critical part of The Escher Quilt Tutorial because the illusion relies on the accurate cutting and arrangement of fabric. Follow these steps to ensure success:
- Wash and Iron Your Fabric: Pre-wash your fabric to prevent shrinkage later. Iron each piece to remove wrinkles and make cutting easier.
- Create a Template: Using cardstock or a quilting ruler, make a template for the geometric shapes used in your quilt. Hexagons, diamonds, or triangles are popular choices for the Escher-inspired design.
- Cut Fabric Precisely: Lay your fabric on the cutting mat and use the rotary cutter to cut shapes with sharp, clean edges. Be sure to cut multiple pieces of each color for balance.
- Organize Pieces by Color: Separate your fabric pieces by color and size. This makes it easier to assemble the quilt without confusion.
- Test the Layout: Before sewing, arrange your pieces on a flat surface to see how the colors interact and to ensure the optical illusion effect is achieved.
- Label Sections: Use small sticky notes or fabric clips to label different sections. This helps you keep track of the order as you sew.
By taking your time with preparation, you’ll set yourself up for a seamless sewing process and a visually stunning finished quilt.
3. Sewing and Assembling The Escher Quilt
Now that your fabric pieces are ready, it’s time to sew them together. This part of The Escher Quilt Tutorial focuses on assembly and maintaining the pattern alignment:
- Start with Small Sections: Begin by sewing smaller sections, such as rows or clusters of shapes. This helps you manage the project without overwhelming yourself.
- Use a Quarter-Inch Seam: A consistent quarter-inch seam allowance is vital for quilting. It ensures your pieces fit together perfectly and maintains the pattern’s integrity.
- Press Seams Open: After sewing each section, press the seams open with an iron. This step reduces bulk and makes it easier to quilt later.
- Assemble the Main Design: Combine the smaller sections to form the larger quilt top. Pay close attention to the alignment of shapes and colors to preserve the Escher effect.
- Baste the Quilt: Once the top is complete, layer it with batting and backing fabric. Use basting spray or safety pins to hold the layers together securely.
- Quilt the Layers: Use your sewing machine to quilt the layers together, following the pattern’s lines or creating a unique design that complements the Escher effect.
Taking your time with each step will ensure your quilt looks polished and professional. The intricate assembly is what makes The Escher Quilt so special.
4. Adding Finishing Touches
The final stage of The Escher Quilt Tutorial involves binding and perfecting your quilt. These finishing touches bring everything together beautifully:
- Trim Excess Fabric: Use your rotary cutter to trim the edges of the quilt, making sure they’re straight and even.
- Prepare the Binding: Cut strips of fabric for the binding. These strips should be long enough to cover the quilt’s perimeter with some overlap.
- Attach the Binding: Sew the binding onto the quilt’s edges, folding it over to the back and securing it with neat stitches.
- Add a Label: Consider sewing a label with your name and the date onto the back of the quilt. This adds a personal and professional touch.
- Inspect for Loose Threads: Check the entire quilt for any loose threads or missed stitches and fix them before finishing.
- Display or Gift Your Quilt: Once complete, your quilt is ready to be displayed, used, or gifted. Its intricate design is sure to impress anyone who sees it.
These finishing touches elevate the quality of your quilt and ensure it’s a piece you’ll be proud of for years to come.
FAQ
Q1: Is The Escher Quilt suitable for beginners?
Yes, while it may seem complex, breaking the process into manageable steps makes it accessible for beginners with patience and attention to detail.
Q2: What fabrics work best for The Escher Quilt?
High-quality cotton fabric in contrasting colors is ideal for creating the optical illusion effect.
Q3: How long does it take to complete The Escher Quilt?
The time varies depending on your skill level and availability, but most quilters complete it within 1-2 weeks of dedicated work.
Q4: Can I hand-sew The Escher Quilt?
Yes, but it will take significantly longer than using a sewing machine. Hand-sewing is a great option if you enjoy slower, more meditative crafting.
Q5: How do I maintain my quilt?
Wash it on a gentle cycle with cold water and lay it flat to dry. Avoid direct sunlight to prevent fading.
Q6: Can I customize the design?
Absolutely! Feel free to experiment with different shapes, sizes, and color schemes to make it uniquely yours.
Join our VIP broadcast list and gain access to exclusive patterns, all for free. As a VIP member, you’ll receive the best patterns daily, delivered directly to your device. ✨📱 It’s a unique opportunity to stay up-to-date with the latest trends and designs, curated just for you. Don’t miss out on enhancing your projects and discovering new inspirations with the best patterns every day! 🎨🔝
Conclusion
The Escher Quilt Tutorial provides a step-by-step guide to creating a stunning quilt that combines art and craftsmanship. With careful preparation, precise cutting, and thoughtful assembly, you can craft a quilt that’s both functional and visually captivating.
We hope this tutorial inspires you to create your own masterpiece. Please share your experiences, feedback, and suggestions for future tutorials. Happy quilting!

