Sunflower Pincushion Fabric Pattern is a charming and practical sewing project that brings warmth, color, and functionality to your crafting space. The Sunflower Pincushion Fabric Pattern combines the beauty of a classic sunflower design with the usefulness of a sturdy pincushion, making it perfect for sewing enthusiasts of all skill levels.
Whether you are organizing your workspace or creating a thoughtful handmade gift, this fabric project offers both decorative appeal and everyday practicality. With careful fabric selection and precise stitching, you can create a durable pincushion that brightens any sewing table.
One of the most appealing aspects of the Sunflower Pincushion Fabric Pattern is its versatility. You can make it in traditional sunflower colors—rich golden yellow petals with a deep brown center—or experiment with modern palettes like soft pastel yellows and warm neutrals.
The pattern can be adjusted in size, allowing you to create a compact desk accessory or a slightly larger statement pincushion. Because it is a fabric-based project, you can also use fabric scraps creatively, making it a sustainable and budget-friendly sewing idea.
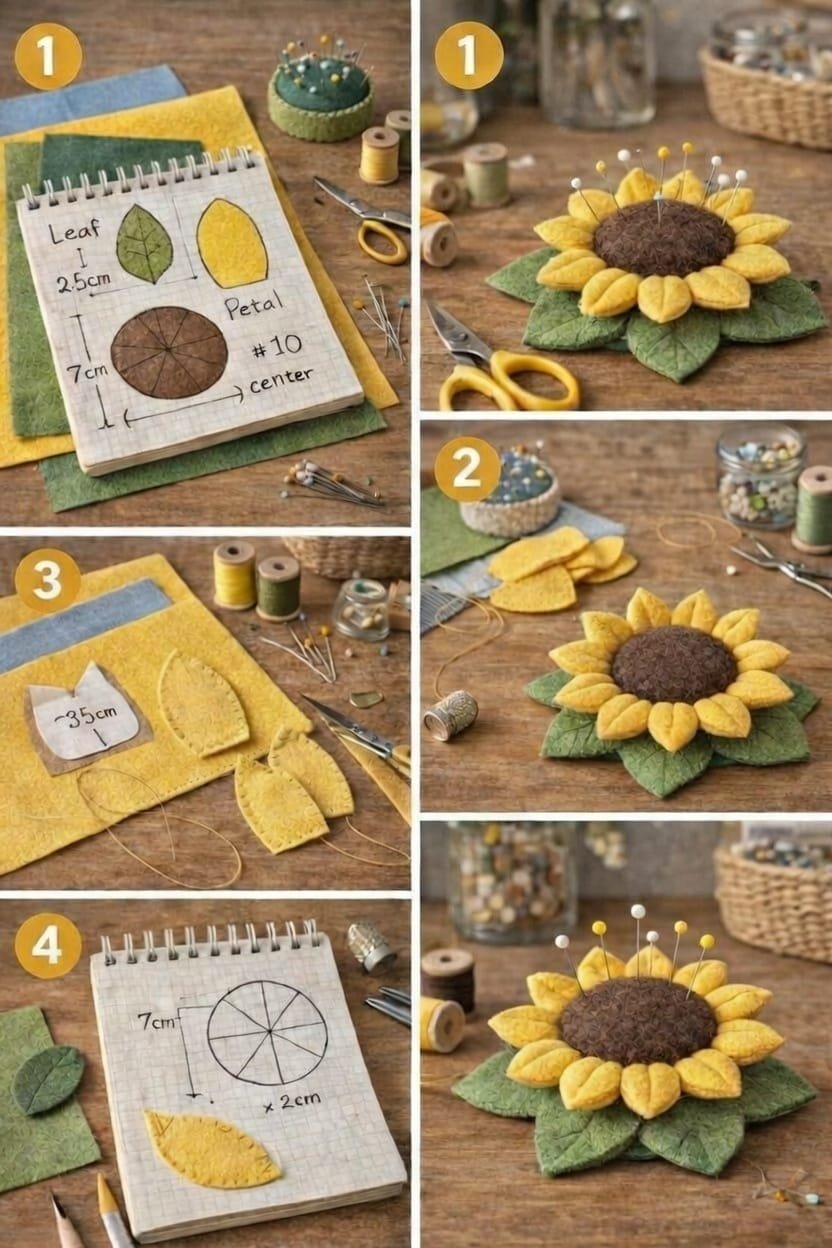
Another reason crafters love the Sunflower Pincushion Fabric Pattern is its structured yet beginner-friendly construction. The design typically includes petal pieces sewn around a circular center, which is then stuffed and shaped. The result is a dimensional flower that looks vibrant and full while remaining firm enough to hold pins securely. In this guide, you will learn how to choose materials, cut and sew each component, assemble the sunflower shape, and finish your pincushion professionally.
Choosing Fabric and Materials
Selecting the right materials is essential when working on the Sunflower Pincushion Fabric Pattern. Cotton quilting fabric is highly recommended due to its durability and ease of handling. For the petals, choose bright yellow or golden tones, and for the center, select brown or textured fabric to mimic the natural sunflower look. Linen blends can also provide a rustic aesthetic.
In addition to fabric, you will need polyester fiberfill stuffing, sharp fabric scissors or a rotary cutter, pins, sewing thread, a sewing needle or sewing machine, and optional interfacing for added structure. If you prefer a weighted pincushion, you can add a small amount of crushed walnut shells or rice to the center for stability.
Pre-washing and pressing your fabric ensures smooth cutting and accurate stitching. Preparation at this stage helps achieve a polished and long-lasting finished product.
Cutting and Preparing the Petals
Begin the Sunflower Pincushion Fabric Pattern by cutting petal shapes from your yellow fabric. You can draw a simple elongated oval template or print a reusable pattern piece. Cut multiple identical petals to maintain symmetry—usually between 10 and 16 pieces depending on desired fullness.
Fold each petal piece right sides together and stitch along the curved edge, leaving the base open for turning. Trim excess seam allowance and clip curves slightly to reduce bulk. Turn each petal right side out and gently press with an iron to define the shape.
Once turned and pressed, lightly stuff each petal with fiberfill. Avoid overstuffing to maintain flexibility and natural curvature. The petals should feel soft yet structured.
Creating the Sunflower Center
The center of the Sunflower Pincushion Fabric Pattern forms the core structure. Cut two circular fabric pieces from brown fabric. Place them right sides together and sew around the edge, leaving a small opening for turning and stuffing.
After turning the circle right side out, fill it firmly with stuffing. For extra stability, add a small amount of weighted filling in the middle. Hand-stitch the opening closed securely. To create a realistic sunflower texture, you can add decorative topstitching or French knots across the center.
This center piece not only defines the flower visually but also serves as the primary area for holding pins, so firmness and durability are important.
Assembling the Pincushion
Lay the stuffed petals evenly around the edge of the sunflower center. Overlap slightly to create a full bloom appearance. Hand-sew the base of each petal securely to the center using strong thread. Ensure consistent spacing for balanced symmetry.
After attaching all petals, inspect the back side and reinforce stitches where needed. You can add a fabric backing circle to cover seams for a clean finish. This extra layer also increases durability.
Light pressing and shaping may be needed to refine the flower’s appearance. The completed Sunflower Pincushion Fabric Pattern should look vibrant, dimensional, and evenly structured.
Customization and Creative Ideas
The Sunflower Pincushion Fabric Pattern offers many opportunities for personalization. You can create layered petals using two shades of yellow for depth or add small embroidered details along the petal edges. Adding a small loop at the back allows the pincushion to hang as décor.
For seasonal variations, experiment with muted autumn tones or soft spring pastels. You can also attach the sunflower to a small fabric-covered jar lid, transforming it into a storage pincushion with hidden compartments.
This project makes a thoughtful handmade gift for sewing enthusiasts. Its cheerful design and functional purpose make it both decorative and practical.
FAQ
1. Is this pattern beginner-friendly?
Yes, it uses simple sewing techniques suitable for beginners.
2. What is the best stuffing for pincushions?
Polyester fiberfill works well, but crushed walnut shells add weight and stability.
3. Can I machine sew the entire project?
Most seams can be machine sewn, but final assembly is easier by hand.
4. How do I keep the petals evenly spaced?
Mark placement points lightly with fabric chalk before attaching.
5. Can I wash the pincushion?
Spot cleaning is recommended, especially if weighted materials are used.
6. How large should the finished pincushion be?
Typically 4–6 inches in diameter, but size can be adjusted easily.
Conclusion
The Sunflower Pincushion Fabric Pattern is a beautiful and functional sewing project that enhances any crafting space. By carefully selecting quality fabric, shaping each petal thoughtfully, and assembling the flower securely, you can create a durable and eye-catching accessory.
This pattern encourages creativity while remaining accessible to sewists of various skill levels. If you enjoyed this tutorial, please share your honest opinion and suggestions. Your feedback helps improve future sewing guides and inspires more creative handmade projects.
Beyond its practical use, the Sunflower Pincushion Fabric Pattern also brings a sense of joy and personality to your sewing routine. A thoughtfully crafted pincushion can make everyday tasks feel more inspiring, especially when it reflects your personal style. The bright sunflower design adds warmth and positivity to your workspace, creating an inviting atmosphere that encourages creativity. Small handmade details like this can transform an ordinary sewing table into a charming and organized crafting corner filled with color and character.
Additionally, mastering the Sunflower Pincushion Fabric Pattern helps build foundational sewing skills such as precise cutting, curved stitching, stuffing control, and secure hand-finishing techniques. These skills are transferable to many other fabric projects, including plush toys, decorative cushions, and appliqué work. As you gain confidence, you may experiment with layered petals, textured fabrics, or embroidered embellishments. Over time, simple projects like this become stepping stones toward more advanced creations, expanding your sewing abilities while keeping the process enjoyable and rewarding.

