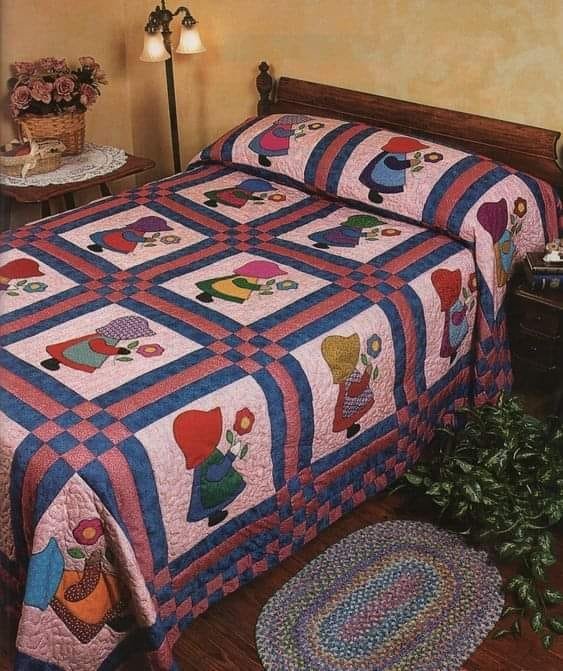
The Sunbonnet Sue Quilt Block Pattern – Tutorial is a timeless design that has charmed quilters for generations. This delightful pattern features the beloved figure of a young girl wearing a bonnet, which can be customized with various fabrics and colors.
Whether you’re a beginner or an experienced quilter, creating your very own Sunbonnet Sue Quilt Block is both fun and rewarding. In this tutorial, we will walk you through each step of making this classic quilt block, from selecting fabrics to finishing touches. By the end of this guide, you’ll have a beautiful Sunbonnet Sue Quilt Block to add to your quilting collection.
Quilters often choose the Sunbonnet Sue Quilt Block Pattern for its versatility and the nostalgia it evokes. Traditionally, the block depicts a girl in profile with her bonnet covering her face, creating an air of mystery and charm.
While the pattern may look intricate, it’s actually quite accessible for quilters of all skill levels. With the right tools, materials, and a little patience, you’ll find that the Sunbonnet Sue Quilt Block Pattern is an enjoyable and manageable project.
Now, let’s dive into the steps for making your own Sunbonnet Sue Quilt Block. We’ll cover the essential materials, explain the process in detail, and share some helpful tips along the way. This tutorial will guide you through each part of the quilting process, ensuring you end up with a delightful quilt block that showcases your creativity and love for quilting.
1. Gathering Materials for Your Sunbonnet Sue Quilt Block
Before you begin your Sunbonnet Sue Quilt Block Pattern – Tutorial, it’s important to gather all the necessary materials. Being prepared will make the process smoother and more enjoyable.
- Fabrics: For your Sunbonnet Sue Quilt Block, you’ll need fabric for Sue’s dress, bonnet, and background. Choose fabrics that contrast well to make Sue stand out.
- Templates: The Sunbonnet Sue Quilt Block relies on specific templates to achieve the correct shape. You can find these templates online or create your own.
- Thread: Use a coordinating thread color for sewing. If you’re machine-sewing, a neutral color like beige or gray works well across different fabrics.
- Scissors and Rotary Cutter: Sharp fabric scissors and a rotary cutter are essential for cutting your fabric pieces accurately.
- Sewing Machine or Hand Sewing Tools: Depending on your preference, you can sew your Sunbonnet Sue Quilt Block by hand or use a sewing machine.
- Iron and Ironing Board: Pressing your fabric pieces as you work helps achieve neat and professional-looking seams.
Once you have all your materials ready, you can begin the actual quilting process. Take your time gathering everything you need, as the right tools make all the difference in creating a polished quilt block.
2. Preparing Your Fabric and Templates
Now that you’ve gathered your materials, it’s time to prepare your fabric and templates for the Sunbonnet Sue Quilt Block Pattern – Tutorial.
- Select and Cut Your Fabrics: Choose fabric for each part of your quilt block. You’ll need fabric for Sue’s bonnet, dress, and the background block. Cut your background square to the desired size, typically 12 inches by 12 inches.
- Trace the Templates: Using your templates, trace the shapes of Sue’s bonnet, dress, arm, and shoe onto the fabric. Make sure to leave enough room around each shape for seam allowances.
- Cut Out the Shapes: Carefully cut out each piece along the traced lines. Use sharp fabric scissors or a rotary cutter to ensure clean edges.
- Position the Pieces: Arrange the cut-out pieces of Sue’s bonnet, dress, arm, and shoe on the background fabric. Make sure the pieces are centered and aligned.
- Pin the Pieces: Pin the fabric pieces in place to prevent shifting during sewing. Make sure each piece is securely fastened to the background fabric.
- Double Check Alignment: Before you begin sewing, double-check the alignment of all pieces. This is your last chance to adjust the positioning to ensure a balanced and visually appealing design.
By following these steps, you’ll have a well-prepared fabric layout for your Sunbonnet Sue Quilt Block. Take your time with this stage to ensure each piece is properly placed, as this will impact the final look of your quilt block.
3. Sewing the Sunbonnet Sue Quilt Block
Now that your pieces are pinned in place, it’s time to sew your Sunbonnet Sue Quilt Block Pattern. This step brings your project to life as the individual pieces come together to form the iconic Sunbonnet Sue figure.
- Appliqué the Pieces: Use an appliqué technique to sew the pieces of Sue’s bonnet, dress, arm, and shoe onto the background fabric. You can either hand-stitch or machine-stitch, depending on your preference.
- Sewing the Bonnet: Start by sewing the bonnet onto the background fabric. Use small, tight stitches to secure the fabric, making sure the edges are neat.
- Attach the Dress: Next, sew Sue’s dress in place, taking care to keep the fabric smooth and flat as you work.
- Adding the Arm: Sue’s arm should be sewn in place so that it overlaps slightly with the dress and bonnet. This helps create a cohesive, unified look.
- Sew the Shoe: Finally, sew Sue’s shoe onto the quilt block, completing the figure. Make sure all edges are sewn down securely.
- Press the Quilt Block: After sewing all the pieces, give your quilt block a final press with an iron. This will help the fabric lie flat and make your stitches look more polished.
By carefully sewing each piece of the Sunbonnet Sue Quilt Block, you ensure a professional finish. Whether you choose to hand-sew or machine-sew, the appliqué technique adds texture and dimension to your quilt block.
4. Adding Final Details and Finishing the Quilt Block
The final step in the Sunbonnet Sue Quilt Block Pattern – Tutorial is adding the finishing touches to complete your quilt block.
- Embroidery for Extra Detail: If you’d like, you can add embroidered details such as Sue’s facial features, or embellishments on her dress and bonnet. This adds a personal touch to your quilt block.
- Quilt the Block: You can now quilt your Sunbonnet Sue Quilt Block by adding layers of batting and backing. This step gives the quilt block dimension and texture.
- Sew the Edges: Once the quilting is complete, sew around the edges of your quilt block to secure all layers in place.
- Binding the Quilt Block: If you plan to use the Sunbonnet Sue Quilt Block as part of a larger quilt, you can add a binding to the edges of the block. This gives it a clean, finished look.
- Display or Gift: Whether you decide to incorporate the block into a quilt or display it as a stand-alone piece, your Sunbonnet Sue Quilt Block is sure to impress.
- Care Instructions: Be sure to care for your quilt block by washing it gently if necessary and storing it properly to preserve its beauty for years to come.
With these final touches, your Sunbonnet Sue Quilt Block is complete! Take a moment to admire your work and think about how you’ll use this classic quilt block in future projects.
FAQ Section
What is the Sunbonnet Sue Quilt Block Pattern?
The Sunbonnet Sue Quilt Block Pattern is a classic quilt design featuring a young girl in profile wearing a large bonnet, traditionally used in appliqué quilt projects.
Is the Sunbonnet Sue Quilt Block suitable for beginners?
Yes, the Sunbonnet Sue Quilt Block is an excellent project for beginners due to its simple shapes and basic sewing techniques.
What materials do I need for this quilt block?
You’ll need fabric, thread, sewing tools, templates, and an iron to create the Sunbonnet Sue Quilt Block.
Can I hand-sew the Sunbonnet Sue Quilt Block?
Yes, the Sunbonnet Sue Quilt Block can be sewn by hand using appliqué techniques or with a sewing machine, depending on your preference.
How do I personalize my Sunbonnet Sue Quilt Block?
You can personalize the Sunbonnet Sue Quilt Block by choosing unique fabric combinations and adding embroidered details to Sue’s dress and bonnet.
What size should my quilt block be?
The standard size for the Sunbonnet Sue Quilt Block is typically 12 inches by 12 inches, but you can adjust the size according to your project needs.
Join our VIP broadcast list and gain access to exclusive patterns, all for free. As a VIP member, you’ll receive the best patterns daily, delivered directly to your device. ✨📱 It’s a unique opportunity to stay up-to-date with the latest trends and designs, curated just for you. Don’t miss out on enhancing your projects and discovering new inspirations with the best patterns every day! 🎨🔝
Conclusion
In this Sunbonnet Sue Quilt Block Pattern – Tutorial, we’ve walked you through every step of creating this charming quilt block, from gathering materials to adding the finishing touches. The Sunbonnet Sue Quilt Block is a beautiful addition to any quilt and offers endless opportunities for customization.
We hope you enjoyed this tutorial and feel inspired to create your own Sunbonnet Sue Quilt Block. Please leave your thoughts, feedback, and any suggestions for future projects in the comments below! We’d love to hear from you!

