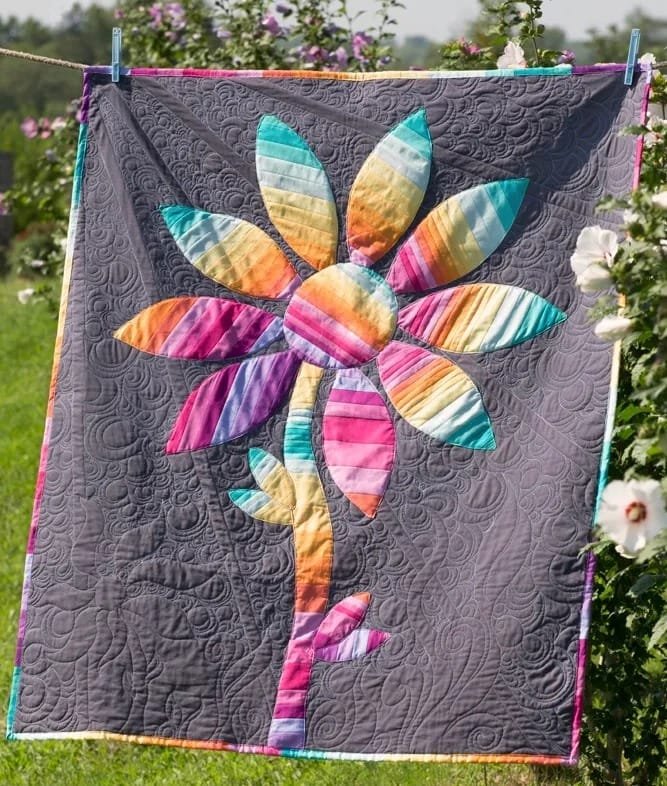
The Strata Flower Quilt is a vibrant and beautiful quilt that stands out with its layered, floral design. Whether you’re a beginner or an experienced quilter, this Strata Flower Quilt – tutorial will walk you through the steps needed to create your very own quilt.
The name “strata” refers to the layers in the fabric, which are combined to create the stunning flower patterns that give this quilt its unique look. Throughout this guide, we’ll focus on every detail to ensure your quilt turns out just as you envision it.
This Strata Flower Quilt is perfect for adding a touch of nature to your home. With the layered, petal-like patterns, it can brighten any space, giving it a fresh and floral feel.
One of the best aspects of this quilt is how customizable it is—you can choose from a variety of colors and fabric types to create something that suits your style perfectly. Whether you’re making this quilt as a gift or for yourself, it’s sure to be a project you’ll love working on.
Now, let’s dive into the step-by-step process of creating this quilt. In this Strata Flower Quilt – tutorial, we’ll break down everything you need to know, from gathering materials to assembling the quilt, and finally, adding those finishing touches.
1. Gathering Materials for Your Strata Flower Quilt
Before you begin sewing your Strata Flower Quilt, gathering the right materials is essential. Here’s what you’ll need to get started:
- Fabric Selection: The fabric is one of the most important parts of any quilt. For this project, you’ll want to choose a variety of fabrics that complement each other. Look for fabrics in different shades of the same color family to create a cohesive flower design. You can also mix and match prints and solids to give your quilt a more textured look.
- Batting: Batting is the layer of padding between the quilt top and backing. You’ll need to choose the right weight and material for your project. A lighter batting is great for a summer quilt, while a heavier batting can make your quilt warm and cozy for colder months.
- Backing Fabric: The backing fabric is the fabric on the underside of your quilt. Choose something soft but durable. If you want the back to be as decorative as the front, select a fabric that complements the flower patterns on your Strata Flower Quilt.
- Cutting Tools: A rotary cutter, self-healing mat, and quilting rulers will help you accurately cut your fabric pieces. Precision is key in quilting, so make sure your tools are sharp and ready to use.
- Sewing Machine and Thread: You’ll need a reliable sewing machine for piecing together your quilt. Choose thread colors that match or blend with your fabrics to avoid contrasting stitches.
- Pins and Quilting Clips: Pins or quilting clips will hold your pieces together as you sew. Make sure you have plenty on hand, especially for the larger layers of the quilt.
2. Cutting and Assembling the Quilt Top
Once you’ve gathered your materials, it’s time to cut and assemble the quilt top. This is where the real magic of the Strata Flower Quilt comes to life.
- Cutting the Fabric: Begin by cutting your fabric into strips of varying widths. These strips will form the layers or “strata” of the quilt. It’s important to measure each strip carefully to ensure the layers are even and symmetrical. The wider strips will create the larger petals of the flower, while the narrower strips will give more definition to the inner parts of the flower.
- Arranging the Strips: Once your fabric is cut, lay out the strips in the order you want them to appear on the quilt. Play around with different arrangements until you’re happy with the color and pattern flow. Remember, the beauty of the Strata Flower Quilt is in its layered, petal-like design, so take your time during this step.
- Sewing the Strips Together: Start sewing the strips together, one at a time. Use a ¼-inch seam allowance for each strip. After sewing a few strips, press the seams open or to one side, depending on your preference. This will help your quilt lay flat as you continue to add layers.
- Creating the Flower Shape: Once all the strips are sewn together, it’s time to shape them into petals. Using a template or freehand drawing, cut the sewn strips into petal shapes. Each petal will form part of the flower on the quilt. Be sure to cut carefully to maintain the symmetry of the flower.
- Piecing the Petals Together: After you’ve cut out all your petals, start arranging them on a large flat surface. You’ll want to make sure the petals overlap slightly to create a layered look. Once you’re satisfied with the arrangement, begin sewing the petals together.
- Adding the Background: The last step in assembling the quilt top is to add the background fabric. Cut your background fabric to size, and sew it around the flower petals. This will frame your flower and make it stand out beautifully against the background.
3. Quilting the Layers Together
Now that your quilt top is assembled, it’s time to quilt the layers together. This step is crucial for both the look and durability of your Strata Flower Quilt.
- Layering the Quilt: First, lay out your backing fabric, then place the batting on top, followed by the quilt top. Make sure all layers are smooth and free of wrinkles. You can use safety pins or quilting clips to secure the layers together before you start quilting.
- Choosing a Quilting Design: For the Strata Flower Quilt, a floral or organic quilting design works well to enhance the petal shapes. You can either freehand the quilting or use a stencil to guide you. If you’re a beginner, simple straight-line quilting may be the easiest option.
- Starting the Quilting Process: Begin quilting from the center of the quilt and work your way out. This will help prevent any bunching or wrinkles in the fabric. Take your time and sew slowly, especially if you’re working with intricate quilting designs.
- Quilting with Different Threads: For a more dynamic look, consider using different thread colors for the quilting. For example, use a lighter thread color on the petals to make them pop, and a darker thread color for the background. This adds contrast and dimension to your quilt.
- Securing the Edges: Once you’ve finished quilting the entire surface, it’s time to secure the edges. Trim any excess batting or backing fabric, and sew a binding around the edges of the quilt. The binding not only gives your quilt a polished look but also protects the edges from fraying.
- Inspecting the Final Quilt: After quilting and binding, inspect your quilt for any loose threads or uneven stitches. Gently press the quilt with an iron if needed, and enjoy your finished Strata Flower Quilt!
4. Finishing Touches and Displaying Your Quilt
Your Strata Flower Quilt is almost complete, but a few finishing touches will ensure it looks its best and lasts for years to come.
- Washing the Quilt: Before using or displaying your quilt, give it a gentle wash. This helps soften the fabric and remove any markings from the quilting process. Be sure to use a mild detergent and cold water to protect the fabric and colors.
- Blocking the Quilt: After washing, lay the quilt flat to dry, gently stretching it into shape. Blocking the quilt ensures that the edges are straight and that it lays flat without curling or bunching.
- Labeling the Quilt: If you’re giving the quilt as a gift or entering it into a competition, consider adding a label. The label can include your name, the date, and the name of the quilt. You can either sew the label onto the back of the quilt or embroider it directly onto the fabric.
- Displaying Your Quilt: Once your Strata Flower Quilt is finished, you’ll want to show it off! Hang it on a quilt rack, drape it over a couch, or use it as a bedspread. Wherever you display it, the vibrant flower design is sure to draw attention.
- Storing the Quilt: If you’re not using your quilt right away, store it in a cool, dry place. Avoid folding the quilt for long periods, as this can cause creases. Instead, roll the quilt loosely or store it flat to keep it in perfect condition.
- Caring for Your Quilt Over Time: With proper care, your Strata Flower Quilt can last for generations. Wash it sparingly, and always use gentle cycles to avoid wear and tear. Avoid direct sunlight, as it can fade the fabric over time.
FAQ
Q1: What fabric is best for making the Strata Flower Quilt?
A: The best fabric for the Strata Flower Quilt is 100% cotton. Cotton is easy to work with, durable, and holds its shape well, making it perfect for both the quilt top and backing.
Q2: How do I ensure my flower petals are symmetrical?
A: You can create symmetrical petals by using a template or stencil when cutting out your fabric. Templates ensure that each petal is the same size and shape, leading to a more balanced and professional-looking quilt.
Q3: Can I use different batting types for this quilt?
A: Yes, you can use different batting types depending on the weight and warmth you want. Cotton batting is lightweight and breathable, while polyester batting offers more warmth. Choose what best suits your needs.
Q4: How do I keep my quilt layers from shifting during the quilting process?
A: To keep your quilt layers from shifting, use plenty of safety pins or quilting clips to secure the layers together before you start quilting. Quilting from the center out also helps prevent fabric bunching.
Q5: Can I customize the size of the Strata Flower Quilt?
A: Absolutely! You can adjust the size of your quilt by changing the number of flower petals and background fabric. Larger petals will result in a bigger quilt, while smaller petals will create a more compact design.
Q6: What quilting design works best for the Strata Flower Quilt?
A: Floral or organic designs complement the Strata Flower Quilt beautifully. If you’re looking for something simple, straight-line quilting can also work well without taking away from the intricate flower pattern.
Join our VIP broadcast list and gain access to exclusive patterns, all for free. As a VIP member, you’ll receive the best patterns daily, delivered directly to your device. ✨📱 It’s a unique opportunity to stay up-to-date with the latest trends and designs, curated just for you. Don’t miss out on enhancing your projects and discovering new inspirations with the best patterns every day! 🎨🔝
Conclusion
In this Strata Flower Quilt – tutorial, we’ve covered all the essential steps, from gathering materials to assembling, quilting, and finishing your quilt. Whether you’re new to quilting or have been quilting for years, this project allows for creativity and customization. We hope this guide inspires you to make your own Strata Flower Quilt and enjoy the process along the way.
Please feel free to leave your thoughts, feedback, or any suggestions on how we can improve this tutorial. We would love to hear about your experiences and see the beautiful quilts you create!

