The beauty of a starry night is both timeless and awe-inspiring, and recreating that magical view through a craft project is a rewarding experience.
This Stars in the Darkening Sky – Tutorial will guide you step-by-step in creating a piece that mimics the allure of twinkling stars against a dark sky. Whether you’re working on a quilt, painting, or embroidery, this project is perfect for all levels of expertise.
Through this tutorial, we’ll explore how to layer colors, arrange star-like patterns, and use techniques to achieve a realistic yet artistic representation of a starry sky.
Each step has been carefully designed to be accessible for beginners while also offering flexibility for experienced crafters.
So, gather your materials and get ready to create a masterpiece inspired by the Stars in the Darkening Sky. Let’s bring the magic of the night sky into your next crafting adventure.
1. Materials and Preparation for Stars in the Darkening Sky
Before diving into the crafting process, it’s important to gather the right materials to ensure a smooth and enjoyable experience while working on your Stars in the Darkening Sky project:
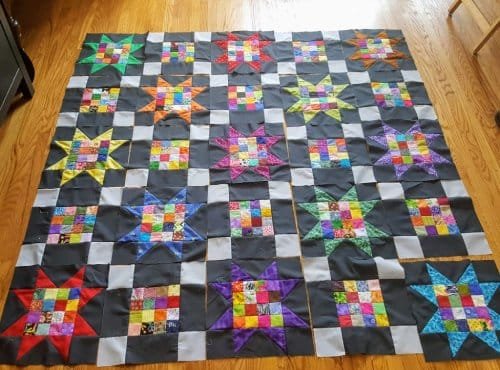
For fabric-based projects like quilts or embroidery, choose a dark fabric in shades of navy, black, or deep purple to represent the night sky.
If painting, use a canvas or heavy paper and select acrylic paints in dark tones for the base and white or metallic paints for the stars.
Have tools like needles, brushes, or pens ready, depending on your medium. Fine-tipped tools will help you create precise star details.
Glitter, metallic threads, or foil accents can add dimension and shine to your project, mimicking the twinkle of real stars.
Consider using templates or stencils to create uniform stars and patterns, especially for beginners looking for extra guidance.
Ensure good lighting and a comfortable workspace to make the process enjoyable and reduce strain during intricate detailing.
Now that you’re equipped with the essentials, let’s delve into the techniques for crafting Stars in the Darkening Sky.
2. Creating the Perfect Starry Background
The background is the foundation of this Stars in the Darkening Sky – Tutorial. Achieving a smooth, realistic base will enhance the overall effect of your design:
Begin by preparing your base. For fabrics, iron the material to ensure a smooth surface. For painting, prime the canvas with a layer of gesso if needed.
Layer your colors. Start with the darkest shade as your base and gradually blend lighter shades outward to mimic the natural gradient of the night sky.
Use a sponge or a soft brush to create a seamless transition between colors, avoiding harsh lines that detract from the realistic look.
Add subtle texture. Use techniques like stippling or sponging with a slightly lighter shade to give the illusion of clouds or faint nebulae in the background.
Allow the base to dry or set completely before proceeding to add stars, ensuring your work stays neat and precise.
Test your star-making technique on a scrap piece or corner before applying it to the main project. This allows you to adjust pressure and density.
With a well-crafted background, you’re ready to move on to the focal point of the project—the stars themselves.
3. Techniques for Crafting Star Patterns
This section of the Stars in the Darkening Sky – Tutorial focuses on creating the stars that bring your night sky to life. Here’s how to achieve that twinkling effect:
Use a fine-tipped brush, needle, or pen to create stars. For embroidery, a French knot works beautifully for small, bright points.
Vary the sizes of your stars. A mix of tiny dots, medium-sized clusters, and occasional larger stars adds depth and realism.
Scatter the stars randomly but consider natural patterns like constellations or the Milky Way for added interest and authenticity.
Add a glow effect. For larger stars, use a lighter shade or metallic color to create a halo effect, giving the impression of light radiating outward.
Include star clusters and subtle trails to mimic shooting stars or galaxies for a more dynamic composition.
Highlight certain areas with glitter or metallic accents to add sparkle and dimension, drawing the eye to specific parts of the design.
Your stars are now shining bright, creating a captivating scene that mirrors the beauty of the Stars in the Darkening Sky.
4. Enhancing Your Design with Final Touches
Now that your stars and background are complete, it’s time to enhance your Stars in the Darkening Sky project with finishing details:
Outline certain elements for definition. Use contrasting colors or metallics to frame specific stars or patterns for emphasis.
Layer additional details like moons, planets, or auroras to add complexity and visual interest to your night sky.
Incorporate texture by using 3D elements like beads, sequins, or raised embroidery stitches to give a tactile feel to your design.
Seal or fix your project to preserve its beauty. For paintings, use a varnish; for fabric projects, consider a fabric sealant.
Frame or mount your work to display it prominently. A well-presented project becomes a piece of art that stands out in any space.
Share your creation! Show off your finished Stars in the Darkening Sky project on social media or gift it to someone special.
With these final touches, your project is complete and ready to be admired.
FAQ
Q1: What skills do I need to complete this tutorial?
Basic skills in your chosen medium (painting, embroidery, etc.) are enough. The tutorial is beginner-friendly but also adaptable for advanced crafters.
Q2: Can I use this tutorial for different types of crafts?
Yes, the techniques can be applied to various mediums, including quilting, painting, or even digital art.
Q3: How long does this project take to complete?
The time varies based on the size and complexity of your design, but most projects can be finished in 2-4 hours.
Q4: What if I make a mistake?
Mistakes can often be corrected by blending or layering additional colors. For embroidery, simply remove the stitch and try again.
Q5: Are there specific brands of materials you recommend?
While any quality materials will work, choosing trusted brands can ensure better results and easier application.
Q6: Can children try this tutorial?
Yes, with supervision, children can enjoy creating their own version of Stars in the Darkening Sky.
Join our VIP broadcast list and gain access to exclusive patterns, all for free. As a VIP member, you’ll receive the best patterns daily, delivered directly to your device. ✨📱 It’s a unique opportunity to stay up-to-date with the latest trends and designs, curated just for you. Don’t miss out on enhancing your projects and discovering new inspirations with the best patterns every day! 🎨🔝
Conclusion
The Stars in the Darkening Sky – Tutorial provides a wonderful way to capture the magic of a starry night in your craft projects. By following these steps, you’ll create a stunning design that’s both rewarding and visually captivating.
We’d love to hear from you! Share your thoughts on this tutorial and let us know how your project turned out. Your feedback helps us continue crafting helpful guides for creative enthusiasts. Happy crafting!

