A Star ornament made from scraps is one of the most charming and creative projects for those who love sewing, quilting, or crafting with leftover materials.
When you choose to create a Star ornament made from scraps, you are working on more than just decoration; you are also developing your creativity and artistic side.
Many people are searching for creative, budget-friendly crafts, and a Star ornament made from scraps is an excellent answer.
Materials and preparation for a Star ornament made from scraps
Before starting the project, it is important to gather all the materials you will need. The beauty of a Star ornament made from scraps lies in its simplicity, so you don’t need professional tools. Collect your fabric leftovers, thread, scissors, and a simple template for the star shape. Templates can be drawn by hand or printed, and they help to maintain symmetry in your ornament.
Choose your scraps wisely, as the combination of textures and colors is what makes the star unique. Cotton fabrics are easy to sew and hold their shape well, but you can also mix felt, denim, or even silk for contrast. Make sure your pieces are clean and ironed before cutting. This ensures a neat and professional finish, even if you are a beginner.
Cutting the fabric is one of the most important steps. Use sharp scissors to avoid frayed edges, and cut the pieces slightly larger than the star template to leave room for seams. You will need two layers of fabric for each side of the star, and you can add batting or soft filling inside for extra volume. This makes the ornament look three-dimensional and gives it a soft touch.
Thread color also plays an important role. Some people prefer using matching thread for a seamless look, while others enjoy contrasting colors to highlight the stitches. Both choices work well depending on your design style. Embroidery thread can also be used for a decorative touch.
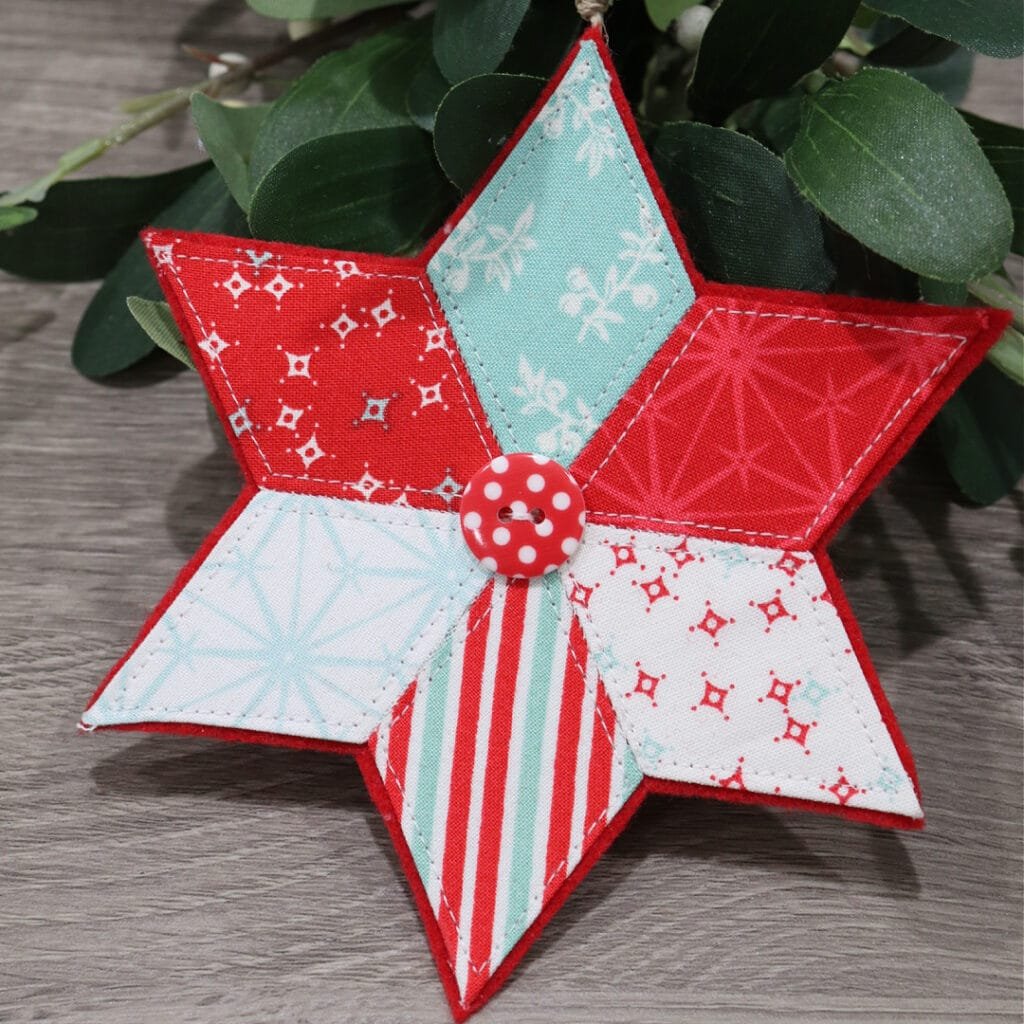
In addition to the basic materials, you may want to prepare embellishments such as small buttons, beads, or ribbons. These details make your Star ornament made from scraps stand out and give it a personal signature. Adding a hanging loop made of ribbon or cord is essential if you want to use the ornament on a Christmas tree or wall.
Finally, create a comfortable and organized workspace. Having everything at hand helps you focus on the creative process. A well-lit area and a soft surface like a cutting mat or ironing board will make the task much easier and enjoyable.
Step-by-step process to sew the Star ornament made from scraps
The first step in sewing your Star ornament made from scraps is to place the fabric pieces right sides together with the template on top. Carefully cut around the star shape, leaving a small seam allowance. Repeat this for both sides of the ornament so that you have two identical star shapes.
Next, place the two star shapes together, right sides facing inward. Pin them in place to avoid slipping while sewing. Start stitching along the edges, leaving a small opening that will later be used to turn the star right side out. This method ensures neat seams and a durable structure.
After sewing, trim the excess fabric around the edges, especially at the points of the star. This helps the shape look sharp once it is turned. Be careful not to cut through the stitches. Then, gently turn the star inside out through the opening, using a pencil or blunt tool to push out the points.
Now comes the stuffing part. Use polyester filling, fabric scraps, or even cotton to give volume to the ornament. Push the stuffing evenly into each point of the star so that it maintains its shape. Don’t overfill, as too much stuffing can distort the design.
Once stuffed, close the opening by hand with small, invisible stitches. At this stage, you can also add decorative stitching along the edges for a more defined look. Blanket stitches or embroidery stitches add charm and strength to the ornament.
Finish your Star ornament made from scraps by attaching a ribbon loop at the top. Simply sew or glue it in place, making sure it is secure enough to hold the weight of the ornament. Now, your star is ready to shine as part of your decoration.
Creative ideas to personalize your Star ornament made from scraps
A great advantage of making a Star ornament made from scraps is the endless customization possibilities. You can mix fabrics of different colors and textures to match your home decor or seasonal themes. For example, red and green fabrics are perfect for Christmas, while pastel shades bring a soft and cozy look.
Personal touches such as embroidery can make the star even more special. You might embroider initials, small flowers, or geometric designs onto the fabric before sewing the pieces together. This detail transforms the ornament into a keepsake or thoughtful handmade gift.
Adding embellishments is another way to personalize your star. Beads, sequins, and small buttons can be sewn along the edges or at the center, giving a sparkling effect. These details catch the light beautifully and make the star stand out among other decorations.
If you enjoy rustic or minimalist styles, you can keep the ornament simple by using neutral fabrics such as linen, canvas, or denim. A rough string loop instead of ribbon gives a natural handmade charm that matches farmhouse or boho-inspired interiors.
For children’s rooms, consider using bright, playful fabrics with cartoon prints or cheerful patterns. This not only adds color but also makes the star fun and appealing for kids. You can even involve children in the process, letting them choose the scraps or help with safe steps.
Finally, create sets of ornaments instead of just one. Multiple stars in different sizes can be arranged together on a tree, wall, or garland. A collection of Star ornaments made from scraps makes the decoration more cohesive and visually attractive.
How to use Star ornaments made from scraps in your home decor
Once you finish crafting your Star ornament made from scraps, there are countless ways to use it creatively in your home. The most traditional idea is to hang it on a Christmas tree. Handmade stars bring warmth and originality to holiday decorations, and they stand out from store-bought items.
Another option is to use them as wall art. You can create a star garland and hang it on a wall, fireplace, or even across a window. This brings a festive spirit not only during holidays but also throughout the year, depending on the colors and fabrics used.
Stars also work beautifully as table decor. Place them in a decorative bowl or scatter them across the dining table for a cozy and inviting look. They can be combined with candles, greenery, or fairy lights to create a magical atmosphere.
A Star ornament made from scraps also makes a thoughtful handmade gift. Instead of buying expensive presents, giving a star shows care and dedication. You can personalize it for each recipient by choosing fabrics that match their style or favorite colors.
If you love seasonal decorations, keep a collection of stars in different palettes for various times of the year. For example, pastel stars for spring, bright tones for summer, earthy colors for autumn, and classic reds and greens for winter. This allows you to reuse the same idea in versatile ways.
Lastly, consider using the ornaments as keychains or bag charms. By adding a sturdy loop or clip, the star becomes a portable accessory. This extends its purpose beyond home decor and turns it into a daily reminder of creativity and sustainability.
FAQ about Star ornament made from scraps
1. What materials do I need to make a star ornament from scraps?
You need fabric leftovers, thread, scissors, a star template, stuffing, and a ribbon or cord for hanging. Optional materials include beads, buttons, or embroidery thread for decoration.
2. Can beginners make a Star ornament made from scraps?
Yes, this project is beginner-friendly. With simple stitches and basic tools, anyone can complete it successfully. It’s a great way to practice sewing without pressure.
3. How long does it take to complete one star ornament?
On average, it takes about one to two hours depending on your sewing speed and the level of detail added. More embellishments may extend the time.
4. What kind of fabric works best for this craft?
Cotton is recommended for beginners because it is easy to cut and sew. However, felt, denim, or silk can also be used for different effects and textures.
5. How can I personalize my star ornament?
You can personalize it with embroidery, beads, buttons, or by choosing fabrics that match your decor. Each choice makes the star unique and meaningful.
6. Can these ornaments be washed?
Yes, but gently. Hand washing with mild soap is the safest method, especially if the ornament contains delicate decorations like beads or sequins.
7. Are Star ornaments made from scraps eco-friendly?
Absolutely. They promote reusing leftover materials, reducing waste, and encouraging sustainable crafting practices.
8. Can I make a set of ornaments instead of just one?
Yes, making multiple stars is common. Sets create a cohesive look for trees, garlands, or table decorations.
9. Is stuffing necessary for the ornament?
Stuffing is optional but recommended, as it gives the star a three-dimensional look and makes it more visually appealing.
10. What occasions are suitable for using star ornaments?
While they are popular during Christmas, star ornaments can be used year-round for home decoration, parties, or as small handmade gifts.
Conclusion
In this tutorial, we explored how to make a Star ornament made from scraps, from gathering materials to sewing, personalizing, and decorating your home.
This project is budget-friendly, eco-conscious, and deeply creative, making it perfect for both beginners and experienced crafters.
By turning scraps into art, you not only save money but also bring charm and warmth into your space. I would love to hear your opinion and suggestions about this craft—feel free to share your thoughts and ideas on how you would personalize your own star ornaments.

