The Stair Quilt Block is a classic and charming quilt design, loved for its clean lines and structural beauty. This step-by-step guide will walk you through the process of creating your own stair quilt block, providing tips on material selection, cutting, piecing, and finishing techniques to ensure your block is precise and visually appealing.
Ideal for beginners and seasoned quilters alike, the Stair Quilt Block offers a chance to experiment with fabric combinations while honing essential quilting skills.
One of the appealing aspects of the Stair Quilt Block is its simplicity, yet it allows for endless customization and creativity. By carefully selecting fabrics and mastering the placement, you can achieve a variety of looks, from traditional to modern.
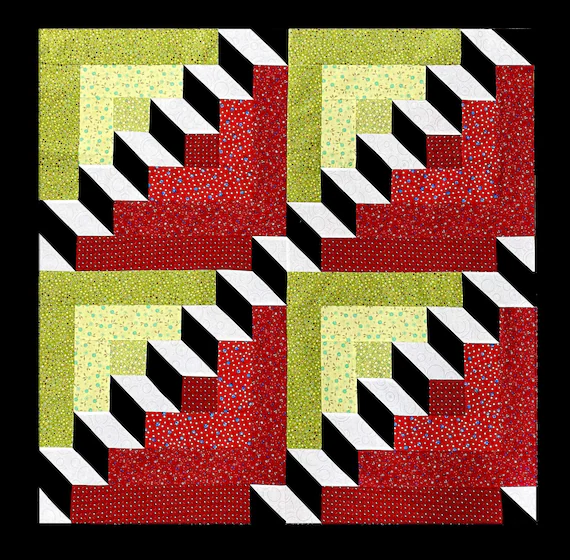
The structured layout of the stair block makes it an ideal design for showcasing color gradients or contrasting fabrics. Whether you’re looking to create a full quilt or add a single Stair Quilt Block to your collection, this guide will help you achieve professional-looking results.
In the sections below, we’ll cover each part of the process, from gathering materials to the final stitch.
With careful attention to detail and some practice, you’ll be able to create a stunning Stair Quilt Block that can serve as the foundation for a larger project or as a standalone piece. Follow along, and soon you’ll be able to craft your own quilt blocks with confidence.
1. Preparing Your Materials for the Stair Quilt Block
Before beginning your Stair Quilt Block, it’s important to gather all necessary materials. This preparation ensures a smooth workflow and helps you stay organized throughout the quilting process.
The first item you’ll need is quilting fabric. For the Stair Quilt Block, consider selecting fabrics in contrasting colors or patterns. This contrast will enhance the visual impact of the stair pattern, making the design stand out. Cotton is a popular choice due to its durability and ease of handling, but you can also explore other fabrics based on the look you want to achieve.
Next, you’ll need a rotary cutter and cutting mat. These tools allow you to cut your fabric with precision, which is essential for achieving accurate shapes and sizes in your Stair Quilt Block. A rotary cutter also helps reduce fraying, making it easier to piece the block together without loose threads.
Lastly, prepare a sewing machine with matching thread. Consistent stitching is key to a successful quilt block, so ensure that your machine is set up correctly. Adjust the stitch length if necessary, as shorter stitches can create a more durable quilt block. Gather all other essentials, like pins, rulers, and fabric scissors, before you start.
Having all your materials ready and accessible will save you time and frustration. By focusing on quality materials and accurate tools, your Stair Quilt Block will come together more smoothly and produce a polished result. Taking the time to prepare also allows you to experiment with different fabric combinations before committing to a final design.
2. Cutting and Organizing Your Fabric Pieces
Once your materials are ready, the next step in creating a Stair Quilt Block is cutting and organizing your fabric pieces. This part of the process requires attention to detail and precision, as well-cut fabric pieces are essential for a well-aligned block.
Start by measuring and marking your fabric according to the size of your Stair Quilt Block. Common sizes include 10×10 inches or 12×12 inches, but you can adjust based on your quilt’s final dimensions. Use a quilting ruler to mark straight lines, ensuring accuracy and consistency in each piece.
After marking, cut the fabric with your rotary cutter on a cutting mat. Press down firmly for a clean cut, and avoid lifting the cutter prematurely. It’s best to cut all pieces at once, organizing them by color or fabric pattern as you go. This way, you can easily access the correct pieces when it’s time to assemble the Stair Quilt Block.
Once cut, lay out the pieces in a stair pattern to visualize the final design. Position the pieces to ensure the color distribution creates a staircase effect, with darker shades on one side and lighter on the other, or however you wish to arrange them. This layout will help you see if any adjustments are needed before sewing.
Using pins, secure each piece in place on your work surface. This step not only prevents misplacement but also keeps the fabric from shifting while you work. A well-organized layout allows you to sew confidently, knowing that each piece is in the correct position.
Lastly, double-check your measurements and layout before moving to the sewing stage. Small adjustments at this stage can prevent mistakes later on. By taking the time to cut and organize carefully, your Stair Quilt Block will have a more professional finish and accurate alignment.
3. Assembling and Sewing the Stair Quilt Block
With your fabric pieces organized, it’s time to assemble and sew the Stair Quilt Block. This step involves piecing together each section, creating a cohesive pattern that resembles a staircase. Precision is key, as even slight misalignments can affect the overall look of the block.
Begin by sewing smaller sections together to form larger units. Use a ¼-inch seam allowance, which is standard in quilting, to maintain consistency and avoid bulky seams. Sew each row or segment separately before connecting them. Start with the top row, aligning each piece carefully before sewing to ensure a straight seam.
Once you’ve sewn each row, press the seams open or to the side, depending on the design’s needs. Pressing helps flatten the fabric, making it easier to piece the rows together and ensuring a smooth, flat block. If you’re using darker fabrics, pressing the seams toward the darker side can prevent the fabric from showing through lighter sections.
Now, sew the rows together, starting from the top row and working your way down. Align each seam carefully and use pins to hold the fabric in place while sewing. This step is essential for maintaining the stair pattern, as uneven seams can distort the design.
After sewing all the rows together, press the entire block one last time. This pressing will set the stitches and ensure that your Stair Quilt Block lies flat. Take time to examine your block for any loose threads or uneven seams, making any necessary adjustments before moving on.
By following these assembly and sewing steps, you’ll create a Stair Quilt Block that is precise, sturdy, and visually appealing. The more practice you have, the more confident you’ll become in creating beautiful quilt blocks with clean lines and accurate alignment.
4. Finishing Touches and Joining Blocks
The final step in creating a Stair Quilt Block is adding finishing touches and preparing to join it with other blocks. These last steps can elevate the quality of your quilt, ensuring that your work is both visually stunning and structurally sound.
First, trim any excess fabric from the edges of your Stair Quilt Block. This trimming step ensures that your block is square and that all sides are even, which is essential when joining multiple blocks together. Use a quilting ruler and rotary cutter for clean, straight edges.
Next, consider adding a border around your Stair Quilt Block if you want to give it a framed look or provide additional space between blocks. A simple strip of fabric can serve as a border, enhancing the stair pattern and making it more prominent. Attach the border by sewing it around the block’s perimeter, using the same ¼-inch seam allowance.
Now, inspect the block for any loose threads or imperfections. A final pressing can help smooth out any remaining wrinkles or seams, making your Stair Quilt Block look professionally finished. This step is especially important if you plan to join the block with others in a larger quilt, as it ensures a cohesive appearance.
To join multiple blocks, align them carefully and sew along the edges. Use the same seam allowance and press the seams between blocks for a polished, flat surface. Repeat this process with as many Stair Quilt Blocks as you need to complete your quilt project, connecting rows and columns until your quilt is fully assembled.
Finally, add a backing fabric and quilt batting if you’re creating a full quilt. These layers provide warmth and stability, enhancing the block’s durability. Bind the edges to finish your quilt, securing all layers together and giving your quilt a neat, polished edge.
With these finishing touches, your Stair Quilt Block and larger quilt project are complete. You can now enjoy your beautiful creation, showcasing your quilting skills and personal style.
FAQ
Q1: What is the best fabric for a Stair Quilt Block?
A1: Cotton is the most popular choice for quilt blocks due to its durability, ease of use, and availability in various patterns and colors. It also holds its shape well, making it ideal for detailed quilt blocks like the Stair Quilt Block.
Q2: How can I ensure my Stair Quilt Block is square?
A2: Using a rotary cutter and ruler to measure and trim each side helps keep your block square. Pressing seams and trimming excess fabric also contribute to a well-shaped block.
Q3: What size should my Stair Quilt Block be?
A3: Common sizes are 10×10 or 12×12 inches, but you can adjust the block size to fit your quilt’s design. Larger blocks are ideal for quick projects, while smaller blocks allow for intricate details.
Q4: Do I need a sewing machine to make a Stair Quilt Block?
A4: While a sewing machine makes the process faster and more precise, you can sew the block by hand if desired. Just ensure to use small, consistent stitches for a sturdy block.
Q5: How can I add dimension to my Stair Quilt Block?
A5: Layering different shades of fabric or using textures can add depth. Adding a border around the block or using a color gradient enhances the stair pattern’s visual impact.
Join our VIP broadcast list and gain access to exclusive patterns, all for free. As a VIP member, you’ll receive the best patterns daily, delivered directly to your device. ✨📱 It’s a unique opportunity to stay up-to-date with the latest trends and designs, curated just for you. Don’t miss out on enhancing your projects and discovering new inspirations with the best patterns every day! 🎨🔝
Conclusion
Creating a Stair Quilt Block is a rewarding experience, offering both simplicity and creativity in a single design. By following this guide and practicing each step, you’ll develop the skills needed to create a precise and attractive quilt block. We hope this tutorial has helped you feel confident in making your own Stair Quilt Block.
We’d love to hear your thoughts, experiences, or any tips you may have. Please leave your feedback and suggestions below!

