In this Square Burst Quilt Block Tutorial by Stephanie Sliwinski, you will learn how to create a stunning quilt block that features a vibrant design, perfect for adding a splash of color to your quilting projects.
Stephanie’s approach to quilting combines creativity with technical skill, making it accessible for both beginners and experienced quilters. This tutorial will guide you step by step through the process of making the Square Burst quilt block, highlighting essential techniques and tips along the way.
The Square Burst quilt block is characterized by its bold geometric shapes that radiate from the center, creating an eye-catching burst effect. This block is versatile and can be used in various projects, from bed quilts to wall hangings.
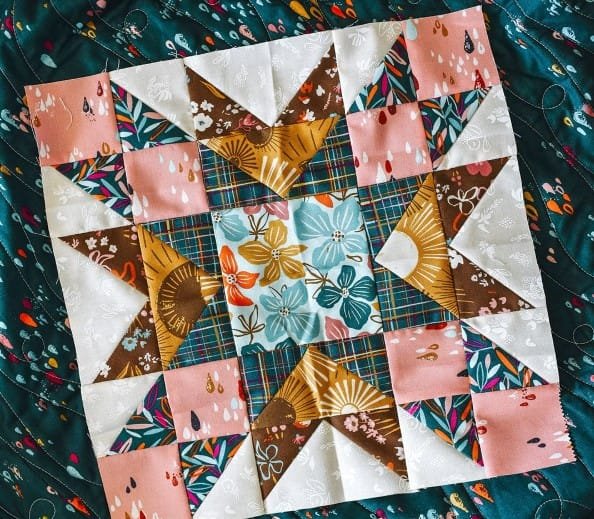
The combination of colors and patterns allows quilters to express their creativity, and the resulting block can be both modern and traditional, depending on the fabrics used.
Before diving into the tutorial, it’s important to gather all necessary materials and understand the basic sewing techniques. This will ensure a smooth quilting experience and a beautifully finished Square Burst quilt block. Let’s get started on this exciting quilting journey!
1. Materials Needed for the Square Burst Quilt Block
To create your Square Burst Quilt Block Tutorial by Stephanie Sliwinski, you will need a selection of materials that will facilitate your quilting process. Here’s a list of everything you need:
- Fabric: Choose a variety of fabrics in different colors and patterns. Typically, you will need a main fabric for the center, contrasting fabrics for the burst, and background fabric. Cotton fabrics work best for quilting due to their durability and ease of use.
- Rotary Cutter and Mat: A rotary cutter will allow you to cut your fabric accurately and efficiently. Pair it with a self-healing cutting mat to protect your surfaces.
- Quilting Ruler: A clear quilting ruler will help you measure and cut your fabric pieces precisely. Look for one that includes 45-degree angle markings, as these will be helpful in this project.
- Sewing Machine: A sewing machine is essential for stitching the quilt blocks together. Make sure it’s in good working condition and that you have the appropriate presser foot for quilting.
- Thread: Use high-quality cotton thread in colors that match your fabrics. It’s important to choose the right weight, usually a 50-weight thread works well for piecing quilt blocks.
- Iron and Ironing Board: An iron is necessary for pressing your fabric pieces and seams flat. A good-quality ironing board will provide a stable surface for pressing.
2. Cutting Your Fabric Pieces
Now that you have all your materials ready, the next step in the Square Burst Quilt Block Tutorial by Stephanie Sliwinski is to cut your fabric pieces accurately. This is a crucial step that can significantly impact the final look of your quilt block.
- Step 1: Measure and Mark: Using your quilting ruler, measure the dimensions for each fabric piece required for the Square Burst block. You will typically need squares and rectangles, so plan accordingly.
- Step 2: Cut Main Fabric: Start by cutting your main fabric for the center square. This is usually the focal point of your block, so choose a vibrant or unique fabric that stands out.
- Step 3: Cut Burst Fabrics: Next, cut your burst fabric into triangles or rectangles. The number and size of these pieces will depend on the specific design of your Square Burst block. Ensure your cuts are precise to maintain uniformity.
- Step 4: Cut Background Fabric: Finally, cut the background fabric that will surround your burst pieces. This fabric will help frame your design and create contrast.
- Step 5: Organize Your Pieces: Once all pieces are cut, organize them into groups based on their placement in the quilt block. This will make it easier to assemble later.
- Step 6: Press Your Fabric: Before sewing, press each fabric piece with your iron. This will remove any wrinkles and help your seams align better during the stitching process.
3. Assembling the Square Burst Quilt Block
With your fabric pieces cut and organized, it’s time to start assembling the Square Burst quilt block. In this section of the Square Burst Quilt Block Tutorial by Stephanie Sliwinski, we’ll walk you through the assembly process step by step.
- Step 1: Start with the Center: Begin by taking your center square and laying it on your work surface. This square will be the focal point of your burst.
- Step 2: Attach Burst Pieces: Take one of your burst pieces and align it with one side of the center square, right sides together. Pin in place and sew along the edge using a quarter-inch seam allowance. Repeat this for all sides.
- Step 3: Press the Seams: After sewing each burst piece, press the seams away from the center square. This will help create a flat surface and keep the block’s shape intact.
- Step 4: Add Additional Layers: Continue adding burst pieces around the center square. As you add more layers, you’ll start to see the burst effect emerge. Be sure to keep the pieces aligned and the seams pressed.
- Step 5: Sew the Background Fabric: Once all burst pieces are attached, it’s time to add the background fabric. Cut background pieces as necessary and attach them to the outer edges of your block, again using a quarter-inch seam allowance.
- Step 6: Final Pressing: After all pieces are sewn together, give your entire block a final press. This will ensure that all seams lay flat and that your Square Burst block looks polished and professional.
4. Finishing Touches and Tips
Now that your Square Burst Quilt Block Tutorial by Stephanie Sliwinski is assembled, it’s time to add the finishing touches. These small details can elevate your quilt block and ensure it is ready for use in a larger project.
- Step 1: Trim the Block: Use your quilting ruler to trim the edges of your block to ensure it’s perfectly square. This will make it easier to piece with other blocks later.
- Step 2: Consider Adding Borders: If desired, add a border around your Square Burst block. This can be a solid fabric or a smaller pattern that complements the burst. Borders can help frame the design and add extra dimension.
- Step 3: Baste Your Quilt: If you plan to incorporate your Square Burst block into a larger quilt, consider basting it with batting and backing fabric. This will create a quilt sandwich that is ready for quilting.
- Step 4: Quilt Your Block: You can either machine quilt or hand quilt your Square Burst block to add texture. Choose a quilting pattern that enhances the design without overwhelming it.
- Step 5: Bind Your Block: If your Square Burst block is standalone, finish it by adding a binding. This can be a simple fabric strip sewn around the edges to create a finished look.
- Step 6: Display Your Work: Finally, consider how you’ll display or use your finished Square Burst block. Whether it’s part of a larger quilt or a decorative piece on its own, take pride in your work!
FAQ
Q: What skill level is required for the Square Burst Quilt Block Tutorial?
A: The Square Burst Quilt Block Tutorial by Stephanie Sliwinski is suitable for quilters of all skill levels, including beginners. Basic sewing skills and familiarity with quilting tools are helpful.
Q: Can I use different fabrics for the Square Burst block?
A: Absolutely! You can use any fabrics you like. Experimenting with different colors and patterns will give your Square Burst block a unique look.
Q: How many Square Burst blocks can I create from a yard of fabric?
A: The number of blocks you can create will depend on the size of your blocks and the width of the fabric. Typically, you can make several blocks from a yard of fabric.
Q: What type of batting should I use if I decide to quilt my block?
A: Use a high-quality cotton or polyester batting for a good balance of warmth and weight. The choice may depend on your project and desired finish.
Q: How do I maintain my quilted block?
A: To maintain your quilted block, avoid washing it frequently. If it needs cleaning, spot-clean with a damp cloth and mild detergent. If it’s part of a larger quilt, follow the care instructions for the specific fabrics used.
Q: Can I use the Square Burst design in other projects?
A: Yes! The Square Burst design can be used in various projects, including table runners, cushions, and wall hangings. Its versatility allows for endless creativity.
Join our VIP broadcast list and gain access to exclusive patterns, all for free. As a VIP member, you’ll receive the best patterns daily, delivered directly to your device. ✨📱 It’s a unique opportunity to stay up-to-date with the latest trends and designs, curated just for you. Don’t miss out on enhancing your projects and discovering new inspirations with the best patterns every day! 🎨🔝
Conclusion
In this Square Burst Quilt Block Tutorial by Stephanie Sliwinski, you have learned the step-by-step process of creating a vibrant quilt block that can be used in various quilting projects. From gathering materials and cutting fabric to assembling the block and adding finishing touches, this tutorial has provided a comprehensive guide to mastering the Square Burst design.
PATTERN HERE
We hope you feel inspired to try this tutorial and incorporate the Square Burst block into your quilting repertoire. We encourage you to share your thoughts, feedback, and suggestions in the comments below. Happy quilting!

