Welcome to this comprehensive Split Star Block – Tutorial! This guide is designed to help you create the beautiful and versatile Split Star Block, perfect for various quilting projects.
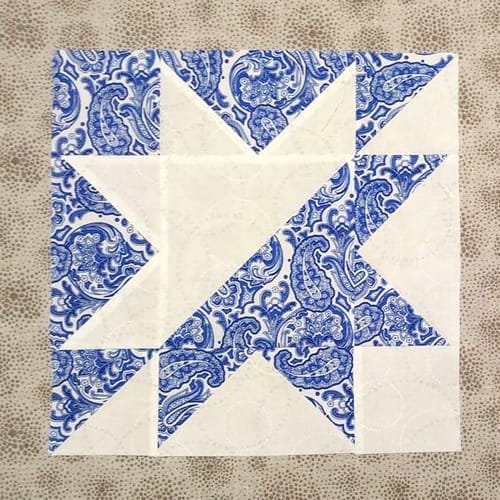
Whether you’re an experienced quilter or just starting out, this tutorial provides step-by-step instructions to help you achieve stunning results. The Split Star Block is characterized by its unique design, combining triangles and squares to form an eye-catching star pattern that adds dimension to any quilt.
The beauty of the Split Star Block lies not only in its visual appeal but also in its versatility. You can use this block in numerous quilt designs, ranging from classic to contemporary styles. Additionally, by changing the colors and fabric choices, you can create a block that suits any theme or occasion.
Imagine creating a quilt that showcases your favorite colors or a holiday-themed quilt using festive fabrics—the possibilities are endless!
In this tutorial, we will guide you through the materials you’ll need, detailed steps to create the block, and tips to ensure your success. So grab your fabric and sewing supplies, and let’s get started on this exciting quilting journey!
1. Materials Needed for the Split Star Block
Before we begin, let’s gather all the materials you will need to create your Split Star Block. Having everything organized will help streamline the process and make your quilting experience more enjoyable.
- Fabrics: You will need two contrasting fabrics: one for the star and one for the background. Cotton fabric is highly recommended for quilting due to its durability and ease of handling. For a classic look, consider using a solid color for the star and a patterned fabric for the background.
- Rotary Cutter and Mat: A rotary cutter is essential for cutting fabric accurately. Pair it with a self-healing cutting mat to protect your surfaces and ensure precise cuts.
- Ruler: A clear acrylic ruler will help you measure and cut your fabric pieces accurately. Look for a ruler with grid lines for easy alignment.
- Sewing Machine: A reliable sewing machine is crucial for stitching your pieces together. Ensure your machine is set up with a standard quilting foot and is in good working condition.
- Thread: Use a high-quality cotton thread that matches your fabrics. This will ensure your stitches are secure and your finished block looks polished.
- Iron and Ironing Board: Pressing your fabric pieces as you go is vital for achieving neat seams and precise points. An iron with steam functionality can help remove wrinkles effectively.
Once you have all your materials ready, you’re set to start creating your Split Star Block!
2. Cutting Your Fabric for the Split Star Block
Now that you have gathered your materials, let’s move on to cutting the fabric pieces needed for the Split Star Block. Accurate cutting is crucial to ensure that your block fits together perfectly.
- Cut the Background Squares: Start by cutting four squares from your background fabric. Each square should measure 5 inches. These will form the corners of your Split Star Block.
- Cut the Star Pieces: Next, cut four squares from your star fabric, also measuring 5 inches. These will create the points of the star. After cutting, you will need to cut each square diagonally into two triangles, resulting in eight triangles total.
- Cut Additional Background Pieces: Cut one more square from the background fabric, this time measuring 10 inches. This larger square will be divided into smaller pieces later, so make sure to measure accurately.
- Prepare for the Trimming: As you cut, stack your pieces neatly to keep everything organized. This will help you keep track of your pieces and ensure you don’t lose any.
- Double-Check Measurements: It’s essential to double-check all measurements before proceeding. If any pieces are incorrectly sized, it can throw off the entire block’s dimensions.
- Store Your Pieces Safely: Once you’ve finished cutting, store your fabric pieces in labeled bags or containers to prevent them from getting mixed up.
With all your fabric cut and organized, you’re ready to move on to assembling the Split Star Block!
3. Assembling the Split Star Block
Now comes the exciting part—assembling your Split Star Block! Follow these steps carefully to ensure your block turns out beautifully.
- Arrange Your Pieces: Start by laying out your cut pieces on a flat surface. Arrange the star triangles and background squares in a way that you find visually pleasing. This is a great opportunity to experiment with color placement.
- Sewing the Triangles: Take one triangle from the star fabric and place it on the corner of a background square, right sides together. Sew along the diagonal edge using a quarter-inch seam allowance. Repeat this process for the remaining triangles and background squares.
- Pressing the Seams: Once you’ve sewn the triangles to the background squares, press the seams open with your iron. This will help reduce bulk and create a neater finish.
- Joining the Star Points: Next, take two of the star-triangle units you just created and sew them together along the long edges. Make sure the points meet at the center for a crisp star point.
- Repeat for All Points: Continue this process for the other two star points. Once all four points are completed, you will have a star shape that is ready to be attached to the center of your block.
- Assemble the Center: Finally, sew the four star points together in the center using the same quarter-inch seam allowance. Press the seams once more to ensure everything lies flat.
Congratulations! You have now assembled your Split Star Block. The next step is to add the final touches.
4. Finishing Touches and Tips for Success
You’ve done an excellent job putting together your Split Star Block! Now let’s focus on the finishing touches to make your block look polished and ready for use.
- Trimming the Block: Use your rotary cutter and ruler to trim your block to the desired size. It’s recommended to square it up to a standard size, typically 12.5 inches, which will make it easier to piece together in a quilt.
- Pressing Again: Give your block one final press with the iron to ensure it lies flat. This step is crucial, especially before joining it with other blocks.
- Choosing Additional Blocks: If you plan to make multiple Split Star Blocks, consider varying the fabrics for each block to create an interesting quilt. This can add depth and visual intrigue to your finished project.
- Storing Your Block: If you’re not using your block immediately, store it flat in a clean, dry space to prevent any creases or damage.
- Incorporating into a Quilt: Once you have several blocks made, you can arrange them into a quilt layout. Think about the overall design and how the colors interact with one another.
- Adding Borders: Consider adding a border around your finished quilt to frame your Split Star Block and add a professional touch.
FAQ
1. What fabrics work best for the Split Star Block?
Cotton fabric is ideal for quilting as it’s durable and easy to work with. Choose contrasting colors for the star and background to make the design pop.
2. Can I use pre-cut fabric for this project?
Yes! Pre-cut fabric like charm packs or fat quarters can save time and ensure uniformity in size. Just make sure to follow the same measurements for cutting.
3. How do I ensure my seams are accurate?
Using a quarter-inch foot on your sewing machine can help maintain consistent seam allowances. It’s also helpful to measure your seams as you sew.
4. What if my block doesn’t turn out perfectly square?
If your block is slightly off, you can trim it to square it up. It’s normal for blocks to need some adjustments, especially with complex designs.
5. How many Split Star Blocks do I need for a quilt?
The number of blocks needed depends on the size of your quilt. A lap quilt may require around 12 blocks, while a larger quilt could need 20 or more.
6. Can I mix different quilt block patterns?
Absolutely! Mixing different block patterns can create a unique and visually interesting quilt. Just ensure all blocks are the same size for easier assembly.
Join our VIP broadcast list and gain access to exclusive patterns, all for free. As a VIP member, you’ll receive the best patterns daily, delivered directly to your device. ✨📱 It’s a unique opportunity to stay up-to-date with the latest trends and designs, curated just for you. Don’t miss out on enhancing your projects and discovering new inspirations with the best patterns every day! 🎨🔝
Conclusion
In this tutorial, you’ve learned how to create the Split Star Block – Tutorial from start to finish. From gathering materials and cutting fabric to assembling and finishing your block, we’ve covered every step to help you achieve stunning results. This block not only enhances your quilting skills but also opens up a world of creative possibilities for your future projects.
PATTERN HERE
We hope you enjoyed this tutorial and feel inspired to create your own Split Star Block! We would love to hear your thoughts and any suggestions you might have. Please leave your feedback in the comments below, and happy quilting!

