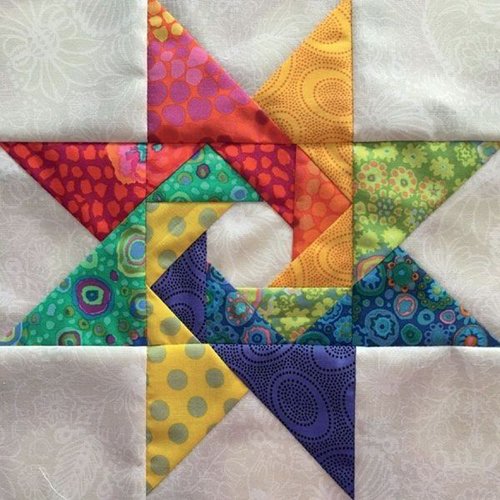
If you’re looking for a fresh and exciting quilting project, the Spinning Star – Quilting Tutorial is the perfect place to start. This dynamic design combines tradition with a modern twist, making it an eye-catching addition to any quilt collection.
The Spinning Star – Quilting Tutorial will guide you through each step, ensuring you can create this stunning pattern, even if you’re new to quilting.
The Spinning Star pattern is a fantastic way to experiment with colors and fabric combinations, allowing you to bring your creative vision to life. This tutorial will break down the entire process, from choosing your fabrics to piecing the star blocks and finally quilting the layers.
Whether you’re making a full quilt or just a single block for a pillow or wall hanging, the Spinning Star – Quilting Tutorial will provide everything you need to succeed.
Now, let’s dive into the materials required and begin crafting your Spinning Star quilt!
1. Selecting the Perfect Fabrics for Your Spinning Star Quilt
Choosing the right fabrics is the first and most crucial step in creating a stunning Spinning Star quilt. The combination of colors and textures will greatly impact the overall look of the quilt, so take your time when picking out your fabric.
1.1 Contrast is Key: The beauty of the Spinning Star pattern lies in the contrast between different fabric colors. Choose one dark fabric and one light fabric to make the star pop against the background. The greater the contrast, the more the star will stand out.
1.2 Mixing Solids and Prints: To add depth to your quilt, mix solid colors with patterned fabrics. For example, use a solid fabric for the star and a subtle print for the background, or vice versa.
1.3 Choosing High-Quality Fabric: Always opt for 100% cotton fabrics, as they are easy to work with and hold up well over time. Cotton also offers a wide variety of prints and colors, making it ideal for quilting projects like the Spinning Star – Quilting Tutorial.
1.4 Pre-Washing Fabrics: Pre-washing your fabrics is essential to prevent any future shrinkage and color bleeding. Once washed, press the fabrics flat before cutting them.
1.5 Coordinating Thread Colors: For a cohesive look, choose thread colors that match or complement your fabric selections. Neutral threads like white, gray, or beige are always safe options, but you can also choose threads that blend into the darker fabrics.
1.6 Cutting the Fabrics: Using a rotary cutter, cutting mat, and ruler will help you achieve precise cuts. Accurate measurements are essential for piecing the star blocks together seamlessly.
2. Creating the Spinning Star Blocks
The Spinning Star – Quilting Tutorial revolves around constructing multiple star blocks, each of which contributes to the stunning final design. Let’s break down how to create these blocks.
2.1 Cutting the Pieces: Follow the instructions in your pattern to cut the various pieces required for each block. This typically includes triangles and squares that come together to form the star points and the background.
2.2 Arranging the Pieces: Before sewing, lay out your pieces in the correct order. This step helps you visualize how the star will come together and allows you to make adjustments to the color arrangement if needed.
2.3 Sewing the Star Points: Begin by sewing the triangles together to form the star points. Use a 1/4-inch seam allowance and press the seams open to reduce bulk. Accurate seams are essential for creating sharp star points.
2.4 Piecing the Star Block Together: After assembling the star points, sew them to the background squares to complete the block. Be sure to press the seams as you go to keep the fabric flat.
2.5 Checking the Alignment: Once the block is pieced, check that the points align correctly at the intersections. Small adjustments can be made if necessary, but careful cutting and sewing should result in a well-aligned star.
2.6 Making Multiple Blocks: Depending on the size of your quilt, you’ll need to make several Spinning Star blocks. Repeat the same process for each block to ensure consistency throughout the quilt.
3. Assembling the Quilt Top
Once you’ve completed your Spinning Star blocks, it’s time to assemble the quilt top. This step involves arranging the blocks and adding any sashing or borders to frame the design.
3.1 Layout Options: Before sewing the blocks together, experiment with different layout options. You can arrange the stars in rows, staggered formations, or even create a secondary pattern by rotating the blocks.
3.2 Adding Sashing: Sashing refers to the strips of fabric that separate the blocks. Adding sashing between the Spinning Star blocks can help define each block and make the stars stand out more prominently.
3.3 Joining the Blocks: Sew the blocks together row by row, using a 1/4-inch seam allowance. Press the seams open to reduce bulk and keep the quilt top flat.
3.4 Adding Borders: Once the blocks are assembled, it’s time to add borders to the quilt. The borders frame the design and give the quilt a finished look. Choose a fabric that complements your Spinning Star blocks.
3.5 Pressing the Quilt Top: After assembling the quilt top, press the entire top to ensure all seams are flat and the fabric is smooth. This step will make quilting much easier later on.
3.6 Measuring the Quilt Top: Measure the completed quilt top to ensure it’s the correct size. Adjustments can be made to the borders if necessary.
4. Quilting and Finishing the Spinning Star Quilt
With the quilt top assembled, the next step is to quilt and finish your Spinning Star – Quilting Tutorial project.
4.1 Choosing the Batting: Select a lightweight batting that suits your quilt’s intended use. Cotton batting is a great option for its softness and breathability, making it perfect for both decorative and functional quilts.
4.2 Layering the Quilt Sandwich: Create a quilt sandwich by layering the quilt top, batting, and backing fabric. Smooth out any wrinkles and secure the layers using safety pins or basting spray.
4.3 Quilting the Layers: You can quilt by hand or machine, depending on your preference. For the Spinning Star quilt, consider quilting along the star points to accentuate the design. Straight-line quilting or free-motion quilting are both great options.
4.4 Trimming the Excess Fabric: After quilting, trim any excess batting and backing fabric from the edges of the quilt to prepare for binding.
4.5 Binding the Quilt: Attach binding around the edges of the quilt to give it a polished finish. Use a coordinating fabric to tie the whole design together.
4.6 Finishing Touches: After binding, give your quilt a final press to smooth out any wrinkles. Your Spinning Star quilt is now complete and ready to be displayed or gifted!
FAQ
1. What is the difficulty level of the Spinning Star – Quilting Tutorial?
This pattern is suitable for quilters of all levels. Beginners can follow the step-by-step instructions, while experienced quilters may enjoy customizing the design with advanced techniques.
2. How long does it take to complete a Spinning Star quilt?
The time required depends on your quilting experience and the size of the quilt. On average, completing a Spinning Star quilt may take a few days to a couple of weeks.
3. What types of fabrics should I use for the Spinning Star quilt?
100% cotton fabrics are ideal for this project. They are easy to work with, durable, and come in a wide range of colors and prints.
4. Can I resize the Spinning Star quilt pattern?
Yes, you can adjust the size of the quilt by adding or removing blocks and changing the size of the borders. This flexibility allows you to create anything from a wall hanging to a full-sized quilt.
5. Can I quilt the Spinning Star quilt by machine?
Absolutely! Machine quilting is a fast and efficient way to finish your quilt. You can use a straight stitch or try free-motion quilting to add unique designs.
6. How do I care for my finished Spinning Star quilt?
To preserve the quality of your quilt, wash it in cold water on a gentle cycle and tumble dry on low. This will help prevent fabric shrinkage and color fading.
Join our VIP broadcast list and gain access to exclusive patterns, all for free. As a VIP member, you’ll receive the best patterns daily, delivered directly to your device. ✨📱 It’s a unique opportunity to stay up-to-date with the latest trends and designs, curated just for you. Don’t miss out on enhancing your projects and discovering new inspirations with the best patterns every day! 🎨🔝
Conclusion
The Spinning Star – Quilting Tutorial offers a fun and creative way to make a striking quilt. Whether you’re a beginner or an experienced quilter, this pattern is both versatile and visually captivating. From selecting fabrics to piecing the blocks and finishing the quilt, this tutorial has provided all the steps needed to guide you through the process.
We hope you’ve enjoyed following along with this tutorial! If you’ve tried the Spinning Star pattern or have any tips and suggestions, please share your thoughts in the comments. We’d love to hear your feedback and see your beautiful quilts! Happy quilting!

