The Spikey Star block is a striking and modern quilt design that adds flair and drama to any quilting project. Characterized by its sharp, elongated star points, this block is perfect for quilters looking to create something bold and eye-catching.
In this tutorial, we’ll guide you through the steps to make your own Spikey Star block, offering tips on fabric selection, cutting techniques, and sewing methods. Whether you’re a beginner or an experienced quilter, you’ll enjoy creating this dynamic block.
This tutorial is designed for quilters who want to bring a bit of edgy style to their quilts. The Spikey Star block stands out because of its distinctive pointed star, which seems to radiate from the center of the block.
With its modern aesthetic, this block can be customized in countless ways, making it a versatile addition to any quilting project.
Let’s dive into the details of the Spikey Star block and learn how to create this unique quilt block, from selecting fabrics to piecing the block together. We’ll also share some helpful tips to ensure your project comes together beautifully.
1. What is the Spikey Star Block?
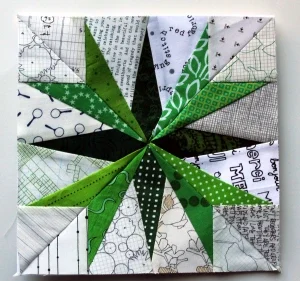
The Spikey Star block is a quilt block that features long, sharp points that give the appearance of a star with extended rays. It is a modern twist on traditional star quilt blocks and can be made in various sizes and color combinations to fit different quilt designs.
- Distinctive Design: What sets the Spikey Star block apart is its exaggerated, pointed star arms. These points can vary in length and angle, creating a dynamic visual effect that gives the block its “spikey” appearance.
- Perfect for Modern Quilts: The bold lines and sharp angles of the Spikey Star block make it perfect for modern quilting projects. It brings energy and movement to any quilt, especially when made with bright, contrasting fabrics.
- Adaptable to Different Styles: This block can be made using a variety of fabric styles, from solids to prints. The versatility of the design allows quilters to adapt it to traditional, contemporary, or even scrappy quilt designs.
- Improv-Friendly: The Spikey Star block is ideal for quilters who enjoy a bit of improvisation. The star points can be made to look irregular and varied, adding a touch of uniqueness to each block.
- Materials Needed: You’ll need basic quilting supplies for this block, including fabric for the star points and the background, a rotary cutter, a ruler, and a sewing machine. It’s also helpful to have a pressing mat and an iron to get crisp, flat seams.
- Why You’ll Love It: The Spikey Star block is fun to make because it allows for creative freedom. Each star can be slightly different, and the sharp points give your quilt a bold, graphic quality.
2. How to Cut Fabric for the Spikey Star Block
The first step in making a Spikey Star block is cutting your fabric. Accurate cutting is important to ensure that the star points are sharp and well-defined, but don’t worry if you’re a bit off — this block is quite forgiving!
- Background Fabric: Start by cutting squares for the background. A 5-inch square is a good size for the background pieces, but you can adjust the size depending on how large you want the block to be.
- Star Points Fabric: To make the star points, cut rectangles or triangles. The length and width of these shapes will determine how long and sharp the star points are. For a bold look, make the points longer by cutting taller triangles.
- Improv Cutting: If you want a more irregular, improvised look, you can cut the star points freehand. This will give each point a unique size and shape, enhancing the dynamic, “spikey” appearance of the block.
- Pre-Cut Fabric: For quilters who want to save time, using pre-cut fabric can be helpful. You can use fabric strips or squares from a jelly roll or charm pack to speed up the cutting process.
- Choose Contrasting Colors: One of the key design elements of the Spikey Star block is the contrast between the star points and the background fabric. For the star to stand out, choose fabrics that are significantly different in color or pattern.
- Cutting Multiple Blocks: If you plan to make several Spikey Star blocks for a larger quilt, consider cutting all your fabric at once. This helps to ensure consistency and saves time in the long run.
3. Sewing the Spikey Star Block
After cutting your fabric, it’s time to sew the pieces together. The assembly process is straightforward, but the sharp points of the Spikey Star block make it especially eye-catching once complete.
- Step 1: Positioning the Star Points: Start by laying out your background fabric and star point pieces. Arrange the star points on the edges of the background squares so that they extend into the block.
- Step 2: Sewing the Points: Sew the star point pieces onto the background squares. If you’re using triangles, place them so that the point extends toward the center of the block. If you’re using rectangles, sew them at an angle to create the pointed effect.
- Step 3: Trimming the Excess: After sewing the star points onto the background fabric, trim any excess fabric to ensure the edges are clean. This will help the block stay square when it’s time to assemble the pieces.
- Step 4: Piecing the Block Together: Once you have all the star points sewn onto their respective background pieces, lay them out in the shape of a star. The points should radiate from the center square, creating the Spikey Star block.
- Step 5: Sewing the Rows: Sew the squares together in rows, and then sew the rows together to form the block. Press the seams flat to ensure a clean, crisp finish.
- Step 6: Finishing the Block: After sewing the block together, you may want to trim the edges to square it up. This ensures that the block will be uniform when combined with other blocks in your quilt.
4. Customizing the Spikey Star Block
One of the best things about the Spikey Star block is its versatility. You can easily customize the block to suit your personal style or the theme of your quilt.
- Adjusting the Size: The Spikey Star block can be made in various sizes by adjusting the size of the background and star point pieces. Larger blocks create a bold, graphic look, while smaller blocks are perfect for more intricate designs.
- Color and Fabric Choices: Choosing the right fabric is key to making your Spikey Star block stand out. Bright, contrasting colors will give the block a modern feel, while more subtle fabrics can create a soft, traditional look.
- Adding Borders: Consider adding a border around your Spikey Star block to frame the design and make the star points pop. A simple, contrasting border can highlight the star’s sharp points and add an extra layer of detail.
- Playing with Angles: The angle of the star points can be adjusted to create different effects. Sharper angles will make the star look more dynamic, while softer angles can give it a more relaxed feel.
- Mixing with Other Blocks: The Spikey Star block pairs well with other quilt blocks, especially those with strong geometric shapes. Try combining it with a traditional star block for a quilt that blends modern and classic elements.
- Experimenting with Layouts: How you arrange your Spikey Star blocks in the quilt will greatly affect the overall design. You can alternate the direction of the stars, create a radial pattern, or even group them closely together for a bold statement.
FAQ about Spikey Star Block – Tutorial
Q1: What fabric is best for the Spikey Star block?
A: High-contrast fabrics work best for the Spikey Star block. Bright solids against a neutral background create a striking look, but you can also experiment with prints or even batiks for a more unique design.
Q2: Is the Spikey Star block suitable for beginners?
A: Yes! The Spikey Star block is beginner-friendly, especially if you’re comfortable with basic piecing techniques. The block’s improvisational style makes it forgiving, so slight mistakes won’t be noticeable.
Q3: Can I adjust the size of the Spikey Star block?
A: Absolutely. The size of the block can be adjusted by changing the size of the background squares and star points. For a larger block, increase the size of both pieces.
Q4: How do I make the star points look “spikey”?
A: To create the “spikey” look, extend the star points beyond the usual angles of a traditional star. The more exaggerated the angles and lengths, the spikier the star will appear.
Q5: Can I use scraps to make the Spikey Star block?
A: Yes, this block is perfect for using up fabric scraps. The star points don’t require large pieces, so you can use small scraps for a scrappy, eclectic look.
Q6: How do I finish a quilt made with Spikey Star blocks?
A: Once your blocks are assembled, you can finish the quilt with sashing, borders, and backing. Quilting in the ditch around the stars will emphasize the spikey points and give the quilt texture.
Join our VIP broadcast list and gain access to exclusive patterns, all for free. As a VIP member, you’ll receive the best patterns daily, delivered directly to your device. ✨📱 It’s a unique opportunity to stay up-to-date with the latest trends and designs, curated just for you. Don’t miss out on enhancing your projects and discovering new inspirations with the best patterns every day! 🎨🔝
Conclusion
In this Spikey Star block – Tutorial, we’ve walked through the steps to create a bold and dynamic quilt block. From cutting your fabric to sewing the star points, this block offers plenty of opportunities for customization.
Whether you’re new to quilting or a seasoned pro, the Spikey Star block is a fun and versatile design to add to your quilt-making repertoire. We hope this tutorial has been helpful, and we’d love to hear your thoughts and suggestions! Leave a comment below to share your experience. Happy quilting!

