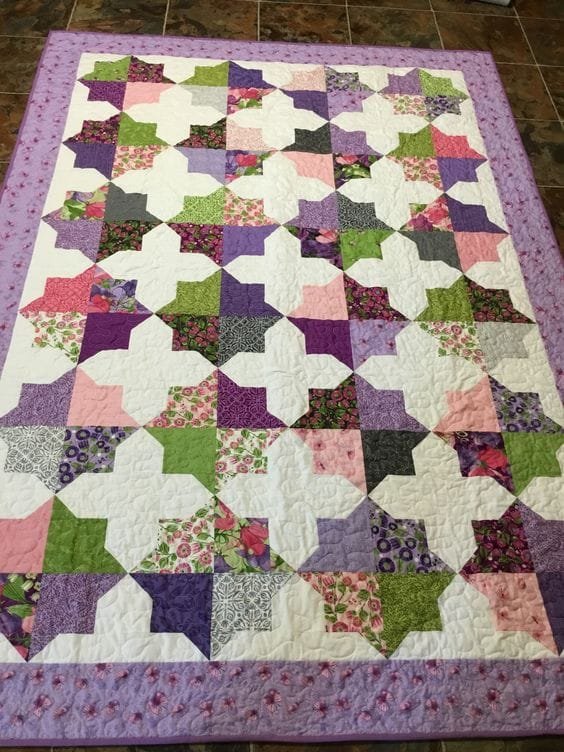
If you’re a quilter looking for a beautiful yet simple pattern to add to your collection, the Speedwell Quilt Pattern – Tutorial is a perfect choice. This quilt pattern offers a balance between elegance and ease, making it ideal for beginners and seasoned quilters alike.
With its classic geometric design, the Speedwell quilt can be customized with different fabrics and colors to create a timeless piece for your home or as a gift.
In this tutorial, we’ll walk you through the entire process of making a Speedwell quilt, from gathering your materials to finishing your edges.
The Speedwell Quilt Pattern – Tutorial provides clear, step-by-step instructions, allowing you to confidently create a quilt that stands out for its beauty and craftsmanship. Whether you are just starting in the world of quilting or looking to expand your skill set, this project will help you achieve that goal.
This pattern is not only aesthetically pleasing, but it is also functional and versatile. The Speedwell quilt can be adjusted to fit any size bed or used as a cozy throw. Ready to start your quilting journey? Let’s dive right into the materials and instructions.
1. Materials Needed for the Speedwell Quilt Pattern
Before starting the Speedwell Quilt Pattern – Tutorial, it’s crucial to have all the necessary materials ready to ensure a smooth quilting experience. Here’s what you’ll need to get started:
- Fabric: The Speedwell quilt shines with contrasting fabrics. You’ll need a combination of light and dark fabrics for the quilt blocks. Depending on the size of your quilt, you may need anywhere from 2 to 6 yards of fabric. Choose high-quality cotton quilting fabric for durability and ease of use.
- Quilting Ruler: A quilting ruler will help ensure that your pieces are cut accurately, which is vital for the geometric pattern in the Speedwell design.
- Rotary Cutter and Cutting Mat: These tools are essential for cutting fabric with precision. A sharp rotary cutter will save time and create clean edges, while the mat protects your workspace.
- Sewing Machine: For piecing the quilt top, a sewing machine with a ¼-inch presser foot is highly recommended. This ensures consistent seam allowances throughout the quilt.
- Thread: Choose a high-quality cotton thread in a neutral color that complements your fabric choices. Make sure to have extra bobbins prepared to avoid interruptions while sewing.
- Batting and Backing Fabric: Depending on the size of your quilt, you’ll need batting (the filling) and backing fabric. Batting comes in different weights, so choose one that provides the level of warmth you desire.
With your materials in place, you’re ready to begin creating your Speedwell Quilt Pattern.
2. Cutting and Piecing the Quilt Blocks
Now that you have your materials ready, it’s time to dive into the cutting and piecing process of the Speedwell Quilt Pattern – Tutorial. This step is essential to ensure that your quilt comes together neatly and evenly.
- Cutting Your Fabric: Begin by cutting your fabric into squares. For the Speedwell quilt, you’ll need to cut a variety of squares in two contrasting colors. For example, if you want a twin-size quilt, you may need to cut 5-inch squares in light and dark fabrics.
- Piecing the Blocks: Lay out your fabric squares in alternating patterns, pairing the light and dark fabrics. Sew the squares together using a ¼-inch seam allowance. Press the seams open or to one side, depending on your preference. This step is crucial in creating the sharp, geometric look that defines the Speedwell quilt.
- Chain Piecing: To save time and make the process more efficient, try chain piecing. This involves sewing multiple squares together in a continuous sequence without cutting the thread between each one. It helps keep your quilt blocks aligned and speeds up the assembly process.
- Pressing for Perfection: After piecing your blocks, pressing them properly will make a significant difference. Use a hot iron to press the seams flat. Pressing is key to ensuring your quilt top lays flat without any puckering.
- Assembling the Quilt Top: Once you’ve pieced all the blocks, it’s time to arrange them in your desired pattern. Lay them out on a large surface to get an overview of how your quilt will look. This step allows you to rearrange any blocks if needed for balance and symmetry.
- Sewing Rows Together: Start sewing the rows of your quilt top together, being mindful of matching the corners of each block. This will create the neat, uniform appearance that makes the Speedwell Quilt Pattern so striking.
3. Adding Batting and Quilting the Layers
Once your quilt top is assembled, it’s time to prepare the quilt for batting and quilting. This is where the quilt really starts to take shape, adding warmth and texture to the Speedwell Quilt Pattern.
- Preparing the Batting and Backing: Lay out your backing fabric on a clean, flat surface with the wrong side facing up. Then, place the batting on top of the backing, followed by your quilt top. Make sure all the layers are smooth and wrinkle-free before proceeding to the next step.
- Basting the Quilt Sandwich: Basting holds the three layers (quilt top, batting, and backing) together while you quilt. You can use basting spray, safety pins, or hand-baste with long stitches. The goal is to prevent the layers from shifting during the quilting process.
- Choosing Your Quilting Design: The quilting design you choose can enhance the geometric look of the Speedwell pattern. For a simple approach, use straight-line quilting either horizontally or diagonally across the quilt. More advanced quilters might opt for free-motion quilting with intricate patterns.
- Quilting the Layers Together: Set your sewing machine for quilting. If you’re using straight-line quilting, use a walking foot to prevent the layers from shifting. For free-motion quilting, use a darning foot. Take your time and work from the center of the quilt outwards to ensure even stitching.
- Securing the Edges: After quilting, secure the edges of the quilt by sewing a basting stitch around the perimeter. This keeps the layers intact while you prepare to bind the quilt.
- Trimming the Excess: Once the quilting is complete, trim any excess batting and backing fabric, leaving a clean edge around the quilt top.
4. Binding and Finishing Your Speedwell Quilt
The final step in the Speedwell Quilt Pattern – Tutorial is binding, which gives the quilt a polished, finished look. This step involves sewing fabric around the edges to enclose the raw edges of the quilt sandwich.
- Creating Your Binding: Cut strips of fabric for the binding, typically 2.5 inches wide. The length will depend on the size of your quilt, but you’ll need enough to wrap around the entire perimeter of the quilt.
- Attaching the Binding: Begin attaching the binding by sewing it to the front of the quilt. Align the raw edges of the binding with the edge of the quilt top. Sew with a ¼-inch seam allowance, leaving enough binding at the corners to miter them neatly.
- Mitering the Corners: When you reach a corner, stop sewing ¼ inch from the edge, fold the binding upwards to create a 45-degree angle, and then fold it back down to align with the next edge. Continue sewing along the next side of the quilt.
- Finishing the Binding: Once the binding is attached to the front, fold it over to the back of the quilt and hand-stitch it in place. This creates a neat, invisible finish on the back of the quilt.
- Hand-Stitching for a Clean Finish: Hand-stitching the binding may take some extra time, but it’s worth it for the professional, polished look it provides. Use small, even stitches to secure the binding to the back of the quilt.
- Final Pressing: Once your binding is complete, give the quilt a final pressing to smooth out any wrinkles and set the stitches. Your Speedwell Quilt Pattern is now ready to be displayed or gifted!
FAQ
Q1: What size quilt can I make with the Speedwell Quilt Pattern?
A: The Speedwell Quilt Pattern can be adapted to any size. Whether you want to make a small baby quilt or a large king-size quilt, simply adjust the number of blocks and fabric accordingly.
Q2: Can I use different fabrics for this pattern?
A: Absolutely! The Speedwell quilt looks fantastic with contrasting fabrics, but you can experiment with solids, prints, or even batiks for a more creative touch.
Q3: Is this pattern beginner-friendly?
A: Yes, the Speedwell Quilt Pattern is perfect for beginners. The geometric design is straightforward, and the tutorial provides step-by-step instructions to guide you through the process.
Q4: How much fabric do I need for a twin-size quilt?
A: For a twin-size quilt, you’ll need about 5 to 6 yards of fabric in total. This includes fabric for the quilt top, backing, and binding.
Q5: Can I quilt this by hand instead of using a sewing machine?
A: Yes, you can quilt the Speedwell quilt by hand if you prefer. Hand-quilting gives the quilt a unique, traditional look, although it may take longer than machine quilting.
Q6: How do I ensure my quilt blocks line up perfectly?
A: Using a quilting ruler and accurate cutting techniques is key to ensuring your quilt blocks align properly. Additionally, pressing seams and chain piecing can help maintain consistency.
Join our VIP broadcast list and gain access to exclusive patterns, all for free. As a VIP member, you’ll receive the best patterns daily, delivered directly to your device. ✨📱 It’s a unique opportunity to stay up-to-date with the latest trends and designs, curated just for you. Don’t miss out on enhancing your projects and discovering new inspirations with the best patterns every day! 🎨🔝
Conclusion
The Speedwell Quilt Pattern – Tutorial is a fantastic project for quilters of all levels. With its clean lines and versatile design, it offers endless possibilities for customization. This guide has walked you through every step, from gathering materials to finishing your quilt with polished edges.
We hope this tutorial inspires you to create a beautiful Speedwell quilt of your own. If you try this pattern, we would love to hear your feedback and any suggestions you might have. Happy quilting!

