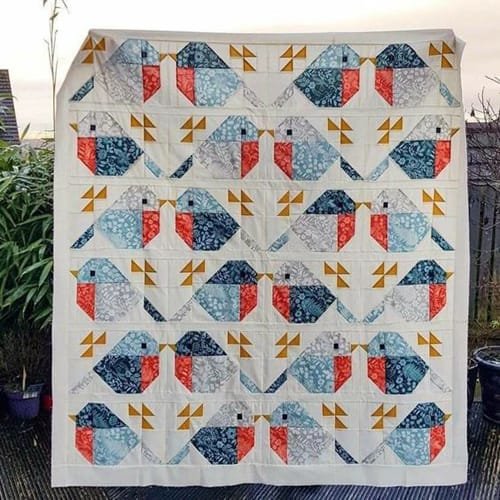
The Sparrows Quilt Pattern – Tutorial is a beautifully intricate design that captures the grace and movement of sparrows in flight. This quilting pattern is perfect for those looking to create a unique and eye-catching quilt.
Whether you’re an experienced quilter or just starting, this tutorial will guide you through the process of bringing the sparrow motif to life in your next quilt project.
In this Sparrows Quilt Pattern – Tutorial, you’ll learn how to choose the right fabrics, cut your pieces accurately, and sew them together to form the iconic sparrow shapes.
The quilt’s design is both delicate and striking, making it a standout piece that’s sure to impress. Throughout the tutorial, we’ll provide tips to help you achieve precise results and ensure your quilt comes together smoothly.
This guide is designed with clear instructions and helpful advice, ensuring that you can confidently complete your Sparrows Quilt Pattern. Let’s dive into the details of creating this beautiful quilt, one step at a time!
1. Choosing Fabrics and Preparing Your Tools
Choosing the right fabrics is the first step in bringing the Sparrows Quilt Pattern – Tutorial to life. This step is crucial for setting the tone of your quilt and ensuring that the sparrows truly stand out.
- Picking Fabrics for Contrast: When selecting fabrics for your Sparrows Quilt Pattern, aim for contrast between the sparrows and the background. Choose bold colors or patterns for the sparrows and a more muted background to make the birds pop.
- Coordinating Colors: For a cohesive look, use colors that complement each other. Think about the overall theme you want your quilt to represent. Earthy tones, pastels, or even vibrant hues can give your quilt a different feel, but it’s important to balance the colors so the sparrows remain the focal point.
- Quality of Fabric: Always choose high-quality cotton fabrics for quilting. Cotton is easy to work with, durable, and provides the perfect texture for both the quilt top and backing. Opting for pre-washed fabric also helps to avoid shrinkage issues later.
- Gathering Tools: Make sure you have all the necessary quilting tools ready. You’ll need a rotary cutter, cutting mat, ruler, pins, and a sewing machine with a walking foot for straight seams. Accurate cutting is key to achieving clean, crisp lines in your sparrow design.
- Pre-washing and Ironing: Before cutting, it’s a good idea to pre-wash and iron your fabrics. This ensures they are free of any chemicals from the manufacturing process and helps them lie flat when piecing.
- Planning Your Layout: Before starting, consider how many sparrows you want on your quilt and their placement. You can opt for a symmetrical layout or create a sense of motion by arranging them in a more dynamic fashion. This step is important in making sure your quilt comes together as envisioned.
2. Cutting and Piecing the Sparrows
Now that your fabric is ready, it’s time to start cutting and piecing the sparrows for your Sparrows Quilt Pattern – Tutorial. This is where precision is crucial.
- Accurate Measurements: For each sparrow, you’ll need several fabric pieces that form the bird’s body, wings, and tail. Using your rotary cutter, ruler, and cutting mat, carefully cut out each piece according to the pattern’s measurements. This ensures that everything fits together perfectly.
- Following the Pattern: If you’re working from a printed Sparrows Quilt Pattern, be sure to follow the cutting instructions closely. The sparrow shapes are typically composed of multiple triangles and rectangles that need to be pieced together with precision.
- Chain Piecing for Efficiency: To speed up the process, use the chain piecing method. This involves sewing multiple pieces together in a continuous line without cutting the thread between them. Not only does this save time, but it also helps keep your pieces in the correct order.
- Sewing the Sparrows: Begin by piecing the bird’s body, followed by the wings and tail. Sew each section with a 1/4-inch seam allowance, pressing the seams as you go to ensure everything lies flat. Accuracy in this step is key to maintaining the integrity of the sparrow shapes.
- Pressing Seams: Pressing your seams as you go is essential for a smooth quilt top. Press the seams open or to the side, depending on the pattern’s recommendations. This helps prevent bulky areas and ensures a cleaner final result.
- Checking for Consistency: Once you’ve pieced several sparrows, check for consistency in their size and shape. If any of your sparrows look uneven, now is the time to make adjustments. Being meticulous during this stage will save you time and frustration later.
3. Assembling the Quilt Top
With your sparrows pieced and ready, it’s time to assemble the quilt top. In this step of the Sparrows Quilt Pattern – Tutorial, we’ll ensure that your quilt comes together smoothly and that the sparrows are arranged beautifully.
- Laying Out the Quilt: Lay all your sparrow blocks on a flat surface or design wall. Take a step back and review the overall layout. Make sure the sparrows are spaced evenly and that the colors and patterns flow harmoniously across the quilt.
- Sewing Rows Together: Once you’re happy with the layout, start by sewing the sparrow blocks together in rows. Use pins to keep the seams aligned and continue using a 1/4-inch seam allowance to maintain uniformity.
- Seam Alignment: When sewing rows together, it’s important to align the seams where blocks meet. Nest the seams by pressing one row’s seams to the left and the next row’s seams to the right. This helps prevent bulky intersections and gives the quilt a clean, professional look.
- Adding Sashing or Borders: Depending on the pattern, you may want to add sashing (strips of fabric between blocks) or a border around the edges of the quilt. This helps frame the sparrows and gives the quilt a finished look.
- Completing the Quilt Top: Once all the rows and any additional borders are sewn together, give the quilt top one final press. At this point, the quilt top should be lying flat with no puckering or uneven seams.
- Preparing for Quilting: Now that your quilt top is complete, it’s time to prepare for quilting. This involves layering the quilt top with batting and backing, and securing the layers together, ready for quilting.
4. Quilting and Binding the Sparrows Quilt
Quilting is where your Sparrows Quilt Pattern really comes to life. In this final step of the Sparrows Quilt Pattern – Tutorial, we’ll cover quilting techniques and binding options.
- Choosing a Quilting Design: Decide on a quilting design that complements the sparrows. You can opt for a simple straight-line quilting, echoing the shape of the sparrows, or a more intricate free-motion design that adds texture and depth.
- Preparing the Quilt Sandwich: To quilt your Sparrows Quilt, layer the quilt top, batting, and backing fabric together. Pin or baste the layers securely so they don’t shift during the quilting process.
- Starting the Quilting Process: If you’re new to quilting, straight-line quilting is a great place to start. Using your walking foot, sew straight lines across the quilt, either horizontally or diagonally, to secure the layers. More experienced quilters might want to try free-motion quilting, which allows for more creative designs.
- Quilting Around the Sparrows: When quilting around the sparrows, be careful not to distort their shapes. Use smaller, more controlled stitches, and consider quilting inside the sparrow shapes to enhance their appearance.
- Binding the Quilt: Once quilting is complete, it’s time to bind the edges. Choose a binding fabric that complements the quilt’s design and colors. Cut strips of fabric, fold them in half, and sew them around the edges of the quilt, mitering the corners for a neat finish.
- Final Touches: After binding, give your quilt a final press to remove any wrinkles. Now your Sparrows Quilt is complete and ready to be displayed or gifted!
FAQ
Q: What size should my Sparrows Quilt be?
A: The size of your quilt can vary depending on your preference. Common sizes include lap quilts (around 50×60 inches) or larger bed-sized quilts. The pattern can be easily adjusted to accommodate different sizes.
Q: Can beginners make the Sparrows Quilt Pattern?
A: Yes! While the sparrows may seem intricate, the Sparrows Quilt Pattern – Tutorial breaks the steps down in a way that’s easy to follow. With patience and attention to detail, even beginners can complete this quilt.
Q: What fabrics work best for this quilt pattern?
A: High-quality cotton fabrics are the best choice for quilting. Look for fabrics with contrasting colors to make the sparrows stand out against the background. Pre-washing the fabric is recommended to prevent shrinkage.
Q: How long does it take to complete the Sparrows Quilt?
A: The time required depends on the size of the quilt and your skill level. A smaller lap quilt might take a few weeks to complete, while larger quilts may take longer.
Q: Can I quilt the Sparrows Quilt by hand?
A: Yes, hand quilting is an option, though it will take more time. Hand quilting adds a personal touch to the quilt and can be especially beautiful around the sparrow shapes.
Q: How do I care for my completed quilt?
A: Wash your quilt in cold water on a gentle cycle and air dry or tumble dry on low. Proper care will help maintain the quilt’s beauty and durability.
Join our VIP broadcast list and gain access to exclusive patterns, all for free. As a VIP member, you’ll receive the best patterns daily, delivered directly to your device. ✨📱 It’s a unique opportunity to stay up-to-date with the latest trends and designs, curated just for you. Don’t miss out on enhancing your projects and discovering new inspirations with the best patterns every day! 🎨🔝
Conclusion
The Sparrows Quilt Pattern – Tutorial provides you with all the necessary steps to create a stunning and unique quilt. By carefully selecting fabrics, cutting and piecing the sparrows, and finishing with quilting and binding, you can complete a masterpiece that reflects both skill and creativity.
We hope this tutorial has been helpful and would love to hear your thoughts! Please leave a comment with your opinions or suggestions for future projects. Happy quilting!

