If you’ve ever wanted to dive into the world of quilting, the Snail Trail Easy Block Quilt Tutorial is a perfect place to start. This beginner-friendly quilt pattern offers a simple yet stunning design that can brighten up any room. In this tutorial, we’ll walk you through the steps of creating your own Snail Trail quilt block, and we’ll provide you with a free pattern to get started.
Creating a quilt can seem daunting at first, but with the right guidance and resources, you’ll find it to be a rewarding and enjoyable craft.
The Snail Trail block is known for its intricate and charming appearance, but the actual process of making it is straightforward and manageable for quilters of all skill levels. This tutorial will cover everything you need to know, from cutting fabric to assembling your quilt block, ensuring that you have all the tools and knowledge necessary to succeed.
Before we dive into the specifics, it’s essential to understand the basic components and techniques involved in quilting. The Snail Trail block, in particular, combines simplicity with visual appeal, making it an excellent choice for both beginners and experienced quilters looking for a quick project. Let’s explore how you can bring this beautiful quilt block to life with ease.
1. Understanding the Snail Trail Block
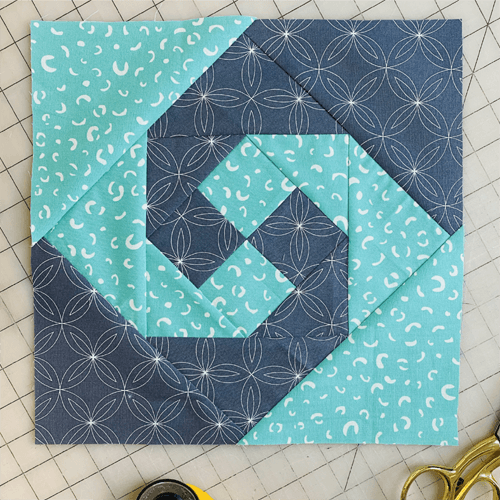
The Snail Trail quilt block is characterized by its spiral-like design that creates a visually engaging pattern. This block is a variation of the traditional log cabin block, which means it has a familiar and approachable structure. The design typically features a central square surrounded by layers of fabric strips that radiate outward, creating a spiral effect.
In this quilt block, the key is to achieve precise measurements and accurate sewing to maintain the block’s symmetry. By following the Snail Trail Easy Block Quilt Tutorial, you’ll learn how to cut your fabric pieces accurately and sew them together in a way that enhances the block’s aesthetic appeal.
The Snail Trail block is versatile and can be made in various sizes, making it adaptable for different quilting projects. Whether you’re making a small wall hanging or a large quilt, the principles remain the same. This tutorial will guide you through the process step by step, ensuring that you can replicate the design effortlessly.
One of the highlights of the Snail Trail block is its ability to showcase different fabric patterns and colors. This makes it an excellent choice for using up fabric scraps or incorporating your favorite fabrics into a cohesive quilt design. As you follow the tutorial, you’ll discover how to choose fabrics that complement each other and create a harmonious overall look.
2. Materials and Tools Required
Before starting the Snail Trail quilt block, gather all necessary materials and tools. Here’s a list of what you’ll need for this free pattern:
- Fabric: Select a variety of fabrics in different colors and patterns. For a standard Snail Trail block, you’ll need both light and dark fabrics to create contrast.
- Rotary Cutter and Mat: A rotary cutter and self-healing mat will help you cut your fabric pieces accurately and efficiently.
- Quilting Ruler: Use a quilting ruler to measure and cut your fabric pieces precisely. This tool is essential for achieving the correct dimensions for your quilt block.
- Sewing Machine: A sewing machine with a quarter-inch foot is ideal for piecing your fabric together. Make sure your machine is in good working condition and ready for quilting.
- Thread: Choose a thread that matches or complements your fabric colors. Thread color can impact the overall look of your quilt block, so select it carefully.
- Iron: An iron is necessary for pressing your fabric pieces and seams as you work. Proper pressing helps ensure that your block lays flat and maintains its shape.
Having these materials and tools on hand will make the process smoother and more enjoyable. The Snail Trail Easy Block Quilt Tutorial will provide guidance on how to use each item effectively to achieve the best results.
3. Cutting and Preparing Fabric Pieces
Once you have your materials ready, the next step is to cut and prepare your fabric pieces. Accurate cutting is crucial for achieving a well-structured Snail Trail block. Follow these steps to get your fabric pieces ready:
- Measure and Cut: Use your quilting ruler to measure and cut fabric strips according to the pattern instructions. Ensure that all pieces are cut to the specified dimensions to maintain consistency throughout the block.
- Organize Pieces: Keep your fabric pieces organized by separating them into groups based on their intended placement in the block. This will help you stay on track and prevent confusion during the assembly process.
- Trim Edges: After cutting your fabric pieces, trim any rough or uneven edges. This will help ensure that your fabric pieces align correctly when sewing them together.
- Label Pieces: If your pattern requires different fabric pieces for various sections, consider labeling them to avoid mix-ups. This step can save time and reduce errors during the assembly.
- Press Fabric: Before sewing, press your fabric pieces to remove any wrinkles and creases. This will help you achieve a smooth and accurate seam when piecing the fabric together.
- Prepare Sewing Area: Set up your sewing machine and workspace in a comfortable and well-lit area. Ensure that your sewing machine is threaded and ready for use.
With your fabric pieces cut and prepared, you’re ready to move on to assembling the Snail Trail block. The tutorial will guide you through each step of the process to ensure a successful outcome.
4. Assembling the Snail Trail Block
Assembling the Snail Trail block involves piecing together your fabric pieces according to the pattern instructions. Here’s a step-by-step guide to help you through the assembly process:
- Sewing the Center Square: Start by sewing the center square of the Snail Trail block. This square will be the focal point of your block, so make sure it is accurately placed.
- Adding Fabric Strips: Begin adding fabric strips around the center square. Follow the pattern instructions to sew the strips in the correct order and direction to create the spiral effect.
- Pressing Seams: As you sew each strip, press the seams to keep them flat. Proper pressing is essential for achieving a clean and professional-looking block.
- Joining Sections: Once you’ve added all the fabric strips, join the sections of the block together. Align the seams carefully to ensure that the spiral design remains consistent.
- Trimming the Block: After assembling the block, trim any excess fabric to ensure that the block is the correct size and shape. This step is crucial for achieving a well-finished look.
- Final Pressing: Give your finished block a final press to smooth out any wrinkles and ensure that it lays flat. This will make it easier to incorporate the block into your quilt.
With these steps, you’ll be able to assemble your Snail Trail block with confidence. The Snail Trail Easy Block Quilt Tutorial will guide you through each phase, ensuring that your block turns out beautifully.
FAQ
Q1: What is a Snail Trail quilt block? A1: The Snail Trail quilt block is a traditional quilt design known for its spiral-like pattern. It consists of a central square surrounded by fabric strips that create a visually engaging spiral effect.
Q2: How do I choose fabrics for the Snail Trail block? A2: When selecting fabrics, choose a mix of light and dark fabrics to create contrast. You can use fabric scraps or coordinate colors to achieve a harmonious look.
Q3: Can I adjust the size of the Snail Trail block? A3: Yes, the Snail Trail block can be made in various sizes. Adjust the measurements of your fabric pieces according to the desired block size while maintaining the overall pattern structure.
Q4: What tools do I need for making the Snail Trail block? A4: Essential tools include fabric, rotary cutter, mat, quilting ruler, sewing machine, thread, and an iron. These tools help in cutting, assembling, and finishing your quilt block.
Q5: Is the Snail Trail block suitable for beginners? A5: Yes, the Snail Trail block is beginner-friendly. Its straightforward design and the Snail Trail Easy Block Quilt Tutorial make it accessible for those new to quilting.
Q6: Where can I find a free pattern for the Snail Trail block? A6: You can find free patterns online through quilting websites, blogs, and quilting communities. This tutorial includes a free pattern to help you get started.
Join our VIP broadcast list and gain access to exclusive patterns, all for free. As a VIP member, you’ll receive the best patterns daily, delivered directly to your device. ✨📱 It’s a unique opportunity to stay up-to-date with the latest trends and designs, curated just for you. Don’t miss out on enhancing your projects and discovering new inspirations with the best patterns every day! 🎨🔝
Conclusion
In this Snail Trail Easy Block Quilt Tutorial, we’ve explored the steps to create a stunning Snail Trail quilt block. From understanding the block’s design and gathering materials to cutting fabric, assembling the block, and troubleshooting common issues, you now have the knowledge to craft your own beautiful quilt.
We hope this tutorial has been helpful and inspiring for your quilting journey. We’d love to hear your feedback and any suggestions you might have. Please leave a comment with your thoughts or questions, and share your finished projects with us. Happy quilting!

