The Shoulder Bag From Old Shirt Tutorial is a creative and sustainable sewing project that transforms an unused garment into a stylish and practical accessory.
From the very first step, this tutorial highlights how everyday clothing items can gain a new purpose through thoughtful design and simple sewing techniques.
By following the Shoulder Bag From Old Shirt Tutorial, you not only create a functional shoulder bag but also embrace an eco-friendly mindset that values reuse, creativity, and mindful crafting.
This type of project appeals to beginners and experienced sewists alike, offering both simplicity and room for personalization.
One of the most appealing aspects of the Shoulder Bag From Old Shirt Tutorial is its accessibility. Most people already have an old shirt at home that is no longer worn due to size, style changes, or minor wear. Instead of discarding it, this tutorial shows how fabric, buttons, pockets, and seams can be repurposed into a unique shoulder bag. The familiar nature of shirt construction makes the process intuitive, while the transformation itself feels rewarding and inspiring.
Creating a shoulder bag from an old shirt is also an excellent way to develop sewing confidence. The Shoulder Bag From Old Shirt Tutorial introduces practical techniques such as cutting, reinforcing seams, attaching straps, and finishing edges, all within a manageable project size. As you work through this guide, you will learn about structure, fabric choice, creative customization, and beginner-friendly tips that ensure a successful and satisfying result.
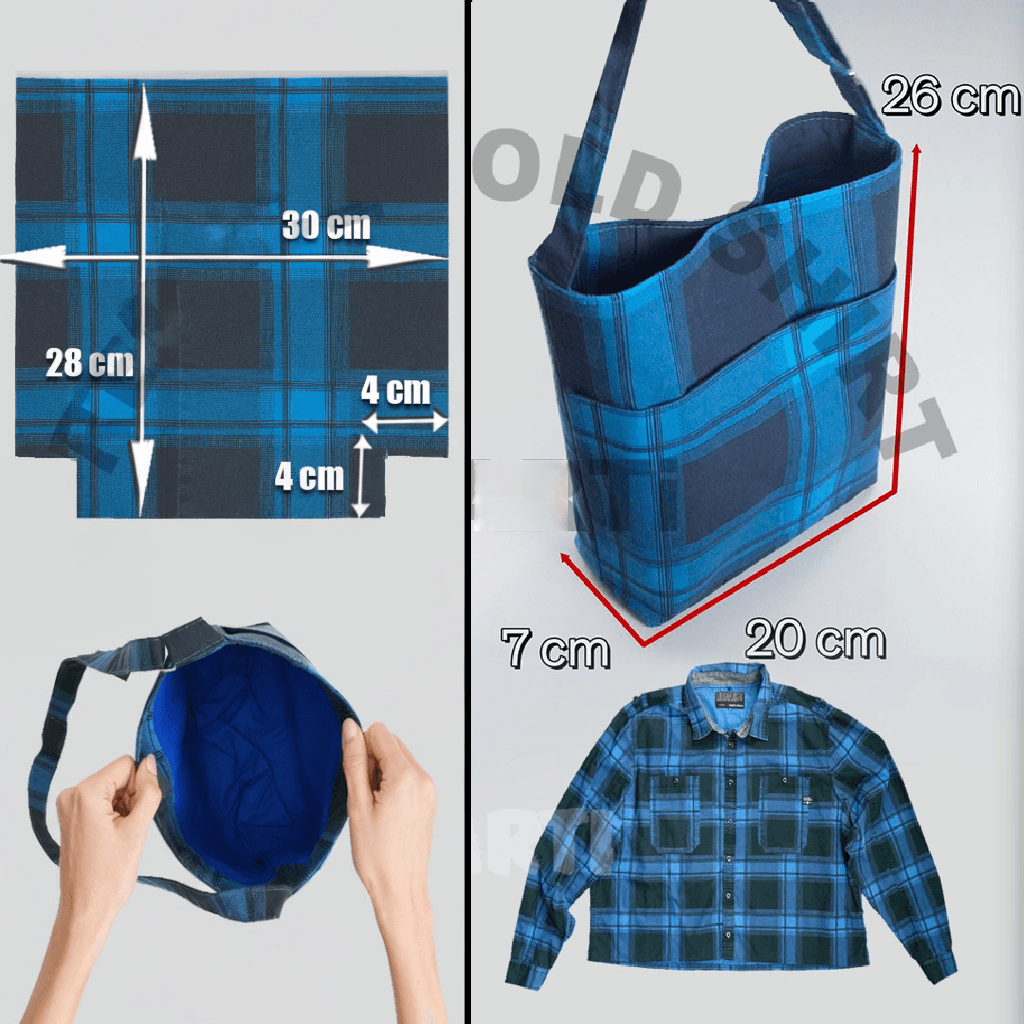
Understanding the Structure of a Shoulder Bag From an Old Shirt
The structure of a bag created through the Shoulder Bag From Old Shirt Tutorial is both simple and clever. Shirts naturally provide ready-made elements such as button plackets, chest pockets, and sturdy seams, which can be incorporated into the final design. These existing features reduce construction time while adding character and functionality to the bag.
Most designs begin by selecting the main body of the shirt, usually from the front or back panel. This area offers a large, flat surface ideal for creating the main compartment of the bag. The Shoulder Bag From Old Shirt Tutorial often uses the shirt’s hem or button edge as a decorative feature, allowing the bag to retain visible elements of its original form.
The sides and bottom of the bag are formed by folding or sewing additional fabric panels, depending on the desired depth. This step defines how much the bag can hold and how it sits when worn. Reinforcing these seams is essential, especially if the bag will carry heavier items. The tutorial emphasizes strong stitching techniques to ensure durability.
Straps are another key structural component. In many cases, the sleeves of the shirt are repurposed into shoulder straps. This not only saves material but also creates a cohesive look. The Shoulder Bag From Old Shirt Tutorial guides you through reinforcing and attaching the strap securely so it can support daily use without stretching or tearing.
Closures and openings are designed for ease of use. Some bags remain open for a casual look, while others include buttons, ties, or zippers for added security. Using the shirt’s original buttons or placket can simplify this step while maintaining a coordinated appearance.
Finally, lining is optional but highly recommended. A lined bag adds strength, hides raw seams, and improves overall durability. The structure provided in the Shoulder Bag From Old Shirt Tutorial allows for both lined and unlined variations, making it adaptable to different skill levels and preferences.
Materials and Tools Needed for the Tutorial
One of the biggest advantages of the Shoulder Bag From Old Shirt Tutorial is that it requires minimal materials. The primary fabric comes from an old shirt, preferably made from cotton, denim, or a sturdy blend. Shirts with thicker fabric tend to produce more durable bags, while lightweight shirts are better suited for casual or decorative use.
In addition to the shirt, basic sewing supplies are required. These include scissors or a rotary cutter, pins or clips, a measuring tape, and thread that matches or complements the fabric. The tutorial encourages using strong thread to reinforce stress points such as strap attachments and corners.
A sewing machine is helpful for speed and strength, but the Shoulder Bag From Old Shirt Tutorial can also be adapted for hand sewing with careful stitching. Beginners often appreciate the flexibility of choosing their preferred method without compromising the quality of the final product.
Optional materials include interfacing or fusible stabilizer. These materials add structure to the bag, especially if the shirt fabric is thin. Applying interfacing to the main panels helps the bag hold its shape and enhances its professional appearance.
Lining fabric is another optional addition. Cotton scraps, old pillowcases, or leftover fabric pieces work well as lining materials. Adding a lining increases durability and gives the bag a polished interior finish.
Finally, decorative elements such as buttons, embroidery, or fabric patches can be included. These details allow you to personalize the bag while keeping the core design simple. The Shoulder Bag From Old Shirt Tutorial encourages creativity while maintaining functionality.
Creative Customization Ideas for Shoulder Bags
Customization is where the Shoulder Bag From Old Shirt Tutorial truly shines. Every shirt has unique features that can influence the final design. Button-down shirts, for example, allow the button placket to become a central decorative element or even a functional closure.
Chest pockets can be positioned on the exterior of the bag to provide easy-access storage. This reuse of existing pockets saves time and adds practical value. The tutorial shows how to reinforce these pockets so they remain secure during use.
Color and pattern choices greatly affect the bag’s style. Plaid shirts create casual, rustic bags, while solid colors produce a more minimalist look. Striped shirts can be aligned strategically for visual interest. The Shoulder Bag From Old Shirt Tutorial allows these natural patterns to guide the design process.
Strap length and width can be adjusted to suit personal comfort. A longer strap creates a crossbody bag, while a shorter strap results in a classic shoulder bag. Using contrasting fabric or decorative stitching on the strap adds personality without complexity.
Adding internal pockets enhances functionality. Small compartments for keys or phones make the bag more practical for everyday use. These pockets can be created from leftover shirt fabric or lining scraps.
Finally, embellishments such as embroidery, fabric paint, or appliqué can turn a simple bag into a statement piece. These details reflect personal style and make each bag truly one of a kind. The Shoulder Bag From Old Shirt Tutorial encourages thoughtful creativity while keeping the project approachable.
Beginner Tips for Sewing a Shoulder Bag From an Old Shirt
For beginners, the Shoulder Bag From Old Shirt Tutorial is an excellent entry point into upcycling and bag-making. One important tip is to choose the right shirt. Start with a shirt that is clean, sturdy, and free of excessive wear. Avoid fabrics that stretch too much, as they can complicate sewing.
Careful cutting is essential. Taking time to measure and mark fabric before cutting prevents uneven panels and wasted material. The tutorial emphasizes accuracy during this step to ensure a well-proportioned final bag.
Reinforcing stress points is another critical tip. Areas such as strap attachments and corners experience the most wear. Sewing these sections twice or using reinforced stitches significantly improves durability. The Shoulder Bag From Old Shirt Tutorial highlights these areas clearly.
Pressing seams as you sew helps achieve a professional finish. Ironing may seem optional, but it makes a noticeable difference in the final appearance. Pressed seams lie flat and are easier to stitch accurately.
Practicing on scrap fabric before sewing the final pieces builds confidence. This is especially helpful for beginners unfamiliar with their sewing machine or fabric behavior. A few test stitches can prevent mistakes later.
Most importantly, beginners should enjoy the learning process. Mistakes are part of sewing, and each project builds valuable skills. The Shoulder Bag From Old Shirt Tutorial is designed to be forgiving, encouraging creativity and confidence with every step.
FAQ – Shoulder Bag From Old Shirt Tutorial
What type of shirt works best for this tutorial?
Cotton and denim shirts are ideal due to their durability and ease of sewing.
Is this project suitable for beginners?
Yes, it is beginner-friendly and uses basic sewing techniques.
Do I need a sewing machine?
A sewing machine is helpful, but hand sewing is also possible.
Can I wash the finished bag?
Yes, washing depends on the fabric used, but gentle washing is recommended.
How long does it take to complete the bag?
Most bags can be completed in a few hours.
Can I add a zipper to the bag?
Yes, zippers can be added for extra security.
Is lining necessary?
Lining is optional but recommended for durability.
Can I sell bags made from this tutorial?
Usage rights depend on the original tutorial’s terms.
What size can the bag be?
The size depends on the shirt and your design choices.
Can I use multiple shirts in one bag?
Yes, combining fabrics adds visual interest and uniqueness.
Conclusion
The Shoulder Bag From Old Shirt Tutorial is a rewarding sewing project that blends sustainability, creativity, and practicality. By transforming an old shirt into a functional shoulder bag, you not only reduce waste but also create a unique accessory filled with character. This tutorial provides a clear path for beginners while offering endless customization opportunities for experienced sewists.
VIDEO TUTORIAL
I hope this article has guided and inspired you to try this project with confidence. Please leave a sincere opinion and share your suggestions, as your feedback is always welcome and valuable.

