If you’re searching for a vibrant and creative way to use your fabric scraps, this Scrappy Rainbow Star Tutorial is the perfect solution.
Combining colorful pieces of fabric with an easy-to-follow process, you can create stunning quilt blocks that look as if they’re glowing with rainbows.
Whether you’re an experienced quilter or just starting, this tutorial will guide you step by step to craft your very own Scrappy Rainbow Star.
The beauty of this project lies in its simplicity and versatility. With just a few basic tools and a variety of fabric scraps, you can turn leftover materials into a work of art.
Plus, this tutorial is beginner-friendly and fun, ensuring you enjoy every moment of the creative process. By the end, you’ll have a vibrant quilt block that showcases your unique style and love for color.
In this Scrappy Rainbow Star Tutorial, you’ll learn how to select fabrics, prepare your pieces, and sew them into a star pattern.
Each section of this tutorial breaks down the steps into manageable parts, making it easy to follow along. Ready to dive in? Let’s get started!
1. Choosing and Preparing Your Fabric Scraps
Fabric selection is the foundation of your Scrappy Rainbow Star Tutorial. The variety of colors and textures you choose will determine the overall look of your quilt block.
- Sort by Color: Begin by sorting your fabric scraps into rainbow categories—red, orange, yellow, green, blue, and purple. This creates a smooth gradient effect when piecing your star.
- Check the Sizes: Ensure that your scraps are large enough to cut into the required shapes. Even small pieces can be useful for this pattern.
- Press Your Fabric: Ironing your scraps before cutting them will make the process smoother and ensure precision.
- Cut the Pieces: Use a rotary cutter and quilting ruler to cut your scraps into squares, triangles, or strips as specified by your pattern.
- Consider Contrast: To make your star pop, use a neutral background fabric, such as white or gray.
- Organize Your Layout: Before sewing, lay out your pieces to visualize the final design and make adjustments if needed.
2. Assembling the Star Points
The star points are the most defining feature of your Scrappy Rainbow Star Tutorial. Sewing them accurately is key to achieving a polished look.
- Divide by Sections: Start by grouping your fabric scraps for each star point. This helps you maintain consistency in color order.
- Chain Piecing: Use the chain-piecing method to sew multiple pieces together quickly and efficiently.
- Press Seams Open: After sewing, press each seam open to reduce bulk and make the block lie flat.
- Trim to Size: Use your quilting ruler to ensure each piece matches the specified dimensions.
- Join the Segments: Sew the smaller pieces together to create the triangular points of the star.
- Arrange Carefully: Lay out all star points around the center block to double-check alignment before final assembly.
3. Sewing the Star Block Together
Now it’s time to bring all the pieces together to form the Scrappy Rainbow Star. This step requires attention to detail for a seamless finish.
- Start with the Center: Assemble the center square using your chosen fabric. This will be the focal point of your star.
- Attach Star Points: Sew each triangular point to the edges of the center block, one at a time.
- Check Alignment: After attaching each point, ensure the edges line up evenly to avoid skewed shapes.
- Add Background Pieces: Fill in the gaps between the star points with your neutral background fabric.
- Sew Rows Together: Assemble the block row by row, joining the top, middle, and bottom sections.
- Final Pressing: Once the block is complete, press it one final time to ensure it’s flat and ready for use.
4. Ideas for Using Your Scrappy Rainbow Star Blocks
With your Scrappy Rainbow Star blocks completed, there are endless possibilities for incorporating them into creative projects.
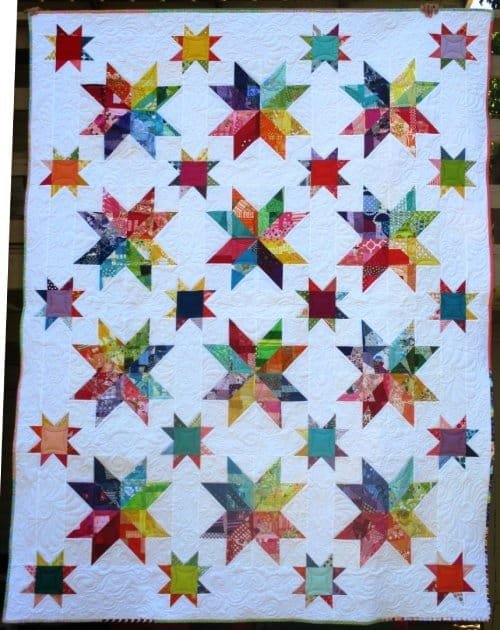
- Quilts: Combine multiple blocks to create a stunning rainbow-themed quilt.
- Pillows: Use a single block to make a decorative throw pillow.
- Table Runners: Line up several blocks for a colorful table centerpiece.
- Wall Art: Frame your block to create a unique piece of wall décor.
- Gift Ideas: Turn your blocks into tote bags, potholders, or coasters for personalized presents.
- Experiment with Sizes: Try making larger or smaller stars to fit different projects.
Frequently Asked Questions (FAQ)
1. What is a Scrappy Rainbow Star?
A Scrappy Rainbow Star is a quilt block made by combining colorful fabric scraps in a star pattern, typically set against a neutral background.
2. Can beginners follow this tutorial?
Absolutely! The Scrappy Rainbow Star Tutorial is designed to be beginner-friendly with clear, step-by-step instructions.
3. What type of fabric is best for this project?
Cotton fabrics work best because they are easy to sew, durable, and widely available in a variety of colors and prints.
4. How can I ensure my points are precise?
Take your time during the cutting and sewing stages. Use a quilting ruler, press seams carefully, and double-check alignment before sewing.
5. What if I don’t have enough fabric scraps?
You can supplement your scraps with small cuts from your fabric stash or purchase pre-cut packs in rainbow colors.
6. Can I use this block in larger projects?
Yes! The Scrappy Rainbow Star is versatile and can be incorporated into quilts, home décor, and various other sewing projects.
Join our VIP broadcast list and gain access to exclusive patterns, all for free. As a VIP member, you’ll receive the best patterns daily, delivered directly to your device. ✨📱 It’s a unique opportunity to stay up-to-date with the latest trends and designs, curated just for you. Don’t miss out on enhancing your projects and discovering new inspirations with the best patterns every day! 🎨🔝
Conclusion
In this Scrappy Rainbow Star Tutorial, we’ve covered everything you need to know to create a vibrant quilt block from fabric scraps. From choosing your materials to assembling the star and exploring creative project ideas, this guide is your roadmap to crafting something truly unique.
We’d love to hear your thoughts! Share your experiences, tips, or suggestions in the comments below. Happy sewing!

