The Scandinavian Star Ornament by Shabby Fabrics – free tutorial is the perfect craft to add a touch of Nordic charm to your holiday décor.
Whether you’re looking to spruce up your Christmas tree or create handmade gifts, these beautiful ornaments are simple to make and have a timeless, elegant look. The minimalist design combined with warm textures makes it an ideal project for anyone who loves crafting.
In this free tutorial, you’ll learn step-by-step how to create these lovely ornaments, using basic materials and simple techniques.
The Scandinavian Star Ornament is a versatile project that can be personalized in different colors and sizes, making it a fantastic DIY option for the holidays. Plus, the tutorial is beginner-friendly, so even if you’re new to crafting, you’ll be able to create stunning results.

Not only is the Scandinavian Star Ornament by Shabby Fabrics – free tutorial easy to follow, but it also provides a creative outlet for anyone looking to add a personal touch to their holiday decorations.
Handmade ornaments hold a special place in any home, and this project is sure to bring joy as you prepare for the festive season. Let’s dive into the process and get crafting!
1. Materials and Tools You Need
Before starting the Scandinavian Star Ornament by Shabby Fabrics – free tutorial, it’s essential to gather all the necessary materials. Ensuring you have everything in place will make the crafting process smooth and enjoyable.
- Fabric Strips: For a traditional Scandinavian look, choose fabric strips in red, white, or neutral tones. Each strip should measure around 1.5 inches wide and 12 inches long.
- Craft Ruler: A ruler will help you ensure your fabric strips are cut to the correct length and width, giving your ornament a polished appearance.
- Scissors: Sharp fabric scissors are a must for cutting your fabric strips cleanly and precisely.
- Fabric Glue: Fabric glue is ideal for securing the edges of the fabric and keeping everything in place without the need for sewing.
- Clothespins: These can be used to hold pieces of fabric together while the glue dries, ensuring a neat finish.
- Ribbon or Twine: To hang your finished ornament, you’ll need a piece of ribbon or twine, preferably in a complementary color to your fabric.
Having these materials on hand will make it easier to follow the Scandinavian Star Ornament by Shabby Fabrics – free tutorial, ensuring you get the best results.
2. Step-by-Step Instructions for Creating Your Ornament
Now that you have all your materials ready, it’s time to follow the Scandinavian Star Ornament by Shabby Fabrics – free tutorial. Below are the detailed steps to guide you through creating your ornament.
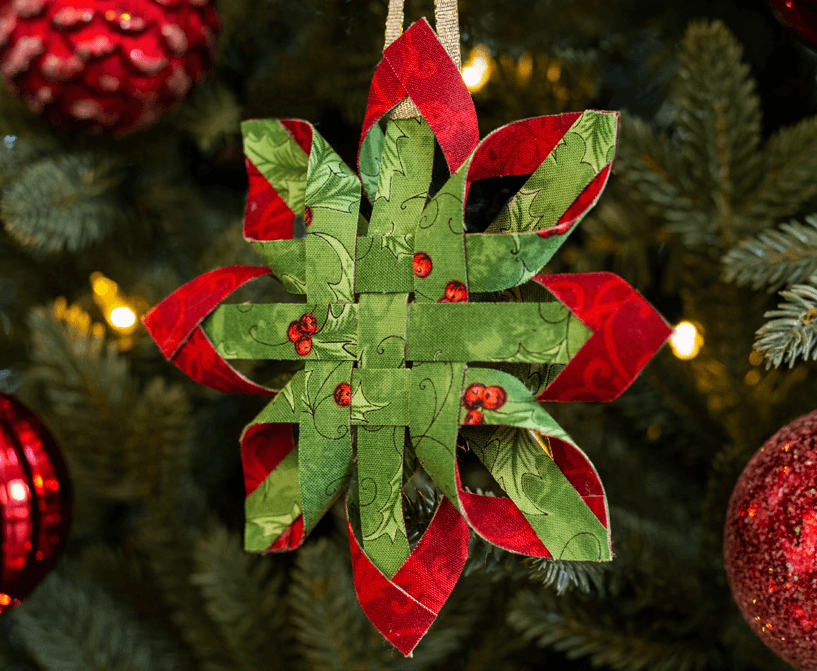
- Step 1: Cut the Fabric Strips: Start by cutting your fabric into strips. You’ll need five strips for each ornament, measuring about 1.5 inches wide and 12 inches long. Make sure the edges are neat, as this will affect the final look of your ornament.
- Step 2: Fold the Strips: Take each strip and fold it in half lengthwise. Then fold it again, so the raw edges are tucked inside. This will give your fabric strips a clean, smooth look.
- Step 3: Weave the Strips: Lay out four strips in a cross shape, weaving them together in an alternating over-under pattern. This forms the base of your star. The fifth strip will be used to form the points of the star.
- Step 4: Create the Star Points: Fold the ends of the fifth strip into loops and tuck them through the base you created. Secure the loops with fabric glue, holding them in place with clothespins while the glue dries.
- Step 5: Secure the Ornament: Once the glue has dried, trim any excess fabric and adjust the points of the star to ensure it looks symmetrical. Attach a piece of ribbon or twine to the top, allowing you to hang the ornament.
- Step 6: Add Finishing Touches: You can leave the ornament as is for a minimalist look, or embellish it with beads, buttons, or sequins for a festive touch.
Following these steps in the Scandinavian Star Ornament by Shabby Fabrics – free tutorial will result in a beautiful handmade ornament perfect for any holiday decoration.
3. Creative Variations for Your Scandinavian Star Ornament
Once you’ve mastered the basic technique in the Scandinavian Star Ornament by Shabby Fabrics – free tutorial, you can start experimenting with creative variations to personalize your ornaments. Here are a few ideas to inspire you.
- Use Different Fabrics: While traditional Scandinavian stars are often made with plain or plaid fabrics, you can use any fabric you like. Try experimenting with metallic fabrics for a more glamorous look or patterned fabrics for a fun twist.
- Change the Size: You can make smaller or larger stars by adjusting the length and width of the fabric strips. Smaller stars work great as gift toppers, while larger stars make striking wall or window decorations.
- Add Decorative Elements: After assembling your star, you can embellish it with beads, sequins, or buttons to add a bit of sparkle. This is a great way to personalize your ornaments and match them to your holiday décor.
- Experiment with Colors: Instead of sticking to the traditional red and white Scandinavian color palette, try using pastels or even bold, bright colors for a more contemporary look. You can also mix and match fabrics to create a multi-colored star.
- Try Different Hanging Methods: While ribbon and twine are popular choices for hanging your star, you can also use metallic wire, yarn, or even attach the star to a wooden dowel for a unique display.
- Make a Garland: Instead of making individual ornaments, try creating multiple stars and stringing them together to make a festive garland. This is a beautiful way to decorate mantels, staircases, or windows.
With these creative variations, you can put your own spin on the Scandinavian Star Ornament by Shabby Fabrics – free tutorial and create ornaments that reflect your personal style.
4. Tips for Perfecting Your Scandinavian Star Ornament
Crafting a Scandinavian Star Ornament might seem simple, but there are a few tips and tricks that can help you achieve the best possible results. Here’s how to make the most out of the Scandinavian Star Ornament by Shabby Fabrics – free tutorial.
- Use High-Quality Fabric: The quality of your fabric will affect the overall look and durability of your ornament. Choose fabric that holds its shape well and doesn’t fray easily.
- Cut Even Strips: When cutting your fabric strips, make sure they are even in width and length. This will ensure your star looks symmetrical and well-balanced.
- Keep Your Folds Crisp: To give your ornament a clean and professional look, make sure to fold your fabric strips neatly. You can even press the folds with an iron for extra sharp edges.
- Work in a Well-Lit Area: Having plenty of light will help you see the details of your work more clearly, ensuring that your weaving and folding are precise.
- Be Patient with the Glue: Allow plenty of time for the glue to dry before handling your ornament. Rushing this step can cause the loops to come undone or the fabric to shift.
- Store Your Ornaments Properly: After the holiday season, store your ornaments in a cool, dry place to prevent them from becoming damaged. Keep them flat or hang them in a safe spot to maintain their shape.
By following these tips, you can ensure your Scandinavian Star Ornament by Shabby Fabrics – free tutorial yields beautiful and durable results.
FAQ
Q: Can I use other types of fabric for this project?
A: Yes, while the tutorial suggests using traditional fabrics, you can experiment with various fabric types such as cotton, felt, or even recycled fabric from old clothes.
Q: Do I need a sewing machine for this project?
A: No, this tutorial uses fabric glue, so there’s no need for a sewing machine. It’s a no-sew project, perfect for crafters of all skill levels.
Q: How long does it take to make a Scandinavian Star Ornament?
A: On average, it takes about 20-30 minutes to make one ornament, depending on your skill level and how familiar you are with the process.
Q: Can children help with this craft?
A: Yes, this is a great project for kids with adult supervision, especially when it comes to using scissors and glue. It’s a fun and simple way for them to participate in holiday decorating.
Q: Can I wash the fabric ornaments?
A: It’s not recommended to wash the ornaments, as the fabric glue might not hold up in water. Instead, spot clean them gently if necessary.
Q: How do I store the ornaments after the holidays?
A: Store your ornaments flat in a cool, dry place to preserve their shape. You can also hang them on a rack or inside a closet to prevent them from being crushed.
Join our VIP broadcast list and gain access to exclusive patterns, all for free. As a VIP member, you’ll receive the best patterns daily, delivered directly to your device. ✨📱 It’s a unique opportunity to stay up-to-date with the latest trends and designs, curated just for you. Don’t miss out on enhancing your projects and discovering new inspirations with the best patterns every day! 🎨🔝
Conclusion
In this Scandinavian Star Ornament by Shabby Fabrics – free tutorial, we’ve walked you through the process of creating stunning handmade holiday decorations. From gathering materials to weaving the perfect star, this project is not only fun but also a great way to add a personal touch to your festive décor. We hope you enjoyed this tu
We’d love to hear your thoughts! Please leave your honest opinions and suggestions in the comments below, and happy crafting!

