The Sawtooth Star Quilt Block is one of the most classic and versatile designs in quilting, loved for its simplicity and timeless elegance.
In this SAWTOOTH STAR QUILT BLOCK – Tutorial, we will take you step by step through the process of creating this iconic block.
Whether you’re a beginner or an experienced quilter, the Sawtooth Star offers a fantastic way to explore quilting techniques and expand your skillset.
This block is composed of a central square, framed by flying geese units, which create the pointed star effect that defines the Sawtooth Star Quilt Block. It’s an adaptable design that can be used on its own or combined with other blocks to create stunning quilts.
Throughout this SAWTOOTH STAR QUILT BLOCK – Tutorial, we’ll provide tips and tricks to help you achieve precision and a professional finish in your project.
By the end of this tutorial, you will not only have a deeper understanding of how to assemble the Sawtooth Star Quilt Block, but also learn how to incorporate it into a variety of quilting projects. Let’s begin the journey into the world of this beautiful quilt block.
1. Gathering the Necessary Materials
Before starting on the Sawtooth Star Quilt Block, it’s essential to gather all the materials and tools you’ll need. Having everything ready before you begin will ensure a smooth and enjoyable quilting process.
- Choosing Your Fabric: The Sawtooth Star Quilt Block stands out best with a contrast between the background and star fabrics. Solid colors work well for both, but you can also mix and match prints for a more personalized look. Choose two contrasting fabrics, one for the star points and one for the background.
- Cutting Tools: Accurate cutting is crucial for this block. A rotary cutter, a self-healing cutting mat, and a quilting ruler will help you achieve clean, precise fabric pieces. Be sure to sharpen or replace your rotary cutter blade for the best results.
- Sewing Machine: A sewing machine with a ¼-inch foot is recommended for piecing the Sawtooth Star Quilt Block. The ¼-inch seam allowance is standard in quilting, and having the right foot will help ensure consistent seam widths.
- Pins and Clips: Use pins or sewing clips to hold your fabric pieces in place while sewing. This prevents the pieces from shifting and helps keep your seams accurate.
- Iron and Pressing Tools: Pressing your seams as you sew is an important step in quilting. An iron and a small ironing board or pressing mat will help keep your blocks flat and make sewing the final pieces together much easier.
- Thread and Needles: High-quality cotton thread is best for quilting. Choose a thread color that blends well with your fabric to ensure that your seams are strong and nearly invisible.
2. Cutting and Preparing Your Fabric Pieces
Once you have your materials ready, it’s time to start cutting the fabric for your Sawtooth Star Quilt Block. Accurate cutting is the key to a neat and precise block, so take your time during this step.
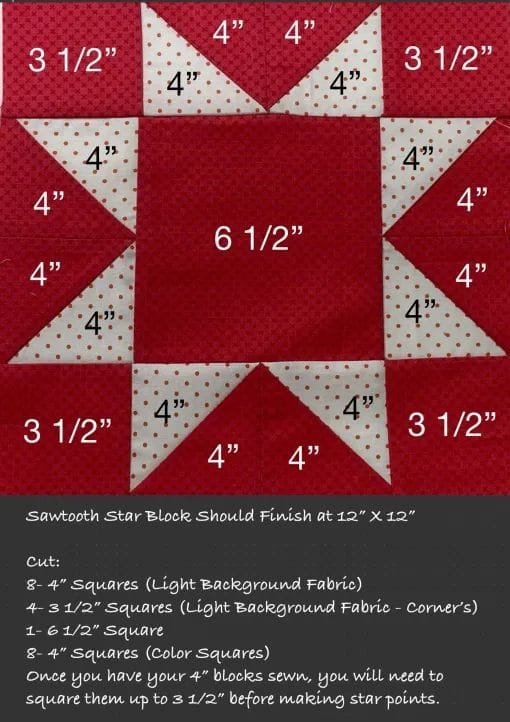
- Cutting the Center Square: The center of the Sawtooth Star Quilt Block is a simple square. For a standard 12-inch finished block, cut a 6½-inch square from your star fabric. This will form the focal point of your star.
- Cutting the Flying Geese Units: The points of the star are created using flying geese units. For these, you’ll need to cut four rectangles (3½ x 6½ inches) from the background fabric and eight squares (3½ x 3½ inches) from the star fabric. These will be used to construct the flying geese that surround the center square.
- Cutting the Corner Squares: The corners of the block are made up of small background squares. Cut four 3½-inch squares from your background fabric. These will be placed in the corners of the block.
- Arranging the Pieces: Before you begin sewing, lay out all your cut pieces on a flat surface. This will help you visualize how the final block will look and ensure that all your pieces are in the correct position.
- Marking Your Seams: For the flying geese units, mark diagonal lines on the back of each 3½-inch star fabric square. These lines will act as guides for sewing the flying geese accurately.
- Double-Check Your Measurements: Before moving on to sewing, double-check all your fabric pieces to ensure they are cut to the correct size. This will save you time and frustration later on.
3. Sewing the Flying Geese Units
The flying geese units are the heart of the Sawtooth Star Quilt Block, creating the points of the star. Follow these steps to sew them together accurately.
- Making the First Half of the Flying Geese: Take one of your background rectangles and place a star fabric square on top, right sides together. The marked diagonal line should run from one corner of the rectangle to the opposite corner. Sew along this line, then trim the excess fabric, leaving a ¼-inch seam allowance. Press the seam toward the triangle.
- Making the Second Half of the Flying Geese: Place another star fabric square on the opposite side of the rectangle, again with the diagonal line running across the corner. Sew along the line, trim the excess fabric, and press the seam. You now have a completed flying geese unit.
- Repeat for All Units: Repeat the above steps to create four flying geese units. These will form the star points in your Sawtooth Star Quilt Block.
- Checking for Accuracy: Once all your flying geese units are sewn, check that they measure 3½ x 6½ inches. Trim them if necessary to ensure they are the correct size. Accurate measurements are important for assembling the block smoothly.
- Pressing the Seams: Press all your seams carefully. Pressing ensures that your fabric lies flat, which will make assembling the final block much easier and give it a professional finish.
- Final Flying Geese Check: Lay out all your flying geese units to check for symmetry and alignment. The star points should meet evenly at the center when sewn into the block.
4. Assembling the Sawtooth Star Quilt Block
Now that your flying geese units and other pieces are ready, it’s time to assemble the Sawtooth Star Quilt Block. This is where all the individual components come together to create the star design.
- Laying Out the Pieces: Arrange your center square, flying geese units, and corner squares in a 3×3 grid. The flying geese should point toward the center square, forming the star.
- Sewing the Rows: Begin by sewing the top row (one flying geese unit between two corner squares) together. Repeat for the bottom row. For the middle row, sew the two side flying geese units to the center square.
- Joining the Rows: Once the rows are sewn, press the seams. Then, sew the top and bottom rows to the middle row, making sure that all seams line up perfectly. The points of the star should meet cleanly at the seams.
- Pressing the Final Block: After sewing all the rows together, give the entire block one final press. This will flatten the seams and make the block look polished and professional.
- Checking for Accuracy: Measure your finished block. It should be 12½ x 12½ inches before sewing into a quilt. If necessary, trim any uneven edges.
- Admiring Your Work: Take a moment to admire your completed Sawtooth Star Quilt Block! You’ve created a beautiful and versatile block that can be used in a variety of quilting projects.
FAQ
What is the Sawtooth Star Quilt Block?
The Sawtooth Star Quilt Block is a traditional quilt block design featuring a central square surrounded by flying geese units, which form the star’s points. It is a popular block for both beginner and advanced quilters due to its simplicity and timeless appeal.
Can I make the Sawtooth Star Quilt Block in different sizes?
Yes! The size of the Sawtooth Star Quilt Block can be easily adjusted by changing the size of your fabric pieces. For example, smaller pieces will create a smaller block, while larger pieces will create a larger block. Just be sure to maintain the same proportions for all the pieces.
Is the Sawtooth Star Quilt Block difficult for beginners?
No, the Sawtooth Star Quilt Block is relatively easy to sew, making it a great choice for beginners. The most important part is accurate cutting and sewing, but the block itself is made up of simple shapes like squares and triangles.
What fabrics work best for the Sawtooth Star Quilt Block?
The Sawtooth Star Quilt Block looks great in both solid colors and prints. It’s important to choose contrasting fabrics for the star and background to make the star pattern stand out. Cotton fabrics are ideal for quilting projects like this.
Do I need special tools to make the Sawtooth Star Quilt Block?
While you don’t need any specialized tools, a rotary cutter, quilting ruler, and self-healing mat will make the cutting process much easier and more accurate. A sewing machine with a ¼-inch foot is also helpful for consistent seams.
What projects can I make with the Sawtooth Star Quilt Block?
The Sawtooth Star Quilt Block can be used in a variety of quilting projects, from full-sized quilts to smaller items like pillows, table runners, and wall hangings. It’s a versatile block that looks great in any setting.
Conclusion
In this SAWTOOTH STAR QUILT BLOCK – Tutorial, we’ve covered everything from gathering materials to sewing the block together. By following these steps, you’ll be able to create a beautiful, precise Sawtooth Star Quilt Block that can be used in a range of quilting projects. We hope you enjoyed this tutorial and found it helpful!
We’d love to hear your feedback and suggestions. How did your Sawtooth Star Quilt Block turn out? Please share your thoughts in the comments below!

