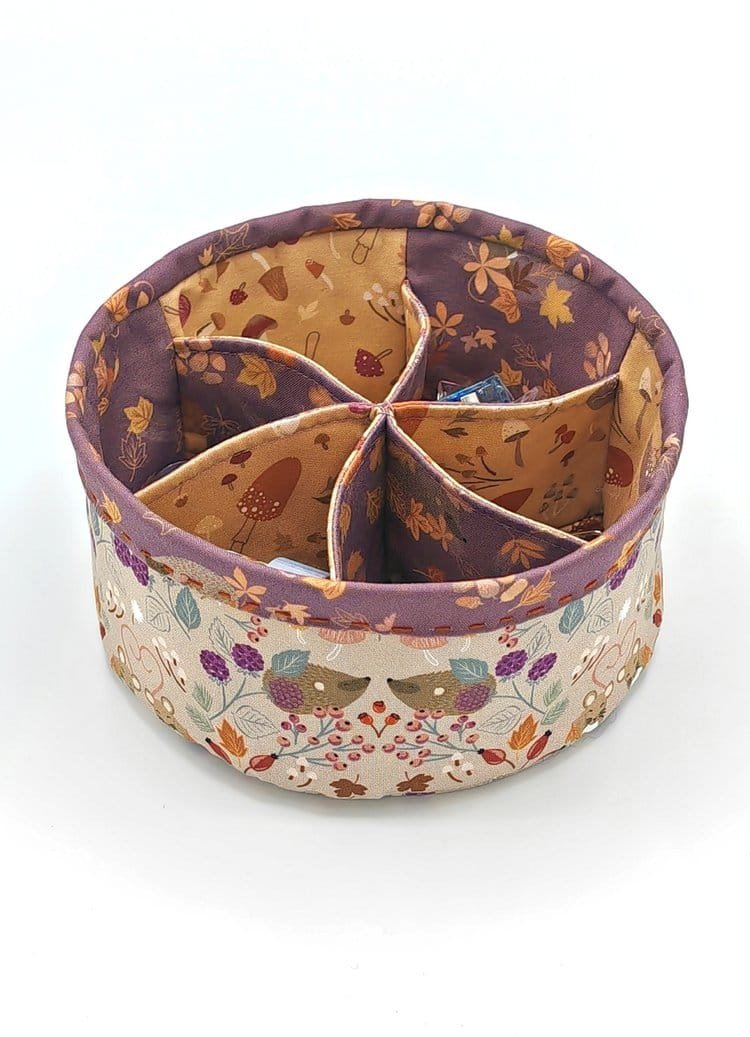
If you’re looking for a satisfying project that blends creativity and practicality, the Round Organiser Basket Sewing Pattern is the perfect choice. This charming quilt-inspired design adds a cozy touch to any space while offering practical storage for sewing tools, yarn, or even bathroom accessories. Using quilting techniques, you can craft a beautiful round organiser that is not only functional but also a stylish décor element for your home.
The Round Organiser Basket Sewing project is great for all skill levels—from beginners who want to build their confidence to experienced sewists looking for a weekend project. With the right fabric combinations, careful stitching, and quilted touches, the basket becomes a long-lasting item that showcases your personality. Whether you’re sewing it as a gift or for your own use, this handmade basket is a wonderful addition to any room.
Throughout this article, we’ll explore every detail of the Round Organiser Basket Sewing Pattern. From choosing fabrics to assembling each quilted layer, you’ll get all the tips and tricks you need to bring your basket to life. Plus, we’ll cover techniques that help ensure your basket is both sturdy and stylish.
Choosing the Right Fabrics and Materials
The foundation of any great Round Organiser Basket Sewing Pattern lies in selecting the right fabrics and materials. The right combination will make your basket strong, durable, and visually appealing.
Cotton is the most popular choice for quilting projects. It’s easy to work with, holds its shape well, and comes in endless patterns. For your round basket, consider mixing solids and prints to create a modern or vintage look depending on your taste.
Interfacing is essential to give your basket structure. A medium to heavy-weight fusible interfacing will help your fabric stay firm and upright. You can also add a layer of batting if you want to give your basket a quilted, padded feel.
The inner lining should complement the outer design while being functional. A wipeable cotton or even a soft flannel can make your organiser more versatile. Just make sure it’s easy to clean if you plan to use it for makeup or crafting supplies.
Handles are optional but incredibly useful. You can create fabric handles by quilting layers together or repurpose pre-made ones. The handles should be comfortable to hold and sewn securely into the side seams.
Lastly, don’t forget the thread. Use high-quality polyester thread that matches your fabric. If you’re adding decorative topstitching, consider using a contrasting color to make the quilt lines pop.
Cutting and Preparing Your Quilt Pieces
Before you begin assembling the Round Organiser Basket Sewing Pattern, it’s crucial to prepare your quilt pieces carefully. A precise cut makes all the difference in achieving clean lines and an even shape.
Start with a circular base. Depending on the size you want, you can use a plate, bowl, or compass to trace a perfect circle onto your fabric. Cut one circle each from your outer fabric, lining, batting, and interfacing.
For the side panels, measure the circumference of your base and add seam allowances. This rectangle will become the body of your basket. Again, cut from all necessary layers: outer fabric, lining, batting, and interfacing.
Use quilting pins or clips to sandwich your layers together. A typical stack would be fabric, batting, and interfacing, all basted or fused. The lining is usually sewn separately but measured the same.
Mark any quilting lines before sewing. These can be horizontal, diagonal, or even decorative swirls. A disappearing ink pen or tailor’s chalk is best for this task.
Quilt the side panel before attaching it to the base. This not only adds beauty but also helps to stabilize the shape. Work slowly to avoid shifting layers, and backstitch at the beginning and end of each line.
Once quilted, press the pieces flat using steam. This will help fuse any layers together and ensure crisp, neat results throughout your Round Organiser Basket Sewing project.
Assembling Your Round Organiser Basket
Now that you have all your pieces prepared, it’s time to bring your Round Organiser Basket Sewing Pattern to life through thoughtful assembly. This part is where your creation begins to take its final form.
Start by sewing the short ends of your side panel together, forming a loop. Press the seam open to reduce bulk. This loop will wrap around the base and create the circular body of your basket.
Pin the bottom edge of the side loop to the circular base, right sides facing each other. Take your time to distribute the fabric evenly—this helps prevent puckering and ensures a smooth, round shape.
Sew around the circle slowly and steadily, removing pins as you go. Once attached, clip the seam allowance at intervals to help the curved edges lie flat when turned right-side out.
Repeat the same steps with the lining. Once both the inner and outer baskets are complete, slide the lining into the outer basket with wrong sides facing. Align the top edges and baste them together if needed.
If you’re adding handles, now is the time to insert them between the lining and outer fabric. Pin them into place and check their alignment before final stitching.
Finish the top edge with binding or a clean folded edge. Topstitching around the rim will lock everything in place and give your Round Organiser Basket Sewing Pattern a professional finish.
Decorating and Customizing Your Basket
Personalization is one of the best parts of working on a Round Organiser Basket Sewing Pattern. From colorful quilting to small embellishments, your basket can become a reflection of your personality and creativity.
Consider using patchwork for the side panels. You can combine scraps from previous quilting projects to create a mosaic of memories and colors. Patchwork not only looks great but adds an extra layer of quilting texture.
Appliqué is another fun option. Use shapes like flowers, hearts, or letters and sew them onto your basket before assembling it. This works particularly well if the basket is a gift or intended for a child’s room.
Embroidery can be added before or after quilting. Simple stitches like backstitch, French knots, or chain stitch can enhance the visual interest of your design. Choose thread colors that complement your fabric.
You can also experiment with edge trims. Add lace, pom-poms, or piping around the top rim of the basket for a unique finish. Just be sure they don’t interfere with the usability of the organiser.
Add a label or tag to personalize your creation further. Hand-stamped fabric tags, leather patches, or even iron-on labels can give your basket a boutique look.
If you’re sewing multiple baskets, you can create a set in coordinating fabrics. Vary the sizes slightly to make nesting baskets that work beautifully together in a set.
FAQ About Round Organiser Basket Sewing
What size should I make the round organiser basket?
The size depends on its intended use. For desk supplies, 6–8 inches in diameter is ideal. For storing yarn or fabric, you might go up to 12–14 inches.
Do I need a sewing machine to make this basket?
While it’s possible to sew by hand, using a sewing machine will save time and provide stronger, more even stitches—especially when quilting layers together.
Can I wash the finished basket?
Yes, if you’ve used washable cotton fabrics and thread. Avoid using materials that shrink or warp in the wash, and always pre-wash fabrics before sewing.
What type of interfacing works best for this pattern?
Fusible fleece or medium-heavy interfacing gives the best structure without being too stiff. Combine with batting for a quilted feel.
Can I add pockets to the inside?
Absolutely! Small pockets sewn onto the lining are great for keeping small items like scissors, clips, or keys organized inside the basket.
Is this project beginner-friendly?
Yes, with basic sewing skills and careful measurements, beginners can complete the Round Organiser Basket Sewing Pattern successfully and confidently.
Conclusion
The Round Organiser Basket Sewing Pattern is a rewarding project that blends the art of quilting with practical home organization. From selecting fabrics to adding your personal touch, this sewing journey encourages creativity while resulting in something useful and beautiful. Whether for yourself or as a handmade gift, a round organiser basket is both a fun project and a charming final product.
We hope this guide helped you understand the steps involved in crafting your very own quilted basket. If you’ve tried this pattern or have tips to share, please leave a sincere opinion and suggestions—we’d love to hear from you!

