If you’ve been looking for a Reversible Fabric Hat Free Pattern, you’ve come to the right place. This fun and practical sewing project is perfect for beginners and experienced sewists alike. Not only will you end up with a stylish and comfortable hat, but you’ll also get the satisfaction of creating it with your own hands. The beauty of a Reversible Fabric Hat is that you can enjoy two different looks in one—simply flip it inside out to match your outfit or mood. In this tutorial, we will guide you through the process of cutting the pieces, sewing them together, and finishing your hat so it’s both durable and beautiful.
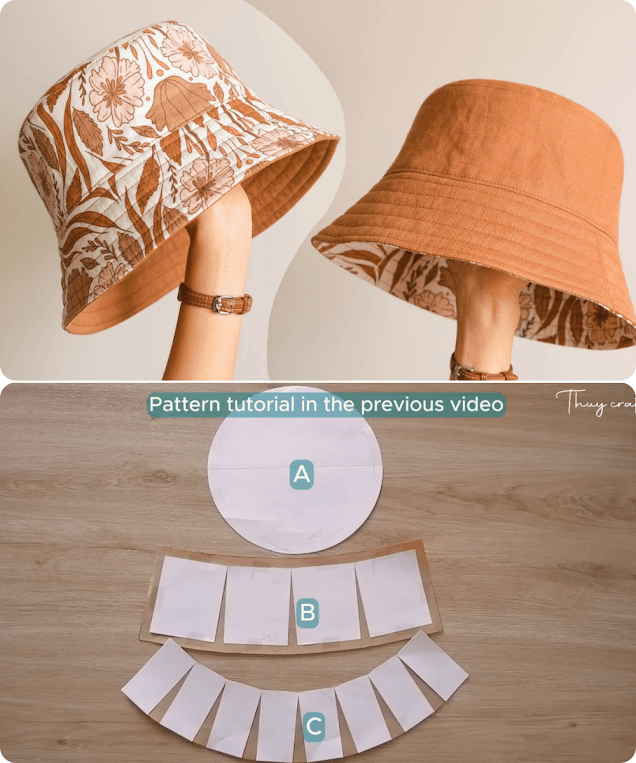
This project involves three main fabric components: A (top of the hat), B (side fabric), and C (hat brim). Each part plays a key role in the overall shape and functionality of your hat. By following the steps carefully, you will not only learn how to sew a Reversible Fabric Hat, but also gain skills that can be applied to many other sewing projects. Whether you choose bold prints, soft pastels, or even mix patterns, the reversible feature ensures you have versatility and style in one accessory.
Before we dive into the sewing steps, think about the fabric choices. Cotton is a popular option because it’s breathable and easy to work with, but you could also try lightweight denim, linen, or even canvas for a sturdier hat. Remember that since the hat is reversible, you will be working with two different fabrics, so choose combinations that complement each other. Now let’s explore the step-by-step process of making this Reversible Fabric Hat Free Pattern.
Choosing and Preparing Your Fabric
When making a Reversible Fabric Hat, the choice of fabric is key. You want something that feels comfortable against the skin, yet is strong enough to hold the hat’s shape. Many sewists choose quilting cotton because it’s easy to sew and comes in endless patterns and colors. If you prefer a softer finish, lightweight linen is also an excellent choice.
Before cutting your pieces, wash and iron your fabric. Pre-washing is important because it prevents shrinkage after the hat is sewn. Ironing helps you achieve more accurate cuts, which is especially important for the three components: A (top of the hat), B (side fabric), and C (brim). Precision here will make the assembly much smoother.
When selecting your fabrics, think about how the two sides will look when the hat is reversed. One side could feature a bold, bright print for sunny days, while the other could have a neutral tone for everyday wear. This is the true beauty of the Reversible Fabric Hat Free Pattern—you get two looks for the effort of making just one hat.
Mark your patterns clearly on the fabric using tailor’s chalk or a washable fabric marker. It’s also a good idea to label the pieces as A, B, and C to avoid confusion during assembly. If you’re a beginner, working slowly and checking each step twice can help ensure accuracy.
Cutting accuracy is essential. A slightly uneven brim (C) can affect how the hat sits on your head, and mismatched side panels (B) can cause the hat to look uneven. Taking a few extra minutes during this step will save time later.
Finally, keep all your pieces organized before sewing. Place each set of A, B, and C together for each side of the reversible hat. This way, you’ll avoid mixing fabrics or accidentally sewing mismatched parts together.
Sewing the Top and Sides
The first step in assembling your Reversible Fabric Hat is to attach the top piece (A) to the side band (B). Place the right sides of the fabric together, pinning carefully along the curved edge. This curve is where the hat begins to take shape, so patience here will give you a smoother result.
Sew slowly, guiding the fabric gently around the curve. If you feel the fabric bunching, lift the presser foot, adjust, and continue. Seam allowances are important here; stick to the recommended 1/4 inch or 1/2 inch, depending on your pattern instructions.
Repeat the process for both sets of fabric—one for each reversible side. When you finish, you’ll have two half-hats that will later be joined together. This is where you’ll start to see the Reversible Fabric Hat Free Pattern coming to life.
After sewing, clip small notches along the seam of the curved edge to help it lay flat when turned right side out. Be careful not to cut into the stitching. Press the seams open with an iron to give a clean, professional look.
If you want to add decorative topstitching along the seam, now is a good time. This not only adds a stylish touch but also reinforces the seam for durability. Choose a thread color that either blends or contrasts, depending on your design vision.
By the end of this step, you should have two complete top-and-side assemblies, each in a different fabric. These will be the foundation of your Reversible Fabric Hat.
Attaching the Brim
The brim (C) is the part that adds both style and function to your Reversible Fabric Hat. It provides shade from the sun and frames your face, making it a crucial element of the design. To start, sew the short ends of the brim pieces together to form a loop. Repeat for both fabric sets.
Next, pin the brim to the side section (B) of each half-hat, right sides together. This step may require more pins than usual to keep the brim evenly aligned around the circle. Taking your time here ensures the hat sits comfortably on your head without gaps or bunching.
Sew slowly around the brim, making sure the seam allowance is consistent. If you want a firmer brim, you can insert interfacing between the fabric layers. This will help the brim keep its shape, especially if you plan to wear the hat outdoors frequently.
Press the seam after sewing to keep everything neat. You can also add topstitching around the brim for extra reinforcement and a polished look. Remember to repeat the process for both fabric sets of the reversible hat.
Once you’ve attached the brim to each side, you’ll have two complete hats. The next step will be to join them together to create the reversible feature. This is where the Reversible Fabric Hat Free Pattern truly shows its magic.
Before moving on, check all your seams to ensure there are no gaps or loose threads. Quality finishing here will make the hat last longer and look more professional.
Finishing and Making It Reversible
To join the two hat halves, place them right sides together, aligning all seams carefully. Pin around the brim edge, leaving a small opening through which you’ll turn the hat right side out. This opening is essential—without it, you won’t be able to flip the hat.
Sew all around the brim edge with the chosen seam allowance. When you reach the opening, backstitch to secure the thread. Turn the hat right side out through the opening, pushing out the brim edges gently for a crisp finish.
Once turned, press the hat thoroughly. This step is crucial for giving the Reversible Fabric Hat a professional look. Ironing helps flatten seams and makes the brim look sharp.
Close the opening by hand-stitching it with a ladder stitch or by topstitching around the entire brim. The latter not only secures the opening but also adds a decorative touch and reinforces the edge.
Test the reversible feature by flipping the hat inside out. Both sides should look equally neat and finished. If one side feels tighter, check your seam allowances to make sure they are even.
Your Reversible Fabric Hat Free Pattern is now complete. You have a stylish, functional, and versatile accessory that’s perfect for sunny days, vacations, or simply adding a handmade touch to your wardrobe.
FAQ About Reversible Fabric Hats
1. What is the best fabric for a Reversible Fabric Hat?
Cotton and linen are popular because they are breathable, easy to sew, and comfortable to wear.
2. Can I add interfacing to the brim?
Yes, adding interfacing can help the brim hold its shape and provide extra sun protection.
3. Do I need a sewing machine for this project?
While it’s possible to sew by hand, a sewing machine will make the process faster and produce more even stitches.
4. How do I make sure the hat fits my head?
Measure your head circumference and adjust the side piece (B) length accordingly before cutting.
5. Can I wash my reversible fabric hat?
Yes, but use gentle washing to avoid shrinking or distorting the shape. Pre-washing the fabric helps prevent shrinkage.
6. Is this pattern beginner-friendly?
Absolutely. The Reversible Fabric Hat Free Pattern is great for beginners because it uses simple sewing techniques.
Conclusion
Making your own Reversible Fabric Hat is a rewarding project that combines creativity with practicality. With just a few pieces of fabric and some basic sewing skills, you can create a stylish, double-sided hat that fits your personal style. We covered everything from fabric selection to final finishing touches, ensuring your hat is both beautiful and functional. I’d love to hear your honest thoughts and any suggestions you might have—your feedback helps make future projects even better.

