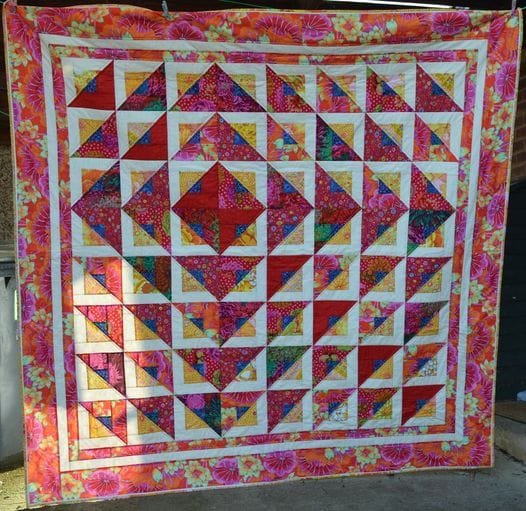
In this Radiant from Cozy Quilt Designs and RJR Fabrics – Tutorial, we’ll explore the step-by-step process to create this stunning quilt pattern.
Whether you’re new to quilting or have years of experience, this guide will help you craft a beautiful quilt using Cozy Quilt Designs’ Radiant pattern paired with RJR Fabrics.
We’ll cover everything from gathering your materials to piecing together the quilt blocks, ensuring that your project turns out just as radiant as the name suggests.
Quilting is a beloved craft because of its rich history and the joy of creating something by hand. The Radiant Quilt combines modern design elements with timeless craftsmanship, making it a versatile project for quilters of all levels.
The unique blend of color and pattern in RJR Fabrics perfectly complements the geometry of the Radiant design, creating a quilt that is both visually striking and deeply rewarding to make.
Before diving into this tutorial, make sure you have the necessary materials on hand, including RJR Fabrics, your Cozy Quilt Designs Radiant pattern, and the basic quilting supplies such as a rotary cutter, mat, and sewing machine. Let’s get started on bringing your Radiant Quilt to life!
1. Materials Needed for the Radiant Quilt
The first step to any successful quilt project is gathering the right materials. For the Radiant from Cozy Quilt Designs and RJR Fabrics – Tutorial, you’ll need a few key items to make sure your quilt comes together smoothly.
- Fabric Selection: The Radiant pattern truly shines with a vibrant combination of fabrics. Using RJR Fabrics adds a luxurious texture and deep color to your quilt, enhancing the overall design. Be sure to choose a mix of bold colors and subtle contrasts to really make the pattern pop.
- Cutting Tools: A sharp rotary cutter is essential for precise fabric cutting. Make sure to have a cutting mat and acrylic ruler on hand to ensure straight lines and accurate measurements.
- Sewing Machine & Thread: While hand-quilting is always an option, a sewing machine will speed up the process significantly. Use a high-quality thread that complements your fabric choices, as it will blend into the quilt and create clean, strong seams.
- Quilting Ruler and Pins: These tools help with block assembly and ensuring your quilt top pieces stay aligned as you sew them together.
Once you’ve gathered these items, you’re ready to begin piecing your Radiant Quilt!
2. Cutting the Fabric for Your Quilt Blocks
Cutting your fabric is a critical step in the Radiant from Cozy Quilt Designs and RJR Fabrics – Tutorial. Accurate cuts lead to perfectly aligned quilt blocks, which will make your final quilt look polished and professional.
- Step 1: Start by laying out your RJR Fabrics and carefully pressing them with an iron. This helps remove any wrinkles that could affect your cutting measurements.
- Step 2: Using your rotary cutter and acrylic ruler, follow the cutting instructions provided in the Radiant Quilt Pattern. Precise cutting is crucial for ensuring all of your quilt pieces fit together seamlessly.
- Step 3: After cutting your fabric into strips, move on to cutting the individual quilt block pieces. The Radiant design consists of geometric shapes, and accurate cutting will make a noticeable difference in how clean your finished blocks appear.
- Step 4: Group your cut pieces according to color and size. This will make the block assembly process more organized and easier to manage.
- Step 5: Double-check your cut pieces with the instructions to ensure everything is the correct size before moving on to the sewing phase.
Taking your time with the cutting process is key to achieving a flawless Radiant Quilt.
3. Assembling the Radiant Quilt Blocks
Now that you have all of your fabric pieces cut and organized, it’s time to start sewing the quilt blocks together. In this section of the Radiant from Cozy Quilt Designs and RJR Fabrics – Tutorial, we’ll cover the block assembly process.
- Step 1: Lay out the fabric pieces for one quilt block, following the design instructions in the Radiant pattern. Make sure you’re happy with the color placement before you start sewing.
- Step 2: Begin by sewing the smaller pieces together. Use a ¼-inch seam allowance for all of your seams to ensure consistency across all blocks.
- Step 3: Press each seam as you go. Pressing the seams helps set the stitches and keeps your blocks looking crisp.
- Step 4: Once all the smaller pieces are sewn together, you can start assembling the larger sections of the block. Pay close attention to the alignment of the seams.
- Step 5: Continue assembling all the blocks for the quilt, following the pattern for fabric placement and block arrangement.
- Step 6: Once your blocks are assembled, lay them out to see how the quilt top will look. Rearrange the blocks if necessary to ensure the design flows as intended.
With careful block assembly, your Radiant Quilt will start to take shape beautifully.
4. Finishing Your Radiant Quilt
The final stage in our Radiant from Cozy Quilt Designs and RJR Fabrics – Tutorial is finishing your quilt. This involves adding the quilt top to the batting and backing, quilting the layers together, and binding the edges.
- Step 1: Choose a batting that complements your fabric choices and desired quilt thickness. Lay the batting and quilt backing on a flat surface.
- Step 2: Carefully place the quilt top over the batting and backing, making sure all layers are smooth and aligned. Pin the layers together to hold everything in place while you quilt.
- Step 3: Quilt the layers together using a quilting machine or hand quilting. Follow the Radiant pattern’s suggested quilting design, or choose your own style for a personal touch.
- Step 4: Once the quilting is complete, trim the edges of the quilt to prepare it for binding.
- Step 5: Sew the binding strips together and attach them to the quilt edges using your preferred method.
- Step 6: Give your finished Radiant Quilt a final press to smooth out any creases and enjoy the results of your hard work!
With the final steps complete, your Radiant Quilt is now ready to be admired and cherished.
FAQ: Common Questions About the Radiant Quilt
1. What size does the Radiant Quilt pattern create?
The size of the finished quilt depends on the number of blocks you create and the dimensions of each block. The pattern usually provides different size options such as lap, twin, and queen.
2. Can I use fabrics other than RJR Fabrics for this quilt?
Absolutely! While RJR Fabrics are recommended for their high quality and rich colors, you can use any fabric of your choice. Just ensure the fabrics work well together in terms of color and weight.
3. Do I need to have prior quilting experience to make the Radiant Quilt?
This pattern is beginner-friendly, but it’s also a great project for more advanced quilters. The clear instructions make it suitable for quilters of all skill levels.
4. How long does it take to complete the Radiant Quilt?
The time it takes to complete this quilt depends on your experience and the time you dedicate to the project. On average, it could take anywhere from a few days to a few weeks.
5. What type of batting should I use?
For the Radiant Quilt, a cotton or cotton-blend batting works well. You can choose the thickness based on your preference for a lightweight or heavier quilt.
6. Can I customize the color scheme of the Radiant Quilt?
Yes, the beauty of quilting is that you can always customize colors to suit your style. Choose a color palette that complements your personal taste or home décor.
Join our VIP broadcast list and gain access to exclusive patterns, all for free. As a VIP member, you’ll receive the best patterns daily, delivered directly to your device. ✨📱 It’s a unique opportunity to stay up-to-date with the latest trends and designs, curated just for you. Don’t miss out on enhancing your projects and discovering new inspirations with the best patterns every day! 🎨🔝
Conclusion
In this Radiant from Cozy Quilt Designs and RJR Fabrics – Tutorial, we’ve covered everything you need to know to create this stunning quilt. From fabric selection and cutting to block assembly and finishing touches, this guide will help you every step of the way. We hope this tutorial inspires you to create your own radiant masterpiece!
PATTERN HERE
Please share your thoughts and suggestions in the comments below. How did your Radiant Quilt turn out? We’d love to hear about your experience and see your creations!

