Creating a Quilted Coinpurse Wallet Pattern is a charming and practical sewing project that blends functionality, beauty, and creativity. This type of handcrafted accessory is compact enough for beginners to enjoy while also offering plenty of customization options for experienced sewists.
A quilted coinpurse wallet is the perfect small item to store coins, folded bills, credit cards, or tiny essentials, making it a versatile companion for everyday use.
The quilted texture adds softness, structure, and personality to the design, giving you a chance to experiment with fabrics, colors, and stitching patterns. Many crafters love projects like this because they are quick, satisfying, and ideal for gifting or selling.
Using a Quilted Coinpurse Wallet Pattern allows you to practice essential sewing techniques such as quilting layers, topstitching, installing zippers or snaps, and adding lining.
Even though it is small, the project teaches valuable skills that translate well into larger items. The quilted layers give the wallet a padded feel, making it not only attractive but durable enough to protect its contents. Whether you prefer minimalist styles, playful patchwork, or elegant vintage-inspired designs, quilting allows you to personalize the piece while enjoying a relaxing and creative process.
Another reason the Quilted Coinpurse Wallet Pattern is so appealing is its versatility. You can shape your wallet into a square, rectangle, rounded silhouette, or even a flap style with a snap button closure. You can also embellish it with decorative stitching, embroidery, appliqué, or a zipper charm. Each small detail transforms the wallet into a unique expression of craftsmanship. Because it uses small fabric pieces, this project is also perfect for using leftover scraps from previous sewing or quilting projects, making it eco-friendly and budget-friendly.
Understanding the Quilted Coinpurse Wallet
A quilted coinpurse wallet is a small, padded wallet made by sewing together fabric and batting. The quilting gives the exterior its signature texture while adding structure and protection. Wallets made with quilting techniques can look simple or intricate depending on the stitches you choose—straight lines, diagonal crosshatching, or free-motion motifs. This flexibility allows anyone, regardless of skill level, to create a beautifully textured accessory.
The closure of the wallet can vary depending on the pattern. Some Quilted Coinpurse Wallet Pattern designs use a zipper, which provides security and a polished look. Others use snap buttons, magnetic clasps, or a fold-over flap, offering a softer and more traditional wallet style. The closure you choose influences the overall look and functionality of your wallet.
Most quilted wallets include an interior lining to give the inside a clean finish and hide all raw edges. Lining fabric also adds stability and durability. Many crafters choose contrasting or colorful linings, creating a delightful surprise every time the wallet is opened. You can also add pockets for cards, small compartments, or dividers if your pattern includes these features.
Because wallets are handled frequently, fabric choice matters. Cotton is the most common exterior fabric, especially quilting cotton because it behaves well when sewn and quilted. For a more structured feel, canvas or cotton-linen blends also work beautifully. You can fuse lightweight interfacing to the lining for additional structure if desired.
The shape and size can be adjusted easily. Some wallets are designed only for coins, while others can fit folded bills, cards, or small items. This flexibility makes the project suitable for various purposes—from everyday use to a special accessory in a larger tote bag.
Materials Needed for a Quilted Coinpurse Wallet
Making a Quilted Coinpurse Wallet Pattern requires basic materials that are easy to find. Start with your exterior fabric. Quilting cotton works best because of its softness and large variety of prints. This allows you to highlight your personal style, whether you enjoy florals, geometrics, vintage prints, modern minimalism, or fun novelty designs. Cotton-linen blends or canvas also create a sturdier wallet if you prefer extra durability.
Batting is essential for creating the quilted effect. Low-loft cotton batting works perfectly because it adds body without excessive bulk. Polyester batting also works and offers a slightly puffier texture. Fusible fleece is another option and is especially helpful if you want the batting to adhere smoothly to the fabric, making quilting easier for beginners.
For the closure, choose a zipper (usually 4–6 inches) if your wallet has a zippered opening. Choose a nylon coil zipper, which is easier to sew through. If your pattern uses hardware, choose a metal or plastic snap, magnetic clasp, or button. Each closure type adds a different aesthetic and level of security.
Your lining fabric should be a lightweight cotton. Solid colors or small prints work well and complement the exterior while adding personality. You may also include lightweight interfacing inside the lining for structure, depending on how firm you want the wallet to feel when handled.
Other materials and tools include strong polyester thread, scissors, rotary cutter, ruler, sewing clips or pins, an iron, and a sewing machine. These basic tools are accessible to beginners and allow you to complete the project with professional results. Optional additions like zipper pulls, charms, labels, or decorative buttons can enhance your wallet’s final look.
How to Sew a Quilted Coinpurse Wallet
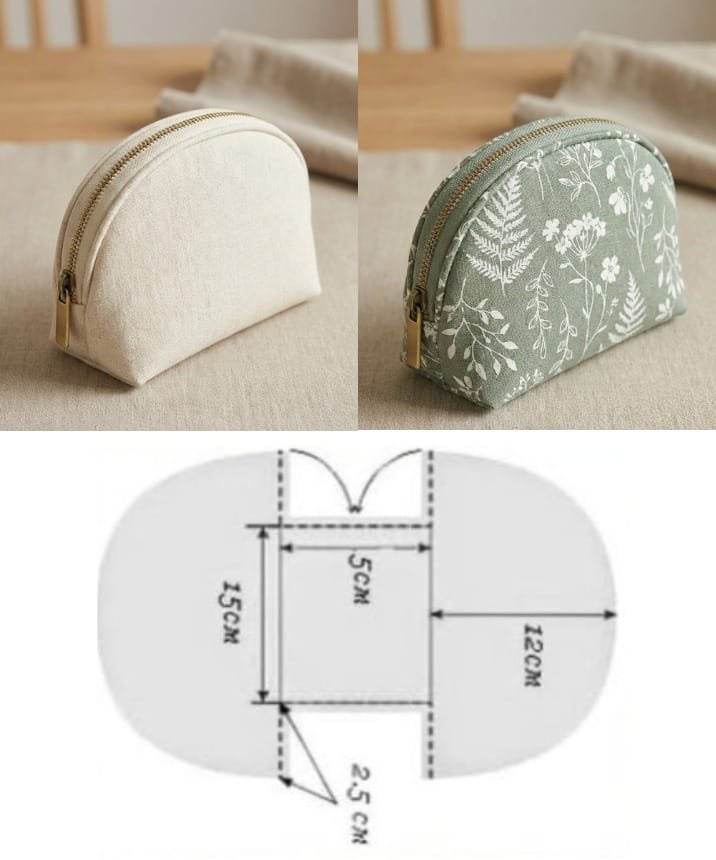
Begin by cutting your exterior fabric, lining pieces, and batting according to your Quilted Coinpurse Wallet Pattern. Typically, this involves cutting two rectangular pieces for the exterior and two for the lining. If your wallet has a flap, pockets, or rounded edges, cut these shapes as directed in the pattern. Place each exterior piece over a piece of batting and baste or fuse them together to prepare for quilting.
Quilt the layers using your preferred method. Straight-line quilting is the simplest for beginners, but diagonal lines, grid patterns, or decorative stitching all add beautiful texture. Take your time with this step, as the quilting design significantly influences the final look of the wallet. Once quilted, trim any excess batting and square the edges for a clean finish.
If your wallet includes an interior pocket, sew this before assembling the main body. Patch pockets, card slots, or small zipper compartments can be added to the lining piece to increase functionality. These details make your wallet practical and personalized.
If your design uses a zipper closure, attach it by placing the zipper right side down on the quilted exterior piece. Place the lining fabric over the zipper, right side down, aligning the edges. Sew along the zipper tape. Repeat for the opposite side. When finished, press the fabric away from the zipper to give it a neat look.
If your wallet uses a flap closure, sew the exterior and lining pieces together with right sides facing, then turn and press. Attach the flap to the back exterior piece according to the pattern. Add the snap or magnetic button either to the flap or body, depending on the design.
After attaching closures, layer the lining and exterior pieces right sides together. Sew around the perimeter, leaving a small opening for turning. If your wallet has boxed corners, shape these before turning. Trim extra bulk around corners and near the closure area to achieve smoother edges.
Turn the wallet right side out and push out all corners. Stitch the opening closed, either by hand or machine. Give the wallet a final press, ensuring all edges are crisp. Your quilted coinpurse wallet is now complete and ready to use or give as a handmade gift.
Creative Ideas for Your Quilted Coinpurse Wallet
One of the most exciting aspects of using a Quilted Coinpurse Wallet Pattern is customizing the design. Patchwork exteriors using leftover fabric scraps create a charming, colorful look and are perfect for quilters who enjoy mixing prints. Tiny squares, stripes, hexagons, or improv piecing add artistic flair.
Embroidery is a delightful way to personalize the wallet. You can stitch flowers, initials, or decorative motifs before quilting. Hand-embroidered wallets make thoughtful gifts with a personal touch. You can also incorporate appliqué shapes such as hearts, stars, or geometric forms for added dimension.
Variegated or metallic thread adds sparkle to the quilted lines, making even simple stitching stand out. These threads highlight the quilt texture and make the wallet visually striking. Use them sparingly or boldly depending on your style preference.
Try adding a wrist strap or key ring loop. This transforms your coinpurse wallet into a mini wristlet ideal for carrying essentials when you don’t want to bring a full bag. It also gives the wallet added functionality for everyday use.
If you enjoy themes or coordinated sets, make multiple wallets in different sizes or colors. Matching coinpurse wallets, pouches, and mini bags create beautiful gift sets and sell well at craft fairs.
Finally, consider using eco-friendly materials like organic cotton, recycled denim, or fabric scraps. Sustainable sewing practices benefit the environment while giving your handmade wallet a meaningful story.
FAQ About the Quilted Coinpurse Wallet Pattern
1. Is a quilted coinpurse wallet beginner-friendly?
Yes. The project is small, simple, and perfect for learning quilting and basic construction techniques.
2. Do I need special quilting tools?
No. Basic sewing tools work fine. A walking foot helps but is not required.
3. Can I add card pockets?
Yes. Many patterns include optional pockets, or you can add simple patch pockets to the lining.
4. Can I hand-quilt the wallet?
Absolutely. Hand quilting gives it a charming, traditional look.
5. Which zipper size is best?
A zipper between 4–6 inches is ideal for most small wallet designs.
Conclusion
Learning the Quilted Coinpurse Wallet Pattern is a fun, rewarding, and highly customizable sewing experience.
VIDEO TUTORIAL
From choosing fabrics to quilting designs and closure styles, every detail allows you to express your creativity while making something practical and beautiful. This small project is perfect for gifts, craft fairs, or simply adding a touch of handmade charm to your daily life.

