Creating a Pins & Paws Cat Quilt – Tutorial is the perfect way to combine your love for quilting and cats into a cozy and charming masterpiece.
This project is ideal for both beginners and seasoned quilters looking for a creative and fun challenge.
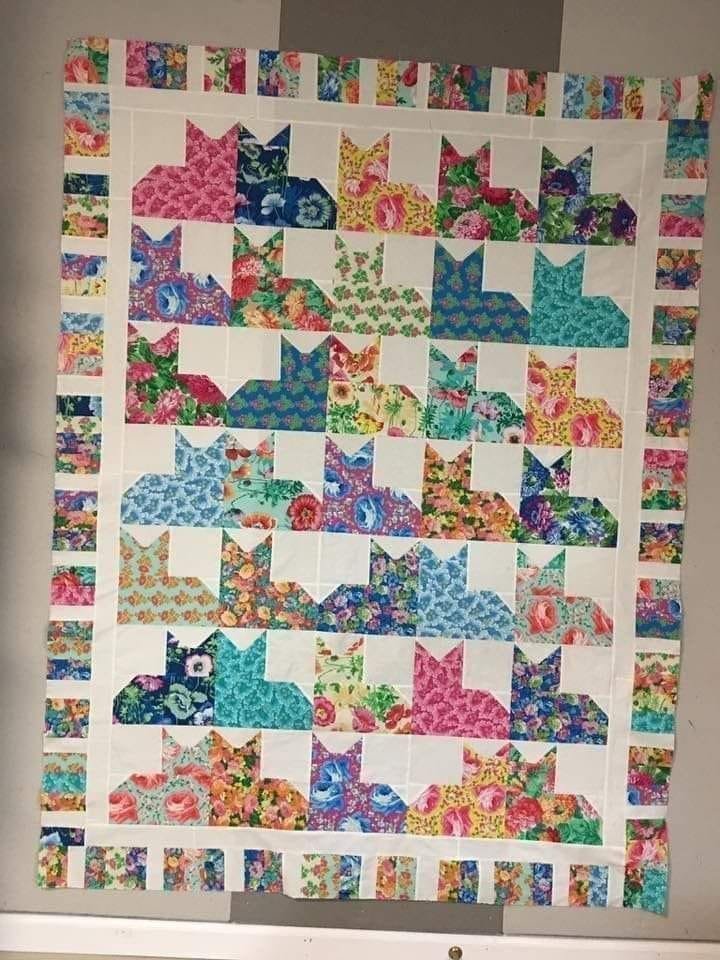
The quilt features delightful cat-inspired designs that add personality and warmth to your home or serve as a heartfelt gift for a fellow cat lover.
The process involves selecting fabrics, cutting precise shapes, and assembling the quilt with care.
By following this guide, you’ll learn how to create a stunning cat quilt step by step. With attention to detail and a bit of patience, you can craft a project that is both functional and beautiful.
Before getting started, gather all your materials. You’ll need a variety of fabrics in complementary colors, a rotary cutter, quilting rulers, pins, and a sewing machine.
The fabric choice is particularly important as it sets the tone of your quilt, so pick prints and solids that reflect the playful and whimsical nature of cats. Now, let’s dive into the details of the Pins & Paws Cat Quilt – Tutorial.
1. Selecting the Perfect Materials for Your Cat Quilt
The foundation of any successful quilt is choosing the right materials. For the Pins & Paws Cat Quilt, your fabric choices will determine its charm and durability.
Start with high-quality cotton fabric. Cotton is easy to work with and provides a smooth finish, making it a top choice for quilting. Look for fabrics that feature cat prints or complementary patterns to enhance the theme.
Select a cohesive color palette. Choose three to five colors that work well together. For a playful look, consider bright hues, or go for soft pastels for a more subdued aesthetic.
Don’t forget the background fabric. A neutral tone like white, gray, or cream works well as it allows the cat designs to stand out.
Choose batting that suits your quilt’s purpose. Lightweight batting is ideal for decorative quilts, while thicker batting is better for warmth and durability.
Pick matching thread for piecing and quilting. Neutral threads blend seamlessly, while contrasting threads can add visual interest.
Finally, gather your tools, including scissors, a rotary cutter, a cutting mat, pins, and a sewing machine. Ensuring you have everything on hand will streamline the quilting process.
2. Designing and Cutting the Cat Quilt Pieces
The design phase is where your quilt starts to come to life. For the Pins & Paws Cat Quilt, the focus is on creating adorable cat shapes.
Begin by sketching a layout for your quilt. Decide on the size, the number of cat blocks, and the placement of each design. This step helps ensure balance and symmetry.
Use templates for precise cutting. Printable cat-shaped templates are widely available online or can be created by tracing from a design book.
Cut your fabric pieces carefully. Use a rotary cutter for straight edges and scissors for intricate shapes like ears and tails. Precision is key to seamless assembly.
Label each piece. If your quilt features multiple blocks, label the fabric pieces to avoid confusion during assembly.
Consider adding appliqué details. Small features like whiskers or eyes can be appliquéd onto the fabric for added dimension and personality.
Test your layout before sewing. Arrange all the pieces on a flat surface to see how the colors and patterns work together. Make adjustments as needed before moving on to stitching.
3. Assembling the Quilt Blocks
With your pieces cut and organized, it’s time to assemble the quilt blocks. This step transforms your materials into cohesive designs for the Pins & Paws Cat Quilt.
Start by sewing smaller pieces together. Assemble the individual components of the cat shapes, such as the head, body, and tail, using a quarter-inch seam allowance.
Press the seams open. Use a hot iron to press each seam for a neat and flat finish. This step ensures your blocks fit together perfectly.
Join the cat blocks. Sew the assembled cat pieces to the background fabric, creating a complete quilt block.
Double-check measurements. Use a ruler to confirm that each block matches the intended size. Trim any excess fabric for uniformity.
Create rows of quilt blocks. Arrange the blocks into rows and sew them together. Press the seams between rows to ensure they lay flat.
Add sashing and borders. For a polished look, add sashing between the blocks and borders around the quilt. This frames the design and gives it a professional appearance.
4. Quilting and Finishing Touches
The final steps involve quilting and adding the finishing touches that complete the Pins & Paws Cat Quilt – Tutorial.
Layer the quilt sandwich. Lay the backing fabric flat, place the batting on top, and then add the quilt top. Smooth out any wrinkles and secure with basting pins.
Choose a quilting design. Simple straight-line quilting works well for beginners, while free-motion quilting adds intricate details for advanced quilters.
Quilt your design. Use your sewing machine to stitch through all three layers, starting from the center and working outward to prevent puckering.
Trim the edges. Once the quilting is complete, trim the excess batting and backing fabric to align with the quilt top.
Bind the quilt. Sew binding strips around the edges to encase the raw edges and give the quilt a finished look.
Add a label. Personalize your quilt with a label that includes your name, the date, and a special message. This adds a meaningful touch to your creation.
FAQ
1. How long does it take to make the Pins & Paws Cat Quilt?
The time required depends on your skill level and the size of the quilt. On average, it can take a few weeks to complete.
2. Can I use different fabrics for the cat designs?
Absolutely! Using various fabrics adds visual interest and makes each cat block unique.
3. What’s the best batting for a cat quilt?
Cotton batting is a great choice for its durability and natural feel, but polyester batting works well for added warmth.
4. How do I clean the quilt after it’s finished?
Wash the quilt in cold water on a gentle cycle and air dry or tumble dry on low heat.
5. Can I customize the size of the quilt?
Yes, you can adjust the number of blocks and the size of each block to fit your desired dimensions.
6. Do I need a sewing machine, or can I quilt by hand?
While a sewing machine speeds up the process, you can hand quilt if you prefer a more traditional approach.
Conclusion
The Pins & Paws Cat Quilt – Tutorial is a delightful project that combines creativity with functionality.
From selecting materials to finishing your quilt, each step is an opportunity to create something uniquely yours.
We hope this guide inspires you to embark on your quilting journey. Share your thoughts, feedback, and any suggestions in the comments below. Happy quilting!

