If you’re searching for a vibrant and intricate quilt block to add to your collection, the Pineapple Quilt Block – Free Tutorial is the perfect pattern for you.
Known for its detailed, symmetrical design, this classic quilt block is not only visually striking but also fun to create. Whether you’re a seasoned quilter or new to the craft, this tutorial will guide you through each step of the process, ensuring a beautiful result every time.
The Pineapple Quilt Block is a variation of the traditional log cabin block, characterized by its concentric layers of fabric strips that radiate from a central square.
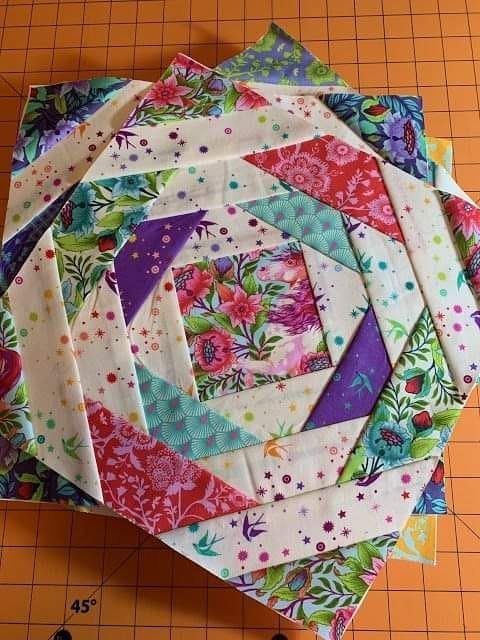
The geometric arrangement creates a dynamic, pineapple-like shape, making it one of the most visually interesting quilt blocks to work on. With some basic materials and a bit of patience, you can master this pattern and create stunning quilts for your home or to gift to loved ones.
In this free tutorial, we’ll take you through the process of cutting, assembling, and sewing the pineapple quilt block, ensuring that even beginners can follow along.
Whether you want to make a single block for a smaller project or multiple blocks for a full quilt, these instructions will help you achieve professional results. So, gather your materials and get ready to dive into the world of Pineapple Quilt Blocks!
1. Gathering Materials for the Pineapple Quilt Block
Before you begin this Pineapple Quilt Block – Free Tutorial, it’s important to gather all the necessary materials. Having everything ready will make the process smoother and ensure that your quilt block comes together seamlessly.
First, you’ll need fabric. Choose three to four different fabrics for the block, typically a mix of light, medium, and dark tones. The color contrast will help highlight the intricate pattern of the pineapple block. You can use solid colors or prints, depending on your desired aesthetic.
Next, you will need a rotary cutter and quilting ruler. The rotary cutter will help you make clean, precise cuts, which are essential for ensuring that all your fabric strips are the same size. A quilting ruler will help guide your cuts and keep your strips straight.
A cutting mat is also crucial for this project. It will protect your work surface and give you a smooth area to cut your fabric on. Make sure the mat is large enough to accommodate your fabric pieces.
You’ll also need thread that matches or contrasts with your fabric, depending on your preference. Cotton or polyester thread is typically used for quilting, as they are strong and durable.
Finally, you’ll need a sewing machine. While it is possible to sew a pineapple quilt block by hand, a sewing machine will save you time and ensure more even stitches. Make sure your machine is set up with the correct needle and tension for quilting.
Once you have all your materials ready, you’re set to begin constructing your Pineapple Quilt Block.
2. Cutting the Fabric for the Pineapple Quilt Block
Now that you have all your materials, it’s time to start cutting the fabric. Accurate cutting is essential to ensure that your Pineapple Quilt Block comes together smoothly. The block is made up of strips of fabric that radiate from a central square, so it’s important that all strips are cut evenly.
Start by cutting a 2.5-inch square for the center of the block. This square will be the focal point of the pineapple design, and you can choose a bold color or pattern to make it stand out.
Next, cut several 1.5-inch strips of your chosen fabrics. You’ll need both light and dark strips, as these will be alternated around the center square to create the pineapple pattern. Make sure your strips are cut straight and even to avoid any wonky lines when you sew them together.
Once your strips are cut, organize them by color and tone. This will make it easier to grab the right strip as you start assembling the block. Keeping your workspace tidy will also help you avoid any mistakes during the sewing process.
Cutting the strips accurately is key to achieving the signature sharp, geometric look of the Pineapple Quilt Block. Take your time with this step to ensure precision, as it will make the sewing process much easier later on.
Now that you have your center square and strips cut, it’s time to start sewing the pieces together and watching your pineapple block take shape.
3. Sewing the Pineapple Quilt Block
The Pineapple Quilt Block – Free Tutorial requires precise sewing to achieve the desired look. Now that your fabric strips and center square are ready, it’s time to begin the assembly process. Don’t worry if it seems complicated at first—by following these steps, you’ll master the technique in no time.
Start by sewing your first light fabric strip to one side of the center square. Make sure the edges are aligned, and use a ¼-inch seam allowance for all seams. Press the seam open to ensure that the fabric lies flat.
Next, sew another light strip to the adjacent side of the square, creating an L-shape around the center. Repeat this process for the remaining two sides of the square, so that the center is framed by the light strips.
Now, it’s time to add the first dark fabric strip. Starting on one side of the block, sew a dark strip to the light strip you just added. Continue sewing dark strips around the block, alternating between light and dark fabrics.
As you sew, it’s important to keep your seams straight and your strips aligned. This will ensure that the pineapple pattern remains symmetrical and even. Use pins if necessary to hold the strips in place while you sew.
Once all the strips are sewn on, press the entire block to ensure that all seams are flat and even. This will give the block a polished look and make it easier to join with other blocks later on.
Repeat this process for each layer of fabric strips until the block reaches the desired size. The alternating layers of light and dark fabrics will create the iconic pineapple shape.
4. Finishing the Pineapple Quilt Block
Once you’ve completed the sewing and your block is the correct size, it’s time to finish your Pineapple Quilt Block. Finishing touches are crucial to ensure that the block looks professional and is ready to be joined with other blocks.
First, check all your seams. Make sure that they are even and that none of the fabric is puckering. If you notice any issues, you can go back and resew any uneven seams.
Next, square up the block. This involves trimming the edges to ensure that the block is perfectly square and all sides are even. Use your quilting ruler and rotary cutter to carefully trim any excess fabric. Squaring up the block will make it easier to join with other blocks and give your quilt a clean, professional finish.
Once the block is squared, press it one final time. This will help set the seams and give the block a crisp, polished appearance. Make sure all the layers are lying flat, and that the block is wrinkle-free.
Now your Pineapple Quilt Block is complete! You can use this block as part of a larger quilt, or as a stand-alone project for a pillow, wall hanging, or other decorative items.
By following these steps, you’ve successfully created a beautiful pineapple quilt block that you can be proud of. Keep experimenting with different fabric combinations and colors to create unique variations of this classic design.
FAQ
What is a Pineapple Quilt Block?
A Pineapple Quilt Block is a variation of the log cabin quilt block, known for its intricate geometric design. It features layers of fabric strips that radiate from a central square, creating a pineapple-like pattern.
Is the Pineapple Quilt Block suitable for beginners?
Yes! While the Pineapple Quilt Block may look complicated, it is suitable for quilters of all skill levels. With patience and attention to detail, even beginners can successfully complete this block by following the free tutorial.
How much fabric do I need for the Pineapple Quilt Block?
For a single pineapple quilt block, you’ll need fabric in three or four different colors, typically light, medium, and dark tones. The amount of fabric will depend on the size of the block, but generally, fat quarters or fabric scraps will work well.
Can I hand-sew the Pineapple Quilt Block?
Yes, while most quilters prefer to use a sewing machine for this project, it is possible to hand-sew the Pineapple Quilt Block. Just ensure that your stitches are even and tight to maintain the block’s structure.
How do I finish my Pineapple Quilt Block?
After completing the sewing, square up the block by trimming the edges with a rotary cutter and quilting ruler. Press the block one final time to ensure that the seams are flat and the block is wrinkle-free.
What projects can I make with the Pineapple Quilt Block?
The Pineapple Quilt Block can be used in a variety of quilting projects, including full-size quilts, pillows, wall hangings, and more. The versatile design allows for endless creative possibilities.
Join our VIP broadcast list and gain access to exclusive patterns, all for free. As a VIP member, you’ll receive the best patterns daily, delivered directly to your device. ✨📱 It’s a unique opportunity to stay up-to-date with the latest trends and designs, curated just for you. Don’t miss out on enhancing your projects and discovering new inspirations with the best patterns every day! 🎨🔝
Conclusion
In this Pineapple Quilt Block – Free Tutorial, we’ve walked through all the essential steps needed to create this intricate and beautiful quilt block. From gathering your materials and cutting your fabric to sewing and finishing the block, this tutorial ensures that even beginners can tackle the project with confidence. The result is a visually striking pineapple quilt block that can be used in a variety of quilting projects.
We hope this guide has inspired you to create your own pineapple quilt block! We would love to hear your feedback, so please leave a comment below with your thoughts and any suggestions for future tutorials. Happy quilting!

