Keeping your sewing machine protected while adding a touch of personality to your workspace is essential for any sewing enthusiast.
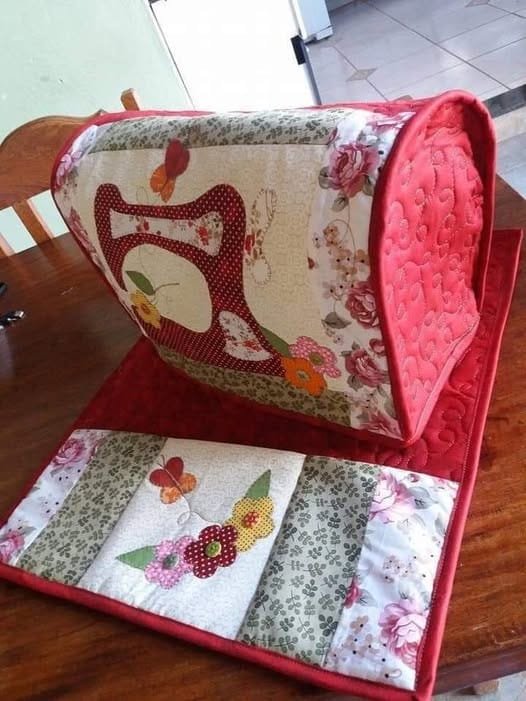
The Peach of a Machine Cover Pattern is a delightful and practical project that combines functionality with creativity.
Whether you are an experienced quilter or a beginner looking for a simple yet rewarding task, this free pattern will help you create a beautiful cover for your machine.
A well-made sewing machine cover prevents dust buildup, keeps your machine clean, and can even add a decorative element to your sewing room.
The Peach of a Machine Cover Pattern is customizable, allowing you to choose your favorite fabrics, colors, and embellishments. With easy-to-follow steps, you’ll have a stylish and protective cover in no time.
In this tutorial, we’ll go over everything you need to know about making this adorable sewing machine cover, from materials and cutting fabric to assembling the pieces and adding finishing touches. Let’s get started!
1. Materials Needed for the Peach of a Machine Cover Pattern
Before beginning your project, it’s essential to gather all necessary materials. Having everything ready will make the process smoother and more enjoyable.
- Fabric selection: Choose high-quality cotton fabric for durability and aesthetics.
- Lining fabric: A lightweight cotton or muslin works well for the inside.
- Batting: Provides extra protection and structure to the cover.
- Bias tape or binding: For clean edges and a professional finish.
- Thread: Match or contrast depending on your design preference.
- Measuring tape: Ensures precise cutting and accurate fitting.
When selecting fabric, consider coordinating patterns or solid colors that match your sewing room decor. Adding quilted panels or embroidery can enhance the design and give it a personalized touch.
Having the right batting thickness is also important. A medium-weight batting works well for structure without being too stiff. If you prefer a softer cover, a lightweight batting will be a better choice.
Finally, using a sturdy, high-quality thread ensures durability. Polyester thread is often preferred for sewing projects, but cotton thread works well for quilting designs.
2. Cutting and Preparing Your Fabric
Once all materials are gathered, the next step is to cut and prepare your fabric pieces. Accuracy is key in this step to ensure a perfectly fitting cover.
- Measure your sewing machine: Take width, height, and depth measurements to determine fabric size.
- Cut main fabric panels: Cut one large piece for the front and back, two side pieces, and one top panel.
- Cut lining fabric: These should be the same size as the outer fabric pieces.
- Cut batting: Slightly smaller than fabric pieces to prevent bulkiness in the seams.
- Add seam allowances: Ensure at least ¼ inch seam allowance on all sides.
To create a professional look, pressing fabric before sewing is recommended. Ironing out any wrinkles helps with accurate measurements and cutting.
Adding fusible interfacing can also provide extra stability if desired. This is particularly helpful if you want your cover to maintain a structured shape over time.
If you plan to add decorative elements like pockets or applique, prepare those pieces before assembling the cover. This allows for easier attachment without interfering with the final sewing steps.
3. Sewing the Machine Cover
Now that all fabric pieces are prepared, it’s time to assemble the Peach of a Machine Cover Pattern. Follow these steps carefully to achieve a clean and professional look.
- Quilt the fabric layers: Sandwich batting between the outer fabric and lining, then quilt as desired.
- Sew side panels to the top panel: Ensure alignment and use a ¼ inch seam allowance.
- Attach front and back panels: Pin carefully to avoid shifting.
- Topstitch for durability: Strengthen seams and create a polished appearance.
- Attach binding: Use bias tape or binding to finish raw edges neatly.
- Add decorative elements: Sew on pockets, applique, or embroidery details if desired.
A walking foot attachment can be helpful when quilting the fabric layers together. It prevents shifting and puckering, resulting in even stitches.
When attaching binding, using clips instead of pins can help secure it evenly. Hand-stitching the binding can provide a clean and seamless finish if preferred.
If you want a snug fit, consider adding ties or Velcro closures at the sides. This will keep the cover securely in place over your sewing machine.
4. Final Touches and Customization
The best part about making the Peach of a Machine Cover Pattern is adding personal touches. This is where you can get creative and make the cover truly unique.
- Embroidered initials or designs: Add a personalized monogram or floral details.
- Decorative stitching: Use contrasting thread for an eye-catching look.
- Fabric embellishments: Ribbons, lace, or buttons can enhance the design.
- Pockets for storage: Add a front pocket for small sewing accessories.
- Patchwork style: Use fabric scraps to create a fun patchwork effect.
- Coordinating sewing accessories: Make a matching pincushion or organizer.
For those who love embroidery, adding hand-stitched motifs can bring a unique handmade feel to the cover. Floral patterns, sewing-related icons, or whimsical designs are great choices.
Using decorative topstitching can also elevate the final look. Experiment with different stitch patterns on your sewing machine to add extra detail.
A pocket on the side can hold bobbins, scissors, or measuring tape, making it a practical addition. Consider using contrasting fabric for the pocket to make it stand out.
FAQ
Q: Can I adjust the size of the cover for different sewing machines?
A: Yes! Simply take accurate measurements of your machine and adjust the fabric dimensions accordingly.
Q: What is the best fabric for making a sewing machine cover?
A: Cotton or canvas fabric works best for durability, but quilting cotton with batting provides a structured and decorative look.
Q: Do I need a sewing machine to make this cover?
A: While a sewing machine makes the process faster, you can also sew this cover by hand with a strong running stitch.
Q: Can I wash the machine cover?
A: Yes, using machine-washable fabrics allows you to clean the cover easily. Gentle washing is recommended.
Q: How can I add personalization to my machine cover?
A: You can use applique, embroidery, patchwork, or decorative stitching to customize the look.
Q: Is batting necessary for this project?
A: Batting provides structure and protection, but if you prefer a lightweight cover, you can omit it.
Join our VIP broadcast list and gain access to exclusive patterns, all for free. As a VIP member, you’ll receive the best patterns daily, delivered directly to your device. ✨📱 It’s a unique opportunity to stay up-to-date with the latest trends and designs, curated just for you. Don’t miss out on enhancing your projects and discovering new inspirations with the best patterns every day! 🎨🔝
Conclusion
The Peach of a Machine Cover Pattern is a fantastic project for sewers of all skill levels. Not only does it keep your sewing machine clean and dust-free, but it also allows you to showcase your creativity.
By selecting beautiful fabrics, adding decorative touches, and ensuring a perfect fit, you can create a stylish and functional cover that complements your sewing space.
We hope this tutorial has inspired you to start your own machine cover project! If you have any questions or suggestions, feel free to leave a comment below. Happy sewing!

