The Paisley Splash Quilt Pattern is a vibrant and eye-catching design that brings life and movement to any quilting project. Whether you are a seasoned quilter or a curious beginner, this pattern combines the timeless elegance of the paisley motif with a fun, modern splash effect. Right from the first stitch, the Paisley Splash Quilt Pattern promises a creative journey full of color, detail, and personal expression.
This pattern is beloved for its flowing teardrop shapes and dynamic layout, making it perfect for statement pieces such as wall hangings, throws, or even full-sized bed quilts. Using bold fabrics or soft pastels, quilters can adapt the Paisley Splash Quilt Pattern to match any theme or mood. It allows for flexibility in fabric selection and encourages experimentation with texture, tone, and contrast.
In this article, we’ll guide you through the essential elements of the Paisley Splash Quilt Pattern, from choosing fabrics to stitching techniques. We’ll also provide helpful tips to get your quilt just right and answer the most common questions about working with this stunning pattern. Let’s dive into this joyful and artistic quilting adventure.
Understanding the Paisley Motif in Quilting
The paisley design has roots that go back centuries, known for its iconic curved teardrop shape that often symbolizes life and eternity. When incorporated into quilts, this motif adds elegance and movement that is hard to achieve with geometric blocks alone.
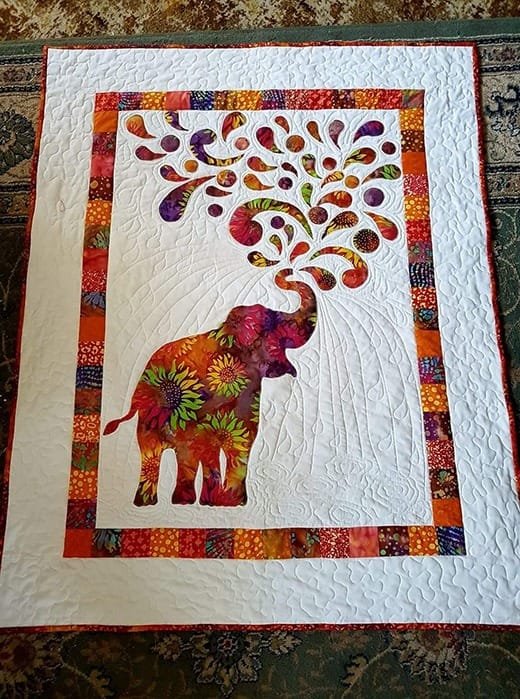
In the Paisley Splash Quilt Pattern, the paisley shapes are typically arranged in a way that creates flow and rhythm across the surface of the quilt. This allows your finished piece to have an almost watercolor effect, as if the design is dancing on the fabric.
Choosing fabrics for this style is a crucial first step. Look for prints that complement the organic lines of paisley, or solids that make the shapes stand out boldly. Blenders, batiks, and even ombré fabrics can also add depth and energy to the pattern.
Color placement plays a huge role in the final look of your quilt. Contrasting colors will highlight the splash elements, while analogous shades can create a more subtle and sophisticated effect. The pattern gives you freedom to play.
Most Paisley Splash Quilt Patterns use appliqué techniques to add the curved shapes to a base layer. This means you can position and layer them exactly where they look best before stitching them down. It’s a forgiving method, perfect for those who like to adjust as they go.
For quilting lines, consider echo quilting or stippling around the paisley shapes. These options help the motifs pop while adding texture. Some quilters even trace the outlines of the paisleys to enhance their movement visually.
Choosing the Right Materials for the Paisley Splash Quilt
Success with the Paisley Splash Quilt Pattern starts with selecting quality materials. Since this pattern relies on visual flow, your fabric and thread choices will define the final aesthetic.
Start by selecting a base fabric that acts as your canvas. White, cream, or grey backgrounds are safe choices, but a bold dark base can also make your paisleys shine. Consider the balance between the background and the paisley fabrics.
For the paisley shapes, you’ll need an assortment of colorful scraps or fat quarters. Choose fabrics with a mix of tone and print density. Too many busy prints might compete with each other, so aim for harmony in your selection.
Stabilizers can be helpful, especially if you are doing raw edge appliqué. Fusible web allows you to position the shapes firmly before sewing, ensuring clean lines and fewer puckers. This adds to the professional finish of your quilt.
When it comes to thread, match it to your paisley pieces if you want them to blend, or choose a contrasting thread if you want them to stand out. Variegated thread can also add interesting color transitions across the quilting lines.
Needles and cutting tools must be sharp to handle the curves smoothly. Rotary cutters work well for large pieces, but precision scissors are better for fine cutting. A good appliqué foot for your sewing machine also helps with accurate stitching.
Consider your batting choice carefully. A low-loft cotton batting is ideal for keeping the quilt flat and emphasizing the stitched design. It’s easier to quilt through and provides a soft, comforting finish.
Techniques for Crafting the Perfect Paisley Shapes
The paisley shape may look intricate, but with the right approach, it becomes an enjoyable part of the quilting process. Many Paisley Splash Quilt Patterns come with templates that make tracing and cutting easy.
Begin by printing or drawing your paisley templates on cardstock. Use these to trace the shapes onto your fabric and fusible web. Be consistent with your shapes, but don’t be afraid to vary sizes slightly for a more dynamic layout.
Cut your fabric shapes carefully, following the traced lines. Try using small, sharp scissors for tight curves. If you’re new to appliqué, practice a few shapes first on scrap fabric to get a feel for the process.
Fuse the shapes onto your quilt top according to your layout plan. Lay everything out before pressing to allow for repositioning. This stage lets your creativity shine—try asymmetrical arrangements for a more artistic feel.
When sewing the shapes down, choose a stitch that suits your style. Satin stitch creates a bold outline, while a narrow zigzag or straight stitch offers a subtler effect. Use stabilizer if needed to prevent puckering.
Layering paisley shapes is a unique feature of this pattern. You can overlap them slightly to create the splash effect. Make sure your stitching secures all layers, especially at the points of overlap.
Finish by quilting around each shape or filling the background with texture. This helps the paisleys stand out and adds movement. Match your quilting style to your fabric and thread choices for the best results.
Creative Ideas and Personalization Tips
The Paisley Splash Quilt Pattern is not limited to traditional color palettes or layout structures. One of the joys of this design is its adaptability to your own style and purpose.
Try using themed fabrics, such as florals for a spring quilt or jewel tones for a bohemian feel. You can even make holiday-themed paisley quilts using reds, greens, and golds for a festive effect.
Mix different textures within your fabric choices. Velvet, satin, or metallic cotton can be used sparingly to highlight certain paisleys and create visual interest. Just ensure they’re easy to work with on your machine.
Add embroidery or beading for extra dimension. This takes time, but the results are unique and can transform a simple quilt into an heirloom-worthy piece.
If you’re making a gift, consider personalizing the quilt with initials or a small message embroidered inside one of the paisley shapes. This adds a loving, thoughtful detail.
Scale the pattern up or down. You can create a mini quilt or pillow cover using just a few paisley shapes, or go large for a statement bedspread. Adjust your template sizes accordingly.
Lastly, trust your instincts. The best Paisley Splash Quilt Pattern results come from quilters who allow themselves to experiment and express something personal through color and form.
FAQ: Paisley Splash Quilt Pattern
What size should my paisley shapes be?
The size depends on the final quilt dimensions and your visual preference. Most shapes range between 3 to 7 inches in length. You can mix sizes for a dynamic look.
Is the Paisley Splash Quilt suitable for beginners?
Yes! While the curves may seem complex, using fusible web and basic appliqué stitches makes it beginner-friendly. Start with fewer shapes to build confidence.
Do I need a special sewing machine for appliqué?
Not necessarily. A regular machine with a zigzag stitch is enough. An appliqué foot can help with visibility, but it’s not essential.
Can I use hand stitching instead of machine appliqué?
Absolutely. Hand appliqué gives a delicate, traditional finish and is perfect for portable projects. Just use tight, secure stitches.
How long does it take to complete a Paisley Splash Quilt?
It depends on the size and your pace. A small wall quilt might take a few days, while a full-size quilt could take several weeks with consistent work.
Can I wash my quilt after finishing it?
Yes, but it’s best to use gentle settings and cold water. Pre-wash your fabrics to prevent bleeding and consider adding a color catcher for safety.
Conclusion
The Paisley Splash Quilt Pattern offers quilters a chance to break free from rigid lines and embrace flowing, expressive design. From fabric selection to appliqué techniques, every step is an opportunity to bring out your creativity and make something truly special. Whether you’re making a gift, decorating your home, or simply exploring new quilting skills, this pattern is both rewarding and visually stunning.
We hope this guide has helped you feel confident and inspired to try the Paisley Splash Quilt Pattern in your next project. If you’ve already tried it or plan to, leave your honest opinion and share your suggestions—your feedback helps make the quilting community even better!

