The Nordic Heart Block is a beautiful and timeless quilt block design that captures the elegance of Scandinavian style. In this Nordic Heart Block – Tutorial, we will guide you through the process of creating this heartwarming block step by step.
Whether you’re a seasoned quilter or a beginner, this tutorial will help you achieve a stunning design, perfect for any quilt. The Nordic Heart Block is known for its simplicity and charm, making it a wonderful addition to your quilting repertoire.
In this tutorial, we’ll cover everything from selecting the right fabrics to cutting, sewing, and assembling your Nordic Heart Block. This pattern is versatile, allowing for creativity in fabric choice and color, which means that each block can have its own unique flair.
By the end of this Nordic Heart Block – Tutorial, you’ll have the skills and confidence to create this lovely design.
Let’s dive into the details of the Nordic Heart Block, explore its construction, and understand how it can be the highlight of your next quilting project. Whether you’re planning to use it for a full quilt or a decorative pillow, this tutorial will cover all the steps to make it with ease.
1. Preparing Your Materials for the Nordic Heart Block
The first step in this Nordic Heart Block – Tutorial is gathering the right materials. Preparation is key to ensuring a smooth and enjoyable quilting experience.
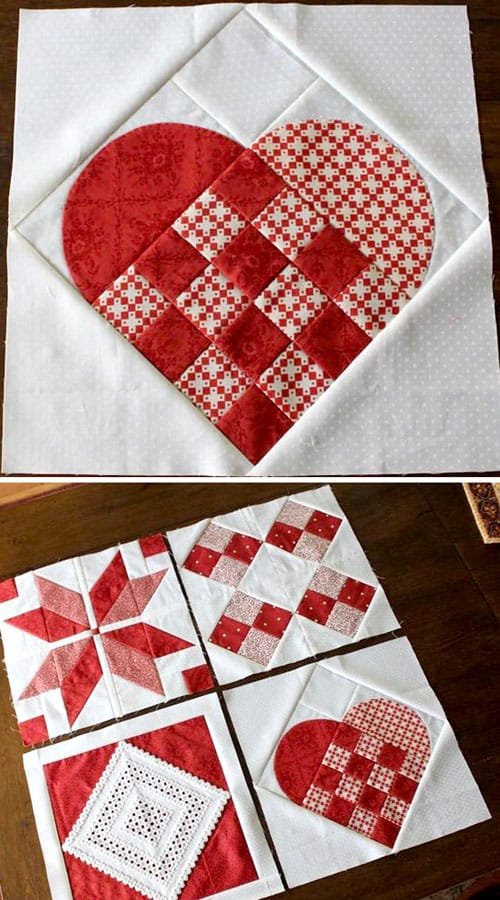
- Selecting the Fabric: The Nordic Heart Block shines with a combination of bold and neutral fabrics. Choose a mix of solid and patterned fabrics, with contrasting colors to make the heart pattern stand out. Red, white, and gray are popular choices, reflecting a classic Nordic color palette.
- Cutting Tools: Accurate cutting is essential for creating neat quilt blocks. Make sure you have a rotary cutter, a self-healing cutting mat, and a quilting ruler. These tools will help you cut precise fabric pieces, making assembly much easier.
- Sewing Machine: While this block can be hand-sewn, using a sewing machine will speed up the process and ensure uniform stitches. A standard sewing machine with a ¼-inch foot is ideal for piecing together your Nordic Heart Block.
- Pins and Clips: Keep your fabric pieces in place as you sew by using pins or sewing clips. This will prevent your pieces from shifting, ensuring that the seams align perfectly for a professional finish.
- Iron and Pressing Tools: Pressing is a crucial part of quilting. After sewing each seam, press your fabric pieces with an iron to ensure that everything lies flat and looks neat. A small pressing board and a steam iron will be useful throughout the process.
- Thread and Needles: Choose a high-quality cotton thread that matches your fabric. This will ensure strong seams and prevent thread breakage. Also, make sure you have sharp sewing needles for your machine.
2. Cutting and Piecing the Fabric
Once you’ve gathered all your materials, it’s time to start cutting and piecing the fabric for your Nordic Heart Block. Careful cutting and accurate measurements are key to achieving a perfect heart shape.
- Cutting the Background Fabric: Start by cutting your background fabric into squares and rectangles. The size of the fabric pieces will depend on the size of the quilt block you want to create, but typically, 4-inch squares work well for the Nordic Heart Block.
- Cutting the Heart Pieces: Next, cut your heart-shaped pieces from your main fabric. You will need triangles and rectangles to form the heart. Make sure the pieces are symmetrical, as this will help the heart pattern to align properly when sewn together.
- Marking the Seam Lines: Before you begin sewing, use a fabric marker or chalk to mark the seam lines on the back of your fabric pieces. This will help guide your sewing and ensure accurate seams.
- Arranging the Pieces: Lay out all of your fabric pieces on a flat surface in the shape of the heart. This will help you visualize how the final Nordic Heart Block will look and ensure that all of your pieces are in the correct position before sewing.
- Joining the Triangles: Start by sewing the small triangles to the corners of the squares to form the top of the heart. Make sure to sew with a ¼-inch seam allowance for accuracy.
- Sewing the Rows Together: After all the individual pieces are sewn together, it’s time to join the rows. Sew the rows together one by one, pressing the seams flat after each step. This will create the complete heart shape in the center of your quilt block.
3. Assembling the Nordic Heart Block
Now that the individual pieces of the Nordic Heart Block are ready, it’s time to assemble the entire block. This is where the design really starts to come together, and the heart pattern will become clear.
- Aligning the Rows: Before sewing the rows together, make sure that the seams between the rows align perfectly. This will help ensure that the heart shape is symmetrical and clean.
- Sewing the Rows: Start by sewing the top row to the second row, continuing down until all rows are joined. Use pins or clips to keep the pieces aligned as you sew, and remember to press each seam flat as you go.
- Checking for Symmetry: After sewing all the rows together, take a moment to check that the heart pattern is symmetrical. If any seams are slightly misaligned, you can adjust them by pressing or carefully re-sewing.
- Pressing the Seams: Once the entire block is assembled, press all the seams one last time. This will help flatten the block and give it a polished, professional look.
- Trimming the Edges: Use a rotary cutter and quilting ruler to trim the edges of the block, ensuring that the Nordic Heart Block is square and even. This will make it easier to join with other blocks in a quilt.
- Final Inspection: Inspect the entire block for any loose threads or uneven seams. This is your last chance to make adjustments before moving on to the next step in your quilt project.
4. Using the Nordic Heart Block in Quilting Projects
Once your Nordic Heart Block is complete, you can incorporate it into a variety of quilting projects. Whether you’re making a full quilt, a wall hanging, or a pillow, this versatile block adds a touch of Scandinavian charm to any design.
- Making a Full Quilt: To create a full quilt using the Nordic Heart Block, simply repeat the block several times, alternating fabric colors for variety. Arrange the blocks in rows and sew them together to form the quilt top.
- Adding Borders: If you’d like to frame your Nordic Heart Block, consider adding borders around the edges. A simple solid color or patterned border can enhance the heart design and make the block stand out even more.
- Incorporating into Other Quilts: The Nordic Heart Block can be used as an accent block in other quilt patterns. For example, you could mix it with traditional blocks like the log cabin or flying geese to create a unique and personalized quilt.
- Making a Pillow: The Nordic Heart Block is the perfect size for a decorative pillow. After assembling the block, simply add a backing and stuff the pillow with batting for a cozy home accessory.
- Creating a Wall Hanging: A single Nordic Heart Block can also be turned into a wall hanging. Add a simple border, quilt the layers together, and hang it up for a beautiful display of your quilting skills.
- Gifting the Block: The Nordic Heart Block makes a thoughtful and handmade gift for loved ones. Use it to create a custom quilt or a set of matching pillows for a unique and personal touch.
FAQ
What is the Nordic Heart Block?
The Nordic Heart Block is a quilt block design featuring a heart shape, inspired by Scandinavian style. It’s a simple yet elegant block that can be used in a variety of quilting projects.
Is the Nordic Heart Block suitable for beginners?
Yes, the Nordic Heart Block is suitable for quilters of all levels, including beginners. The pattern is straightforward, and with careful cutting and sewing, it can be mastered by those new to quilting.
What fabrics work best for the Nordic Heart Block?
Cotton fabrics are ideal for the Nordic Heart Block. Choose contrasting colors for the background and heart pieces to make the design stand out. Solid colors or small patterns work well for this block.
What size should the Nordic Heart Block be?
The size of the Nordic Heart Block can vary depending on your project. Typically, a finished block is around 12 inches, but you can adjust the size by cutting your fabric pieces larger or smaller.
Can I sew the Nordic Heart Block by hand?
While it’s possible to sew the Nordic Heart Block by hand, using a sewing machine is recommended for speed and accuracy. A sewing machine ensures uniform seams, which is important for a clean, professional finish.
How can I use the Nordic Heart Block in a quilt?
The Nordic Heart Block can be used as a standalone block or repeated to create a full quilt. You can also mix it with other quilt blocks to create a unique design, or use it in smaller projects like pillows or wall hangings.
Join our VIP broadcast list and gain access to exclusive patterns, all for free. As a VIP member, you’ll receive the best patterns daily, delivered directly to your device. ✨📱 It’s a unique opportunity to stay up-to-date with the latest trends and designs, curated just for you. Don’t miss out on enhancing your projects and discovering new inspirations with the best patterns every day! 🎨🔝
Conclusion
In this Nordic Heart Block – Tutorial, we’ve walked you through every step of creating this charming quilt block, from gathering materials to assembling and using the block in various quilting projects. The Nordic Heart Block is a versatile design that adds warmth and beauty to any quilt, making it perfect for both experienced quilters and beginners.
We’d love to hear your thoughts on this tutorial! Please share your experiences, feedback, or suggestions in the comments. What project will you use the Nordic Heart Block for? Let us know!

