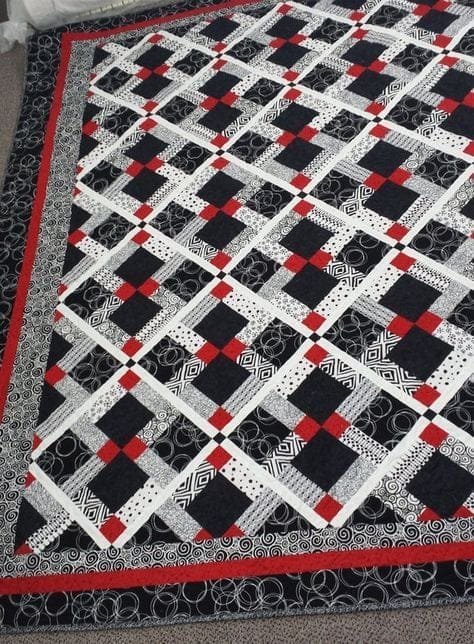
If you’re looking for a fun and versatile quilting project, the Nine Patch Bento Box Quilt Pattern – Tutorial is a perfect choice.
This pattern combines the simplicity of the classic nine-patch block with the more intricate and contemporary bento box design, resulting in a stunning quilt that can be adapted to a variety of sizes and color schemes.
Whether you’re a beginner or an experienced quilter, this project will inspire your creativity while helping you hone your quilting skills.
The Nine Patch Bento Box Quilt Pattern – Tutorial teaches you how to create a quilt that’s not only visually appealing but also functional.
The design involves cutting and reassembling blocks in a way that creates an interlocking pattern, reminiscent of Japanese bento boxes. This process is both enjoyable and meditative, allowing you to focus on precision and design while creating a unique and striking quilt.
In this tutorial, you’ll find a detailed guide on how to master the Nine Patch Bento Box Quilt Pattern, from choosing fabrics to cutting and assembling the blocks.
By following the steps carefully, you’ll end up with a quilt that’s perfect for gifting or adding a cozy touch to your home. Let’s dive into the process and get started on your next quilting masterpiece!
1. Understanding the Nine Patch Block
The nine-patch block is a basic yet essential element in quilting, and mastering it is key to creating the Nine Patch Bento Box Quilt Pattern. This block is made by sewing together nine squares in a grid, forming a larger square. It’s one of the most beginner-friendly blocks, making it ideal for those just starting their quilting journey.
- Choosing Fabrics for Your Nine Patch Block: The first step is selecting your fabrics. For this quilt, consider choosing fabrics with a strong contrast in color or pattern to highlight the grid structure. This contrast will make your quilt pop and give the bento box effect more definition.
- Cutting the Fabric: Accuracy is crucial when cutting your fabric squares. Each square should be the same size, typically 2.5 inches or 4.5 inches, depending on your desired quilt size. Use a rotary cutter and ruler to ensure straight edges and uniform pieces.
- Sewing the Nine Patch Block: Once your squares are cut, begin sewing them together in rows. Press the seams after each row to ensure a neat and flat finish. Then, sew the rows together to complete the nine-patch block. Remember to match your seams carefully for a precise look.
- Arranging Your Nine Patch Blocks: After sewing several nine-patch blocks, lay them out to see how they interact. You can experiment with different color arrangements before moving on to the next step, where the blocks will be sliced and reassembled.
- Adding Personal Touches: The nine-patch block offers plenty of room for customization. You can add embroidered details or mix in patterned fabrics for a unique twist. These personal touches will make your quilt truly one-of-a-kind.
- The Importance of Practice: If you’re new to quilting, practicing the nine-patch block will help you gain confidence in cutting and sewing. Take your time to ensure precision, as this will set the foundation for the entire Nine Patch Bento Box Quilt Pattern.
2. Creating the Bento Box Design
Now that you’ve mastered the nine-patch block, it’s time to move on to the bento box design element of the Nine Patch Bento Box Quilt Pattern. This design is all about slicing and rearranging blocks to create an interlocking effect that adds depth and visual interest to your quilt.
- Cutting the Blocks: Once your nine-patch blocks are completed, you’ll cut them into quarters. This process is where the magic of the bento box design begins, as it allows you to rearrange the smaller blocks to create a more intricate pattern.
- Reassembling the Blocks: After cutting the blocks, you’ll rearrange the pieces to form a bento box effect. Typically, you’ll rotate the quarters and swap them with pieces from other blocks to create a cohesive yet varied design. This step requires attention to detail, but the results are worth the effort.
- Sewing the Reassembled Blocks: Once you’re satisfied with the arrangement, sew the pieces back together. Be sure to press your seams carefully to maintain a flat and smooth surface. Precision is key here, as any misalignment could throw off the bento box effect.
- Playing with Color: The bento box design allows for endless creativity with color. You can opt for a monochromatic scheme for a modern look, or mix and match vibrant hues for a more playful effect. The choice is yours, and this flexibility is one of the reasons why the Nine Patch Bento Box Quilt Pattern is so popular.
- Creating a Balanced Design: When arranging your blocks, aim for a balanced distribution of colors and patterns. This will help the eye move across the quilt and enhance the overall aesthetic. Don’t be afraid to play around with different layouts before committing to the final design.
- Adding Borders: Once your bento box blocks are sewn together, consider adding a border to frame the quilt. A solid-color border can help balance the intricate pattern inside, while a patterned border can add an extra layer of interest.
3. Assembling the Quilt Top
After completing your nine-patch and bento box blocks, it’s time to assemble the quilt top. This process involves sewing the blocks together and preparing the quilt for the next stages, such as adding batting and backing.
- Laying Out Your Blocks: Begin by laying out your blocks in the desired order. Make sure you’re happy with the overall design and that the blocks are evenly distributed. This is your chance to make any last-minute adjustments before sewing the rows together.
- Sewing the Blocks into Rows: Start by sewing your blocks into rows. Press the seams as you go to keep everything flat and neat. If you’re working with a large quilt, it’s helpful to pin the blocks together before sewing to ensure they stay aligned.
- Joining the Rows Together: Once your rows are sewn, you’ll join them together to complete the quilt top. As with the previous steps, take your time to ensure that your seams line up properly. The more precise you are, the better the final quilt will look.
- Pressing the Quilt Top: After the quilt top is assembled, give it a final press. This will help eliminate any wrinkles or folds and ensure that the quilt top lies flat. A well-pressed quilt top makes the quilting process easier and results in a cleaner finish.
- Trimming the Edges: Before adding the batting and backing, trim the edges of the quilt top to ensure they’re straight. This step will make it easier to align the quilt sandwich and prevent any misalignment when quilting.
- Preparing for Quilting: With the quilt top complete, you’re ready to move on to the quilting stage. Depending on your preference, you can either quilt by hand or use a sewing machine. Either way, the Nine Patch Bento Box Quilt Pattern will look stunning once quilted.
4. Quilting and Finishing Your Quilt
The final step in the Nine Patch Bento Box Quilt Pattern – Tutorial is quilting and finishing your masterpiece. This stage brings everything together and transforms your quilt top into a functional and beautiful quilt.
- Choosing Your Quilting Design: There are many ways to quilt the Nine Patch Bento Box Quilt Pattern. You can opt for simple straight lines that follow the seams, or go for a more intricate free-motion quilting design. The choice depends on your skill level and the look you’re going for.
- Preparing the Quilt Sandwich: Before you start quilting, you’ll need to prepare the quilt sandwich, which consists of the quilt top, batting, and backing. Lay the layers flat, smooth out any wrinkles, and pin them together to keep everything in place.
- Quilting the Layers Together: Once your quilt sandwich is prepared, it’s time to start quilting. Whether you’re quilting by hand or machine, take your time to ensure that the stitches are even and that the layers remain aligned throughout the process.
- Trimming the Quilt: After quilting, trim the excess batting and backing from the edges of the quilt. This will give you a clean edge to work with when attaching the binding.
- Adding the Binding: The final step in finishing your quilt is adding the binding. This step frames the quilt and protects the edges from fraying. Choose a binding fabric that complements your quilt’s design, and sew it on carefully for a neat finish.
- Admiring Your Work: With the binding sewn on, your Nine Patch Bento Box Quilt Pattern is complete! Take a moment to admire your work and appreciate the time and effort you put into creating this beautiful quilt.
FAQ: Frequently Asked Questions
1. What is the Nine Patch Bento Box Quilt Pattern?
The Nine Patch Bento Box Quilt Pattern combines the classic nine-patch block with a more modern bento box design. It involves cutting and reassembling the blocks to create a unique interlocking pattern.
2. Is this pattern suitable for beginners?
Yes! The Nine Patch Bento Box Quilt Pattern is a great choice for beginners. The nine-patch block is easy to master, and the bento box design adds an extra layer of interest without being overly complicated.
3. What fabrics work best for this pattern?
Fabrics with a strong contrast in color or pattern work best for this pattern. The contrast helps highlight the grid structure and enhances the bento box effect.
4. Can I quilt this pattern by hand?
Yes, you can quilt this pattern by hand or machine, depending on your preference. Hand quilting will give a more traditional look, while machine quilting is faster and allows for more intricate designs.
5. How large should the squares be?
The size of the squares depends on your desired quilt size. Typically, squares are cut to 2.5 inches or 4.5 inches, but you can adjust the size to suit your project.
6. Can I customize the design?
Absolutely! The Nine Patch Bento Box Quilt Pattern is highly customizable. You can experiment with different fabrics, colors, and even add personal touches like embroidery or appliqué.
Join our VIP broadcast list and gain access to exclusive patterns, all for free. As a VIP member, you’ll receive the best patterns daily, delivered directly to your device. ✨📱 It’s a unique opportunity to stay up-to-date with the latest trends and designs, curated just for you. Don’t miss out on enhancing your projects and discovering new inspirations with the best patterns every day! 🎨🔝
Conclusion
The Nine Patch Bento Box Quilt Pattern – Tutorial offers a wonderful blend of traditional quilting techniques and modern design elements. Whether you’re a beginner or an experienced quilter, this pattern allows for creativity and personalization. By following the steps outlined in this tutorial, you’ll be able to create a beautiful quilt that’s both functional and a work of art.
We hope you enjoyed this tutorial and feel inspired to start your own project. Please share your thoughts, feedback, and any suggestions for future tutorials in the comments below. Happy quilting!

