Are you ready to dive into a new quilting adventure? In this Next Door Neighbor Variation Quilt Block – a free tutorial, you’ll learn how to make a fun and dynamic twist on a classic quilt block pattern.
Whether you’re an experienced quilter or a beginner looking for a new project, this quilt block variation offers a fresh take on a timeless design. By following this step-by-step guide, you’ll create a unique quilt block that stands out while still maintaining the charm of a traditional quilt.
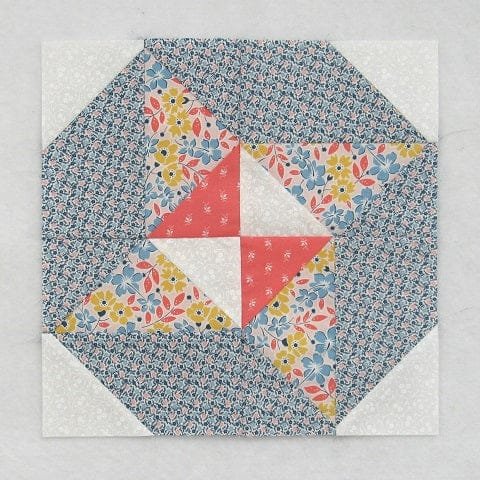
The Next Door Neighbor Variation Quilt Block gets its name from its closely related layout to other popular block patterns, but it introduces subtle changes that give it its own distinctive flair.
It’s perfect for anyone looking to add a bit of personality and creativity to their quilt. This free tutorial is easy to follow and provides all the details you need to make a beautiful quilt block, no matter your skill level.
In this guide, we will cover everything from selecting the right fabrics to assembling the quilt block and finishing the final touches. So, grab your sewing machine, fabrics, and let’s get started with the Next Door Neighbor Variation Quilt Block!
1. Choosing Fabrics for Your Quilt Block
Selecting the right fabrics is the first and perhaps most important step in creating a stunning Next Door Neighbor Variation Quilt Block. The color, texture, and pattern of the fabrics you choose will determine the overall look of your quilt. Follow these tips to make the best fabric choices:
- Use Complementary Colors: Choose fabric colors that complement each other to create a balanced and visually appealing quilt block. Pair a bold color with a neutral tone for a modern look, or use soft pastels for a more traditional feel.
- Experiment with Textures: Mixing different fabric textures, like cotton and linen, can add an extra dimension to your quilt. This variation helps make each block stand out while maintaining cohesiveness in the overall design.
- Choose Patterned Fabrics Carefully: Too many busy patterns can overwhelm the quilt. For the Next Door Neighbor Variation Quilt Block, it’s best to balance patterned fabrics with solid colors to keep the block from looking too chaotic.
- Consider the Quilt’s Purpose: Is this quilt meant for a cozy bedspread or a decorative wall hanging? The intended use of the quilt can influence your fabric choices. For a cozy blanket, opt for soft fabrics, while a display quilt might benefit from more vibrant colors and patterns.
- Pre-cut Fabrics: If you’re short on time or want an easy start, pre-cut fabric bundles like fat quarters or charm packs can be a great option. These come in coordinated color schemes that take the guesswork out of choosing fabrics.
- Personal Preference: Ultimately, the fabric choices come down to personal taste. Whether you prefer classic, vintage styles or bold, modern looks, choose fabrics that reflect your style and vision for your quilt.
2. Cutting and Prepping Your Pieces
Once you’ve chosen your fabrics for the Next Door Neighbor Variation Quilt Block, it’s time to cut and prepare your pieces. Proper preparation will ensure that your quilt block comes together smoothly.
- Accurate Cutting: The key to a perfect quilt block is accurate cutting. Using a sharp rotary cutter and quilting ruler, carefully cut your fabric pieces. For this block, you’ll need squares and rectangles in varying sizes, depending on the final quilt size you want to achieve.
- Marking Your Fabric: Use a fabric-safe pencil or chalk to mark any cutting or sewing lines on the fabric. These markings will help keep your sewing lines straight and even.
- Press Your Fabrics: Before you begin assembling your quilt block, press all your fabric pieces. This will help remove any wrinkles and make the fabric easier to sew.
- Half-Square Triangles: The Next Door Neighbor Variation Quilt Block often incorporates half-square triangles (HSTs). These are easy to create by placing two fabric squares right sides together, drawing a diagonal line from corner to corner, and sewing along both sides of the line. Once sewn, cut along the line to create two HSTs.
- Trimming for Precision: After sewing your half-square triangles or other pieces, use a square quilting ruler to trim the pieces to the exact size needed. Precision in cutting and trimming is essential for a well-aligned quilt block.
- Chain Piecing: For efficiency, you can chain piece your fabric units. This means sewing multiple pieces together in a continuous line without cutting the thread between each one. This technique saves time and thread and helps keep your pieces organized.
3. Assembling the Next Door Neighbor Variation Quilt Block
Now that your pieces are prepped, it’s time to assemble the Next Door Neighbor Variation Quilt Block. Follow these steps to ensure a clean and professional-looking quilt block:
- Lay Out Your Pieces: Begin by laying out all of your fabric pieces according to the Next Door Neighbor Variation Quilt Block design. This will help you visualize how the finished block will look and allow you to make any necessary adjustments before sewing.
- Sewing Rows Together: Start by sewing smaller units together to create the rows for your quilt block. Press the seams after sewing each row to keep the fabric flat.
- Press Seams Open or to One Side: Depending on your preference, you can either press the seams open or to one side. Pressing seams open can reduce bulk, especially when many pieces come together at a single point.
- Assemble the Rows: Once the rows are complete, sew them together to form the finished quilt block. Again, press the seams to ensure a smooth and flat block.
- Check Alignment: As you sew the rows together, check to make sure that all corners and seams align properly. Misaligned seams can disrupt the visual flow of the quilt block.
- Final Pressing: After assembling the block, give it a final press to ensure all seams are flat and the block is wrinkle-free. A well-pressed block will make the next steps in your quilt-making process easier.
4. Adding the Finishing Touches
Your Next Door Neighbor Variation Quilt Block is almost complete! The final steps involve adding finishing touches to your block and thinking about how it will fit into the larger quilt project.
- Adding a Border: Adding a border around your block can give it a framed look and help the block stand out when pieced together with others. Choose a fabric that complements the colors in your block but doesn’t overpower the design.
- Sashing: If you’re creating a full quilt, consider adding sashing between each block. Sashing is the fabric that separates the quilt blocks, providing space for each block to shine and reducing visual clutter.
- Quilting the Layers: Once your quilt top is assembled, you’ll need to quilt the layers together. This involves sewing the quilt top, batting, and backing together. You can use hand quilting or machine quilting, depending on your preference.
- Choosing a Quilting Pattern: The quilting pattern can enhance the overall design of your quilt. For the Next Door Neighbor Variation Quilt Block, straight lines, geometric shapes, or free-motion quilting can work well.
- Binding the Quilt: Finish the edges of your quilt with a binding. Binding not only adds a professional finish but also protects the edges of the quilt from fraying over time.
- Labeling Your Quilt: Don’t forget to add a label to your quilt. Include details such as your name, the date, and any other personal notes that you’d like to remember.
FAQ
1. What is the Next Door Neighbor Variation Quilt Block? The Next Door Neighbor Variation Quilt Block is a modern twist on traditional quilt block designs, featuring subtle variations that give it a unique look. It’s a versatile block that can be used in various quilt designs.
2. Can I use scraps for the Next Door Neighbor Variation Quilt Block? Yes! This quilt block is great for using up fabric scraps. Since the design often involves smaller pieces, it’s perfect for scrap quilting.
3. What size should the finished quilt block be? The size of the finished block can vary depending on your pattern. A common size for the Next Door Neighbor Variation Quilt Block is 12 inches, but you can adjust the block size by cutting larger or smaller fabric pieces.
4. Is this quilt block beginner-friendly? Yes, the Next Door Neighbor Variation Quilt Block is beginner-friendly. It’s a straightforward design that introduces a fun variation without being overly complicated.
5. What is the best way to sew accurate seams for this block? To ensure accurate seams, always use a quarter-inch seam allowance when sewing your quilt pieces. Additionally, press your seams carefully and trim your blocks as needed for precision.
6. Can I mix and match different quilt block designs in one quilt? Absolutely! The Next Door Neighbor Variation Quilt Block can be paired with other quilt block designs to create a dynamic and interesting quilt. Just ensure that the blocks are the same size or adjust the sashing accordingly.
Join our VIP broadcast list and gain access to exclusive patterns, all for free. As a VIP member, you’ll receive the best patterns daily, delivered directly to your device. ✨📱 It’s a unique opportunity to stay up-to-date with the latest trends and designs, curated just for you. Don’t miss out on enhancing your projects and discovering new inspirations with the best patterns every day! 🎨🔝
Conclusion
In this Next Door Neighbor Variation Quilt Block – Free Tutorial, we covered everything you need to know to create this unique quilt block, from selecting fabrics to finishing the block with precision.
Whether you’re a beginner or an experienced quilter, this block offers a creative way to add variety to your quilt projects. We hope you enjoyed this tutorial! Please leave a comment below with your thoughts or suggestions – we’d love to hear from you! Happy quilting!

