The Multipurpose Fabric Bag with Handles Tutorial is an essential sewing guide for anyone who values practicality, sustainability, and creative expression.
Fabric bags have become increasingly popular as reusable alternatives to disposable bags, and learning how to sew your own allows you to combine function with personal style.
From grocery shopping and travel to everyday organization, a well-made fabric bag can serve countless purposes. This tutorial focuses on creating a durable, attractive, and adaptable bag that can be used in many situations while also helping you improve fundamental sewing skills.
Sewing a bag using the Multipurpose Fabric Bag with Handles Tutorial is not only rewarding but also empowering. When you make your own bag, you gain full control over size, fabric choice, handle length, and finishing details.
This flexibility allows you to tailor the bag to your exact needs, whether you want a sturdy tote for shopping, a lightweight bag for daily errands, or a stylish accessory for casual outings. Additionally, handmade fabric bags reflect a conscious lifestyle choice, encouraging reuse and reducing waste while showcasing craftsmanship.
Before diving into construction techniques, it is important to understand why multipurpose fabric bags are such valuable sewing projects. They are beginner-friendly, practical, and endlessly customizable. The Multipurpose Fabric Bag with Handles Tutorial guides you through creating a bag that balances strength and elegance, making it suitable for both functional and decorative use. With careful fabric selection and thoughtful assembly, your finished bag can become a long-lasting item that fits seamlessly into your daily routine.
Understanding the Structure of a Multipurpose Fabric Bag
The structure of a bag created using the Multipurpose Fabric Bag with Handles Tutorial is designed to maximize usability and durability. Typically, this type of bag consists of a rectangular or slightly boxed body, reinforced seams, and sturdy handles that distribute weight evenly. Understanding this basic structure helps ensure that the bag remains functional even when carrying heavier items.
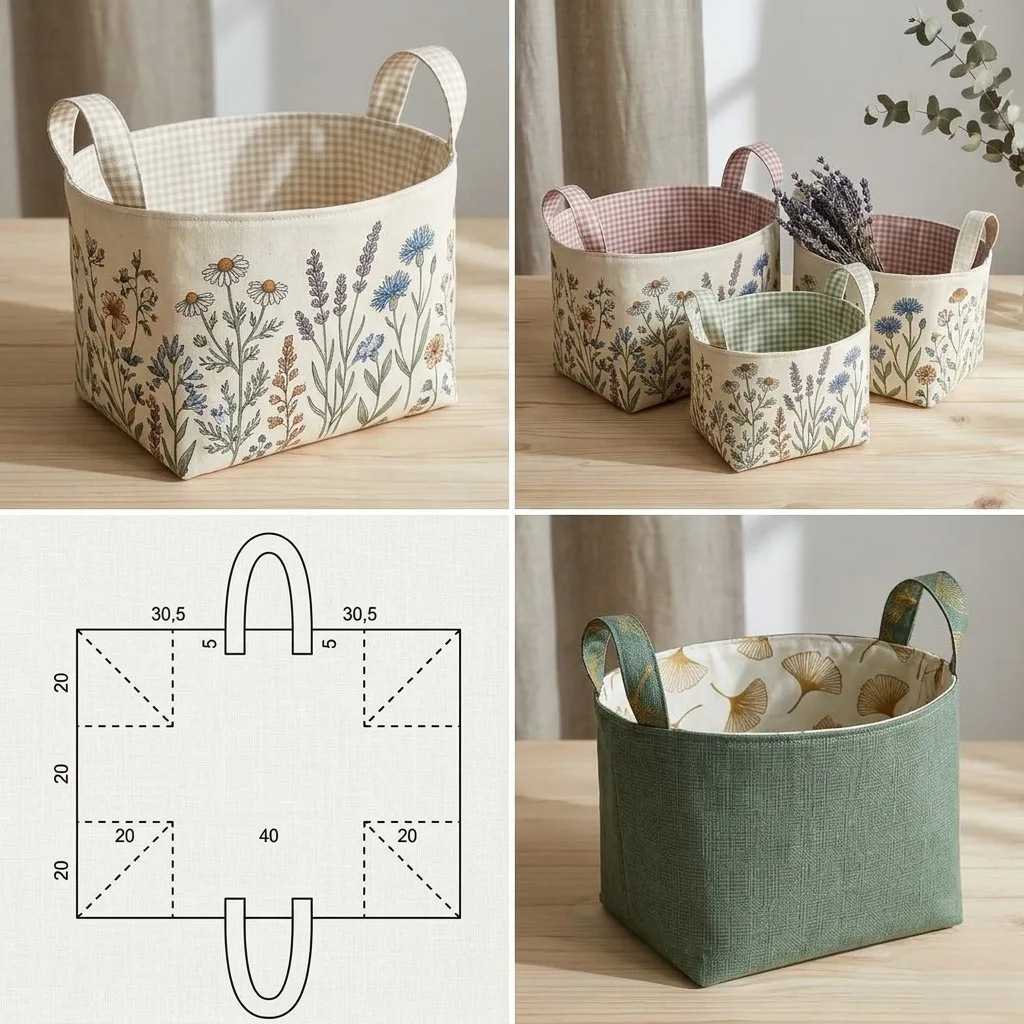
The bag body is usually made from two main fabric panels sewn together, with optional boxed corners to provide depth. Boxed corners increase the bag’s capacity and help it stand upright when filled. This structural detail is especially useful for grocery bags or storage totes. The tutorial often includes instructions on how to create these corners neatly and accurately.
Handles are a critical component of the design. In a Multipurpose Fabric Bag with Handles Tutorial, handles can be made from the same fabric as the bag or from contrasting material for added interest. Proper handle placement and reinforcement stitching are essential to prevent tearing and ensure comfort when carrying. Handles can be short for hand carrying or longer for shoulder use.
Lining is another structural element that adds strength and polish. A lined bag looks more professional and protects the outer fabric from wear. Linings also allow for additional features such as interior pockets, which increase the bag’s functionality. The tutorial typically explains how to attach the lining cleanly for a smooth interior finish.
Seam reinforcement plays a major role in bag longevity. Stress points, especially at the handle attachments and bottom corners, benefit from extra stitching or bar tacks. These details ensure that the bag can withstand frequent use. A well-constructed bag using this tutorial can last for years.
Finally, understanding the structure allows you to adapt the design. Once you master the basics of the Multipurpose Fabric Bag with Handles Tutorial, you can easily adjust dimensions, add closures, or include compartments to suit specific needs.
Materials and Tools Needed for the Tutorial
Selecting the right materials is essential for success when following a Multipurpose Fabric Bag with Handles Tutorial. Fabric choice determines not only the appearance but also the strength of the finished bag. Cotton canvas, denim, linen blends, and heavy quilting cotton are popular options because they offer durability and structure. Lighter fabrics can also be used but may require interfacing for added support.
Interfacing is often recommended to reinforce the bag body and handles. Fusible interfacing adds stiffness and helps the bag maintain its shape over time. The tutorial usually specifies the weight of interfacing needed depending on the fabric used. Choosing the right interfacing ensures that the bag feels sturdy without becoming overly rigid.
A sewing machine capable of handling thicker layers is ideal for this project. Straight stitching is usually sufficient, but having a zigzag stitch option helps finish raw edges. Using a strong needle, such as a universal or denim needle, prevents skipped stitches and needle breakage when sewing through multiple layers.
Thread quality matters when constructing a bag. Polyester thread is commonly used for its strength and durability. Matching thread creates a seamless look, while contrasting thread can add decorative appeal. The Multipurpose Fabric Bag with Handles Tutorial often encourages neat topstitching to enhance both strength and aesthetics.
Basic sewing tools such as fabric scissors, pins or clips, a ruler, and a marking tool are essential. Clips are especially helpful when working with thick layers, as they avoid pin marks. Accurate marking ensures proper alignment of handles and pockets.
An iron is another indispensable tool. Pressing seams as you sew improves accuracy and gives the bag a professional finish. Taking the time to press each step makes a noticeable difference in the final result and helps the bag hold its shape.
Sewing and Assembly Process Explained
The sewing process in a Multipurpose Fabric Bag with Handles Tutorial typically begins with cutting the fabric pieces according to the desired size. Accurate cutting ensures symmetry and simplifies assembly. Most tutorials recommend cutting both outer fabric and lining pieces at the same time to maintain consistency.
Once the pieces are cut, any additional elements such as pockets or decorative panels are sewn onto the main fabric panels. This step is completed early so that the bag’s interior and exterior remain clean and uncluttered. Pocket placement should be measured carefully to ensure usability.
The next stage involves attaching interfacing if required. Fusible interfacing is applied using heat and pressure, reinforcing the fabric before assembly. This step adds structure and prevents stretching, especially around the handles and bottom of the bag.
After preparation, the outer fabric panels are sewn together, followed by the lining panels. Creating boxed corners at this stage adds depth to the bag. The tutorial usually explains how to measure and stitch these corners accurately for a balanced shape.
Handles are then constructed and attached. They are typically folded, pressed, and stitched for durability. Reinforced stitching at the attachment points is essential. The Multipurpose Fabric Bag with Handles Tutorial emphasizes secure handle construction to ensure the bag can carry weight comfortably.
Finally, the lining and outer bag are joined, often using a turning gap that is later closed. Topstitching around the opening provides a clean finish and additional strength. At this point, the bag is complete and ready for use.
Creative Uses and Customization Ideas
One of the greatest strengths of the Multipurpose Fabric Bag with Handles Tutorial is its adaptability. This bag can be used for shopping, travel, storage, work, or leisure activities. Its neutral structure allows it to fit seamlessly into various aspects of daily life.
Customization begins with fabric selection. Bold prints, solid colors, or textured materials can dramatically change the bag’s appearance. Seasonal fabrics can turn the bag into a festive accessory, while neutral tones create an everyday essential.
Adding pockets is a popular customization option. Interior pockets help organize smaller items, while exterior pockets provide easy access. You can also add zipper closures, magnetic snaps, or buttons for added security.
Handle length customization allows you to tailor the bag for specific uses. Short handles are ideal for hand carrying, while longer handles make the bag suitable for shoulder use. Adjustable straps can also be incorporated for versatility.
Decorative elements such as embroidery, appliqué, or contrast topstitching add personality. These details transform a simple bag into a statement piece. The Multipurpose Fabric Bag with Handles Tutorial provides a foundation that supports creative expression.
Finally, resizing the bag allows you to create matching sets. Small versions work well as lunch bags or organizers, while larger versions are perfect for shopping or travel. This versatility makes the tutorial endlessly reusable.
FAQ – Multipurpose Fabric Bag with Handles Tutorial
Is this tutorial suitable for beginners?
Yes, it is beginner-friendly and focuses on basic sewing techniques.
What fabric works best for this bag?
Canvas, denim, and heavy cotton fabrics are ideal for durability.
Do I need interfacing?
Interfacing is recommended for structure but can be adjusted based on fabric choice.
Can I wash the finished bag?
Yes, most fabric bags are washable, depending on the fabric used.
How long does it take to make the bag?
Most sewists complete it within a few hours.
Can I add a zipper or closure?
Yes, closures can be added for extra security.
Is the bag strong enough for groceries?
With proper reinforcement, it can carry heavy items.
Can I sell bags made from this tutorial?
That depends on the original tutorial’s usage terms.
Can the size be adjusted?
Yes, the dimensions are easily customizable.
Is lining necessary?
Lining is optional but recommended for durability and a polished look.
Conclusion
The Multipurpose Fabric Bag with Handles Tutorial is a valuable sewing project that combines practicality, creativity, and sustainability. By learning how to construct a durable and versatile fabric bag, you gain a skill that can be applied to countless projects.
VIDEO TUTORIAL
This tutorial empowers you to create bags that reflect your style while serving real-life needs. I hope this article has guided you clearly through the structure, materials, process, and creative possibilities of this project.

