The Mini Round Robin — Last Round – Tutorial is an exciting way to engage with your creative side while learning a fun and collaborative quilting technique. This method is perfect for quilters of all skill levels, offering a unique opportunity to create stunning designs by working with others.
In this article, we will explore the details of the last round of a mini round robin project, the materials needed, the process involved, and tips for ensuring your quilt turns out beautifully. So grab your supplies and let’s dive into this delightful quilting journey!
The Mini Round Robin is a quilting approach where a group of quilters collaborates to create a quilt, with each participant adding their unique flair to the piece. The last round is crucial as it ties all the individual contributions together, ensuring a cohesive final design.
This collaborative technique not only helps build friendships but also enhances skills through shared experiences and ideas. Whether you’re new to quilting or a seasoned pro, this tutorial will guide you step by step through the last round process.
Throughout this tutorial, you will learn how to select fabrics, incorporate various techniques, and apply personal touches that reflect your style. The Mini Round Robin — Last Round – Tutorial will help you understand the best practices for achieving stunning results while fostering creativity and teamwork. Let’s embark on this quilting adventure together!
1. Understanding the Mini Round Robin Concept
The Mini Round Robin concept is rooted in collaboration and creativity. Each participant starts with a small quilt top, usually measuring around 12 to 16 inches. They then pass their quilt to the next person in the group, who adds a new layer or border to the quilt. This cycle continues until each member of the group has had the opportunity to contribute to every quilt.
One of the main benefits of the Mini Round Robin is the variety of styles and techniques you will encounter. As different quilters add their personal touch, the project becomes a rich tapestry of creativity and innovation. This method encourages you to step out of your comfort zone, trying techniques you might not typically use in your own projects.
Moreover, the last round of the Mini Round Robin is an essential phase where all contributions come together harmoniously. It allows you to create a final piece that showcases everyone’s efforts while maintaining a cohesive design. Understanding this concept is crucial to successfully completing the last round of your project.
Finally, the Mini Round Robin offers a fantastic opportunity for social interaction. Whether you work with friends or join an online community, you will build connections and friendships while enjoying the art of quilting. This collaborative spirit is what makes the last round so special.
2. Preparing for the Last Round
Before diving into the last round of your Mini Round Robin, it’s essential to prepare effectively. Start by gathering the materials needed for your project. You will require a well-constructed quilt top from the previous rounds, your choice of fabrics for the final round, and any additional tools like rotary cutters and rulers.
Next, assess the quilt top you received. Take note of the styles and colors already used, as these elements will influence your choices for the final round. Understanding the existing design will help you create a balanced addition that complements the previous contributions.
It’s also beneficial to communicate with your fellow quilters. Share your thoughts and ideas about the last round, as their input can lead to exciting outcomes. Discussing design elements, fabric choices, and overall themes will help you align your final touches with the collective vision of the group.
When selecting fabrics for the last round, consider the overall color palette and texture. Choosing complementary fabrics will ensure your addition feels integrated rather than disjointed. Aim for a mix of patterns and solids to add visual interest and depth to the final piece.
As you prepare, gather inspiration from various sources. Look for patterns and designs that excite you, whether from quilting books, online tutorials, or social media platforms. This exploration will not only spark creativity but also provide ideas for innovative techniques to incorporate into your last round.
Lastly, make sure your workspace is organized and ready for action. A clutter-free area will enhance your focus and creativity, making the quilting process smoother and more enjoyable. Once you’re prepared, you can confidently move into the final round, eager to contribute your unique style.
3. Techniques for the Last Round
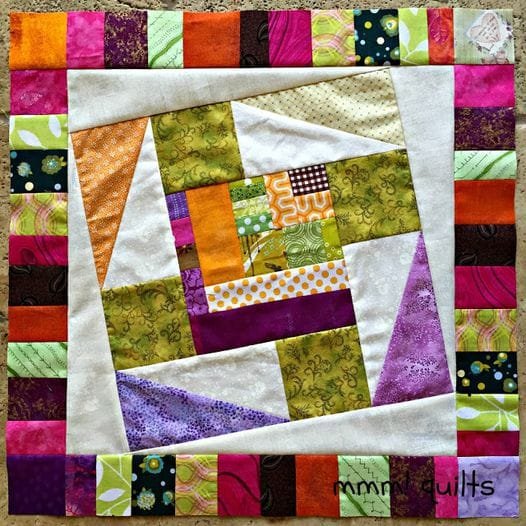
In the last round of the Mini Round Robin, various techniques can enhance your contribution and elevate the overall design. One popular approach is adding borders to the quilt top. Borders can frame the central design, drawing attention to the unique contributions made by each quilter. When selecting border fabrics, ensure they echo the colors and patterns used throughout the quilt.
Another technique to consider is the use of appliqué. This method allows you to add shapes or designs that can bring a personal touch to the quilt. Whether you choose to create floral motifs, geometric patterns, or themed designs, appliqué can significantly enhance the final piece’s visual appeal.
Quilting techniques also play a significant role in the last round. Consider incorporating decorative stitching or free-motion quilting to add texture and dimension to your project. Experimenting with various quilting patterns can create stunning results that highlight the collaborative nature of the quilt.
Don’t forget about the power of embellishments! Adding elements like buttons, beads, or embroidery can provide a unique flair to your final round. These small touches can make a big difference in how the quilt feels and looks, turning it into a true work of art.
Moreover, layering different fabrics can create depth in your design. Mixing solids, prints, and textures allows you to play with contrasts and highlights, resulting in a more dynamic final piece. Don’t hesitate to think outside the box and combine various materials for exciting outcomes.
Finally, remember to keep the overall design in mind. While it’s tempting to add numerous elements, sometimes less is more. Strive for a balance between individuality and cohesiveness to ensure your last round contributes positively to the overall quilt.
4. Finalizing Your Mini Round Robin Quilt
Once you’ve completed your contribution to the Mini Round Robin — Last Round, it’s time to finalize the quilt. Start by carefully inspecting the entire quilt for any loose threads or uneven seams. A meticulous check will ensure your quilt is polished and ready for presentation.
After addressing any necessary adjustments, it’s time to think about the quilting process. Consider whether you want to quilt by hand or machine. Both methods have their unique benefits, so choose the one that best suits your skills and preferences. If you opt for machine quilting, test your stitching on a scrap piece to ensure everything runs smoothly.
Next, decide on the binding for your quilt. A well-chosen binding can frame your project beautifully, providing a finishing touch that ties the entire design together. When selecting binding fabric, consider colors and patterns that harmonize with your quilt top, enhancing its overall aesthetic.
After binding, think about how you will present your quilt. Whether it’s for a quilting show, a gift, or simply a personal keepsake, showcasing your work can be a rewarding experience. Consider taking high-quality photographs to document your efforts and share them with your fellow quilters.
Lastly, celebrate your accomplishment! The Mini Round Robin — Last Round is a collective achievement, and sharing your final quilt with the group can foster a sense of pride and camaraderie. Organize a reveal party or share your photos online, allowing everyone to appreciate the unique journey you’ve all taken together.
With your quilt completed, take a moment to reflect on the skills you’ve gained and the friendships you’ve built throughout the process. The Mini Round Robin experience extends beyond the quilt itself, nurturing creativity and community among quilters.
FAQ
1. What is a Mini Round Robin?
A Mini Round Robin is a collaborative quilting project where each participant creates a small quilt top that is passed among the group, allowing everyone to add their unique touch before the final piece is completed.
2. How do I choose fabrics for the last round?
When selecting fabrics, consider the existing colors and patterns in the quilt top. Aim for complementary fabrics that will enhance the overall design while providing visual interest.
3. What techniques can I use in the last round?
You can use a variety of techniques, including adding borders, appliqué, decorative stitching, and embellishments. Experimenting with different methods can elevate your contribution to the quilt.
4. Should I quilt by hand or machine?
The choice between hand or machine quilting depends on your comfort level and preferences. Both methods can produce beautiful results, so choose the one that works best for you.
5. How do I present my finished quilt?
Consider taking high-quality photographs or organizing a reveal party to share your completed quilt with your fellow quilters. Showcasing your work can be a rewarding experience.
6. Can I participate in a Mini Round Robin if I’m a beginner?
Absolutely! The Mini Round Robin is suitable for quilters of all skill levels. It’s a great opportunity to learn from others, share ideas, and improve your skills in a supportive environment.
Join our VIP broadcast list and gain access to exclusive patterns, all for free. As a VIP member, you’ll receive the best patterns daily, delivered directly to your device. ✨📱 It’s a unique opportunity to stay up-to-date with the latest trends and designs, curated just for you. Don’t miss out on enhancing your projects and discovering new inspirations with the best patterns every day! 🎨🔝
Conclusion
In conclusion, the Mini Round Robin — Last Round – Tutorial is an engaging way to explore collaborative quilting. By understanding the concept, preparing adequately, using creative techniques, and finalizing your quilt with care, you can create a stunning piece that showcases the contributions of all participants. This tutorial not only guides you through the process but also encourages connection and creativity within the quilting community.
I invite you to share your thoughts and experiences with the Mini Round Robin. Your feedback and suggestions can help improve this process for others looking to embark on a similar journey. Happy quilting!

